
ML5R User Manual
Overview
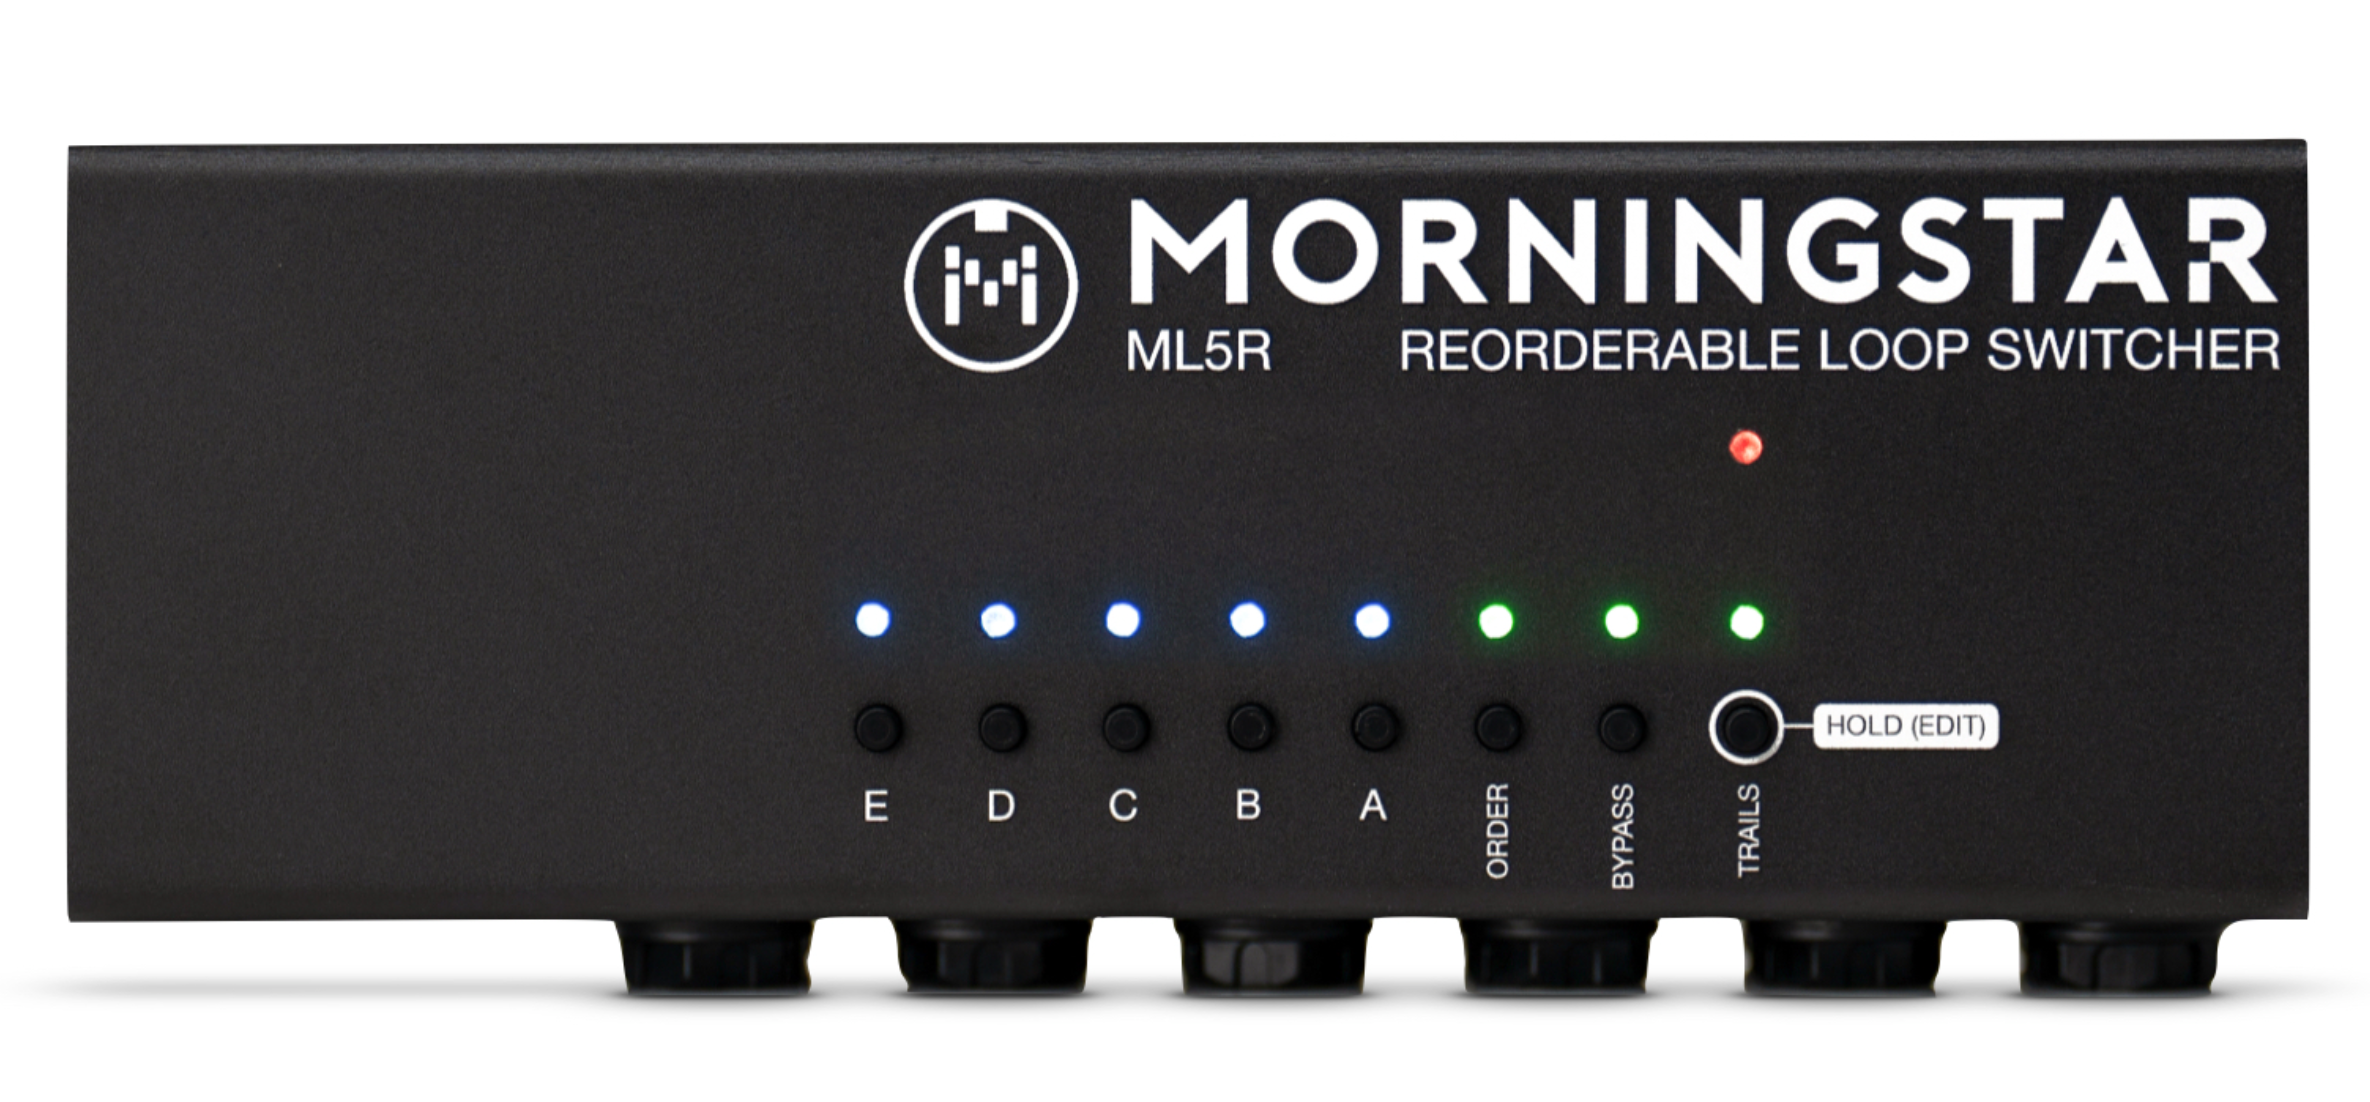
The ML5R is a re-orderable 5 loop switcher.
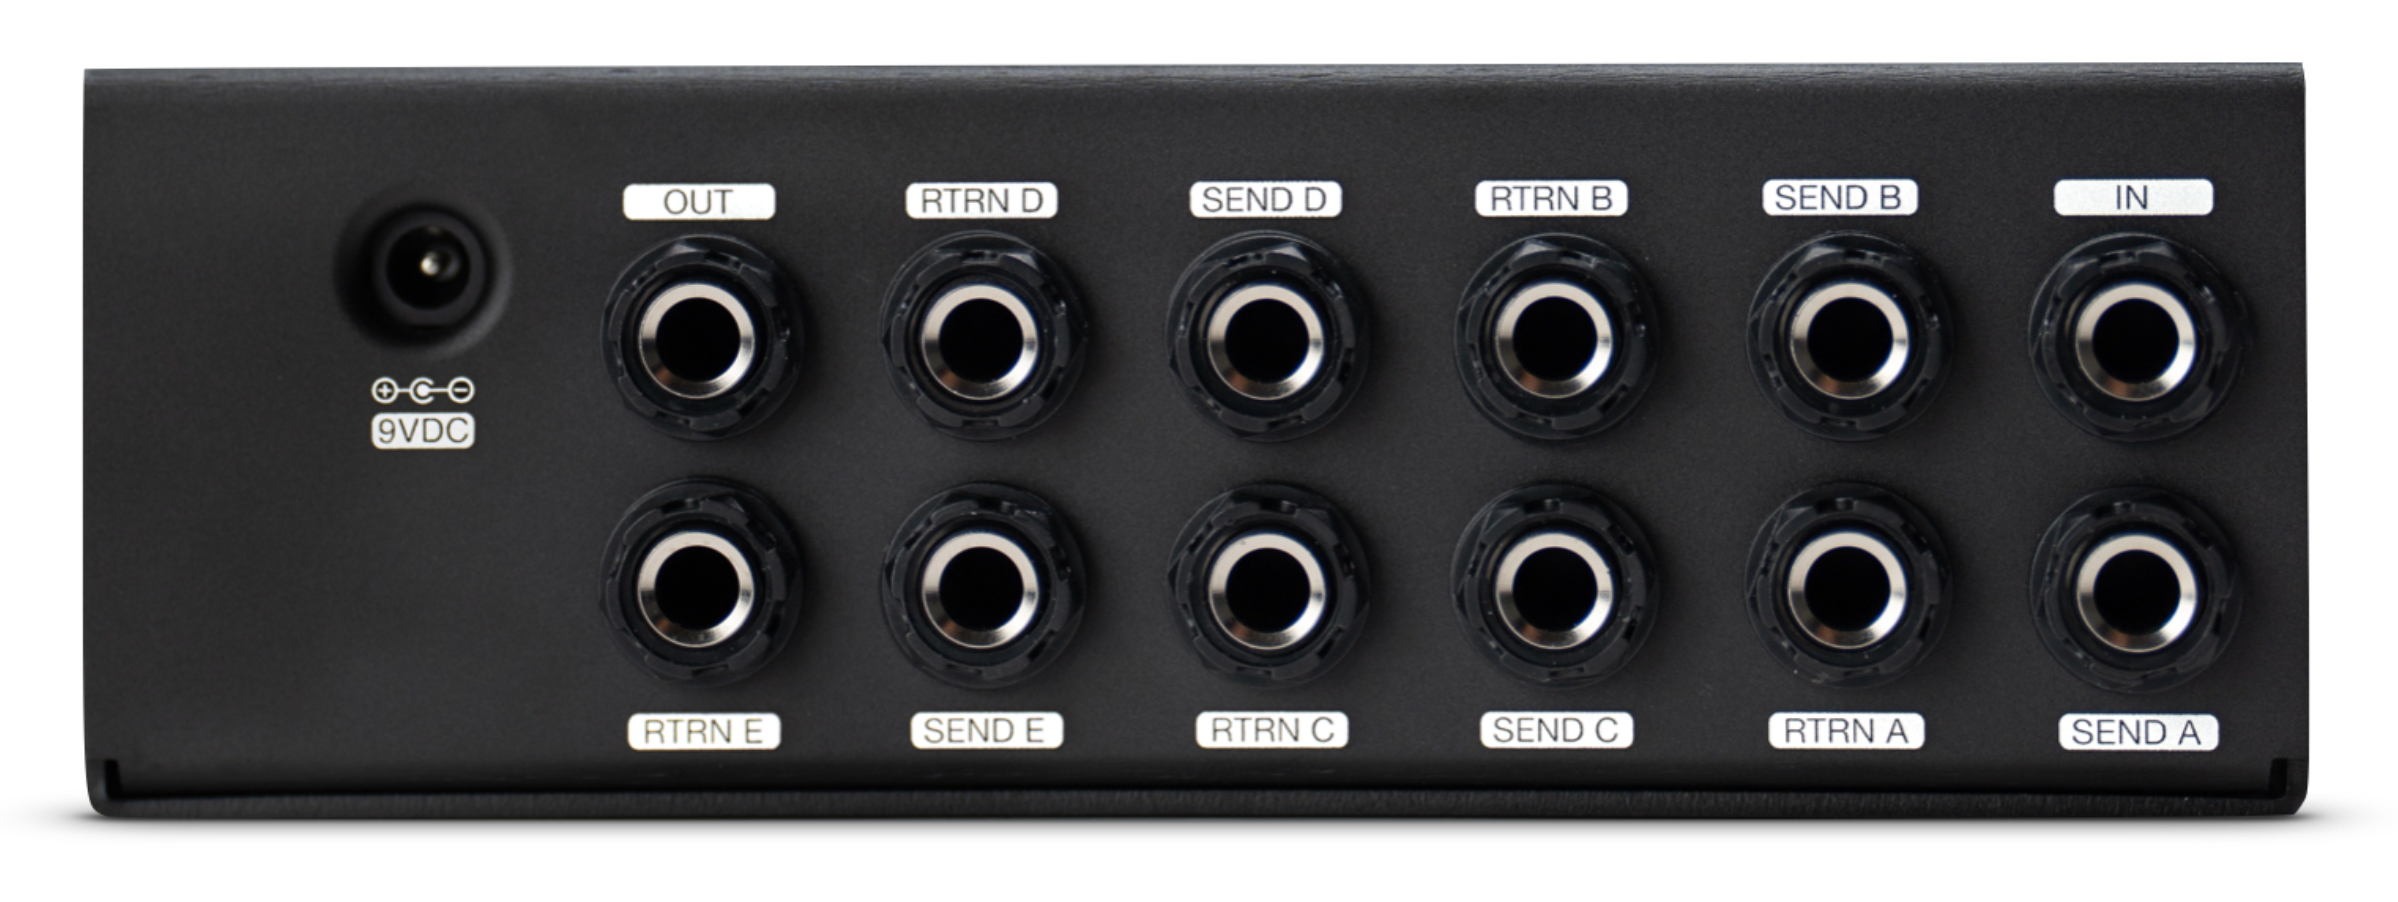
Audio Ports
There are a total of 5 independent loops available, configured as 5 TS send and return ports.
The send and return ports are called Loop A, Loop B, Loop C, Loop D and Loop E.
All the input/return and output/send ports are buffered.
MIDI Ports
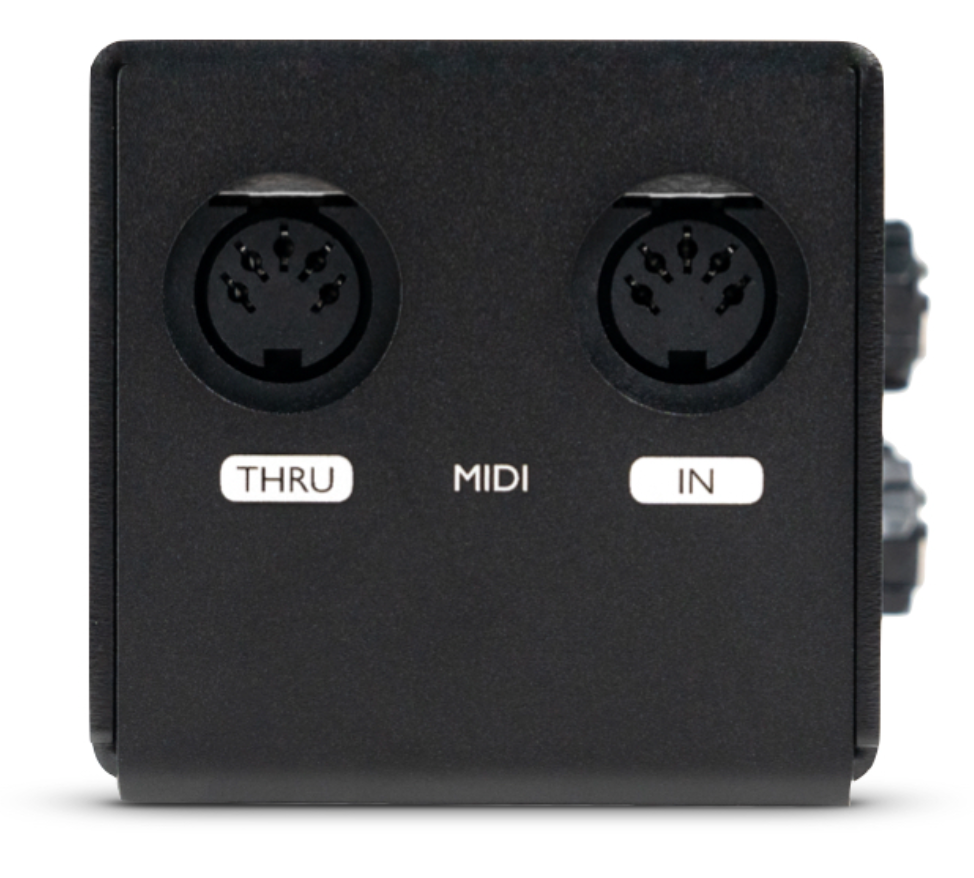
The ML5R has one 5-pin MIDI IN port and one 5-pin MIDI THRU port.
Presets
The ML5R has 128 Presets, which can be selected by sending a PC message to the ML5R.
Power Requirements
9-18v Center Negative with at least 160mA current.
Other Specifications
Max input level
4v peak to peak (with 9v power supply)
10v peak to peak (with 18v power supply)
Impedance
Input/Return Impedance: 1M ohm
Output/Send Impedance: Approx 100 ohm
Device Controls
Buttons | Function |
|---|---|
| Scroll down Preset |
| Scroll Up Preset |
| Engage/Bypass respective loop |
Hold down | Enter Edit function |
| Show loop order |
| Show bypass status for current Preset |
| Show trails loop for current Preset |
Global Settings
Setting MIDI Channel
Hold down Trails button on Power up
To set the MIDI channel on the ML5R, power up the ML5R while holding down the TRAILS button. After releasing the button, the ML5R TRAILS and ORDER green LED will be blinking to indicate that it is waiting for the MIDI channel to be set.
The following buttons will set the MIDI channel:
Button | MIDI Channel |
|---|---|
A | 1 |
B | 2 |
C | 3 |
D | 4 |
E | 5 |
PC messages to set MIDI channel
You can also send a PC message to the ML5R on your desired MIDI Channel. The ML5R will set it’s MIDI Channel to the channel of the first PC message it receives.
Setting Device ID
Hold down Trails button on Power up
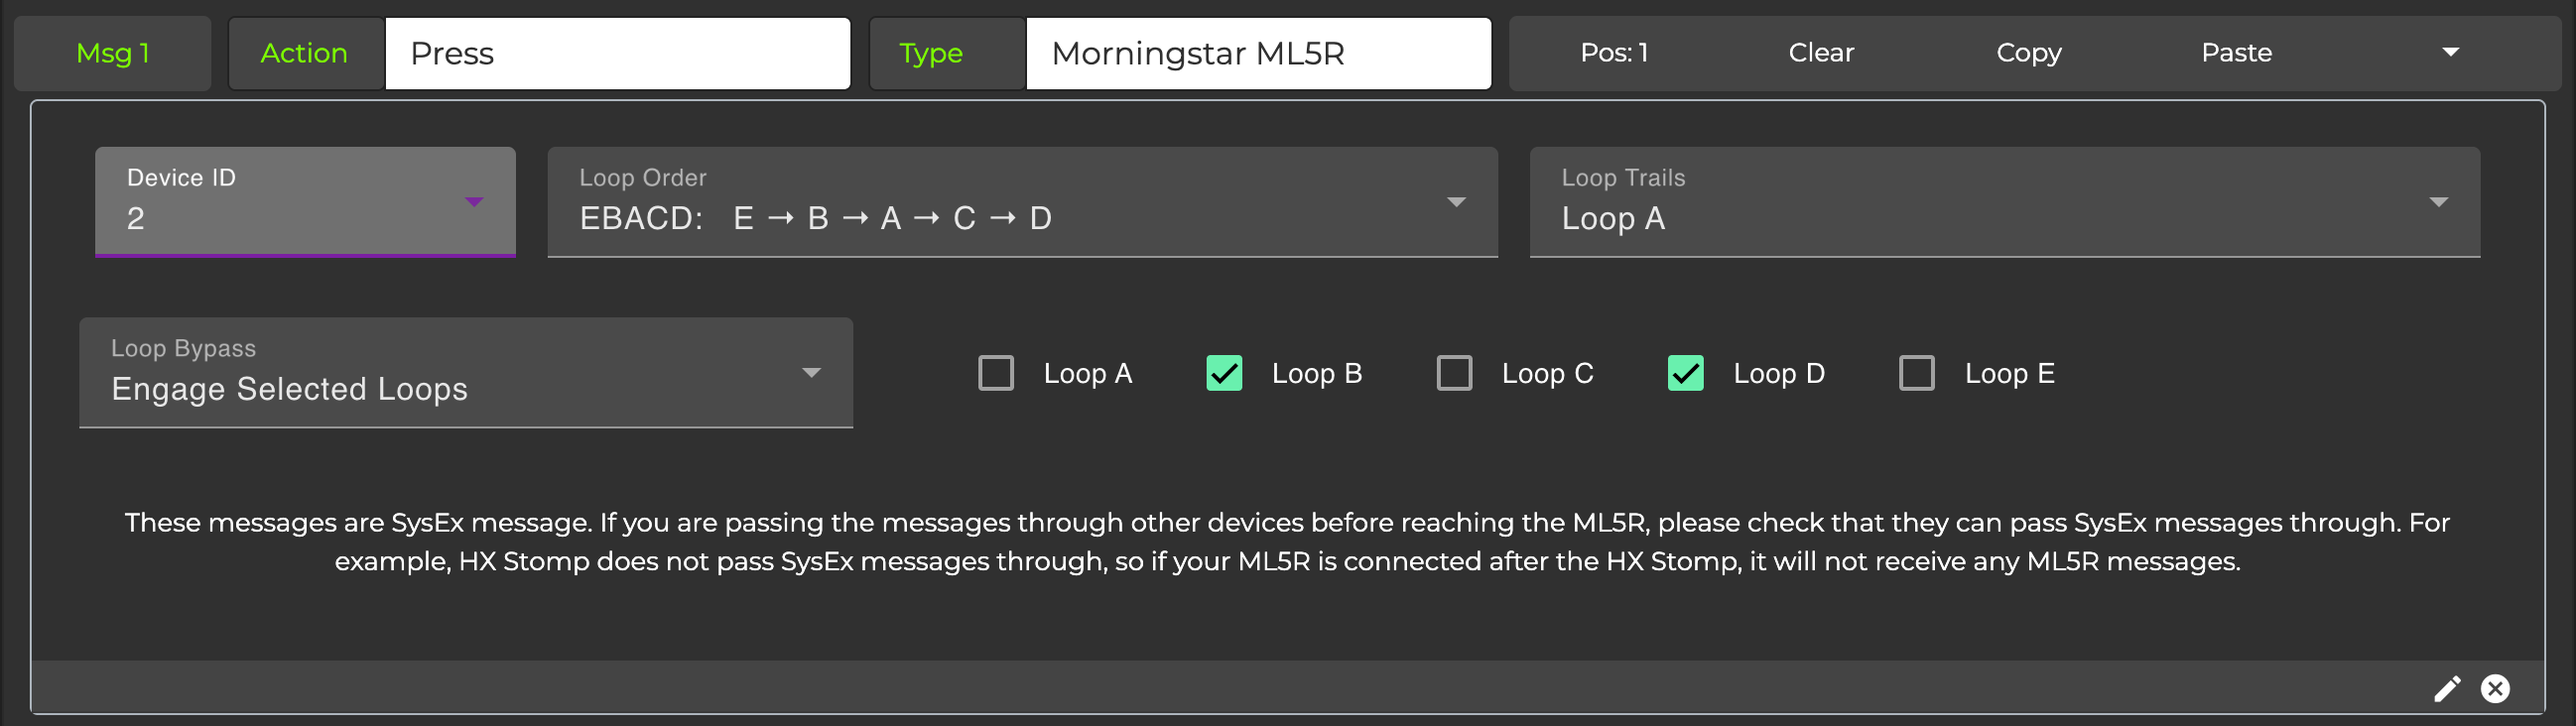
Similar to setting the MIDI channel, power up the ML5R while holding down the TRAILS button. Then, send a ML5R message type from your Morningstar MIDI Controller on your desired Device ID. The ML5R will set it’s Device ID to the first message it receives.
For example, sending this ML5R message type from your MC will set the Device ID to 2. Afterwhich, the ML5R will only respond to ML5R messages sent on Device Channel 2.

If the Device ID is set to Omni, then the ML5R will respond to all ML5R messages sent on any Device channels.
The ML5R message type is a SysEx message. If you are passing the messages through other device before reaching the ML5R, please check that your devices can pass SysEx messages through. Some devices, like the HX Stomp, do not pass SysEx messages through.
Loop Bypass Persist
Hold down Bypass button on Power up
The Loop Persist setting allows you to keep the bypass state of each loop unchanged when you change Presets on the ML5R. This setting can be toggled on and off, either temporarily or permanently.
To toggle the Loop Bypass Persist setting on and off, and persist this setting across power cycles, hold down the BYPASS button while powering up the device. The Red LED will blink for 1 second before booting up, to indicate that the setting is saved.
For a temporary switch where the state is not persisted across power cycles, you can send a CC message to toggle this function. Please refer to the MIDI Implementation Chart.
Factory Reset
Hold down E and Trails button on Power up
To factory reset your ML5R, power up the device while holding down the E and TRAILS button.
During the factory reset the RED led will be blinking for a few moments while the data is resetting.
After the factory reset is completed, the ML5R goes into a “Test mode”. This is indicated by all the LEDS blinking together.
If you do not wish to run this test mode, you can just power cycle the ML5R to exit this test mode.
Test Mode
The Test Mode will run after a factory reset is completed.
There are 2 tests:
Button response check (ALL LEDS are blinking)
This is run immediately after the factory data reset where all the LEDs are blinking. You can press through all the buttons and the test will only pass if all the button presses are registered.
If all the buttons are working correctly and all have been pressed once, then it proceeds to the audio check test
Audio Loop Check (Only RED LED blinking)
This test checks whether the Send/Return for each loop is working. When you press any button from A - E, it will engage each loop to test that selected loop. For example, if A is pressed, then the signal chain will be
Input >> Send A >> Return A >> OutputPressing
OrderorBypasswill clear the routing so that the signal chain becomesInput >> OutputPressing
Trailsexits the test and then the ML5R will return to it’s normal operating mode.
Preset Settings
Selecting a Preset
To edit a desired Preset, first send a PC message to the ML5R to load a Preset, then enter the
PRESET EDIT MODE by holding down the TRAILS button.
Preset Edit Mode
To enter Preset Edit Mode, hold down the TRAILS button for 2 seconds. The LED will start blinking to indicate that you are in Preset Edit mode.
Editing Loop Order
While in Preset Edit Mode, press the ORDER button.
Next, select the loops in the order in which you want them to be in. The LED light for each loop will turn on as you select them. After selecting the order for all 5 loops, the order will automatically save.
If you want to cancel the function before selecting all 5 loops, you can press the Trails button to exit the Loop Order function.
The ML5R will display the order in the sequence it has recorded before saving.
Setting Bypass Loops
When a Preset is loaded, each loop can be set to whether it is engaged or bypassed.
While in Preset Edit Mode, press the BYPASS button.
You can then select which loops you want to be engaged when the Preset is loaded. This is indicated by the LEDs above the loop buttons, where if the LED is lighted, it indicates that the loop will be engaged.
Setting Trails
When a Loop is bypassed, it can be set to continue it’s trails to the Output. This is useful for delay pedals where you might want the delay to fade out after bypassing the delay pedal.
While in Preset Edit Mode, press the TRAILS button.
You can then select which loop you want as trails when it is bypassed.
MIDI Implementation
Program Change
PC messages will recall presets in the ML5R.
Control Change
Number | Value | Function |
|---|---|---|
0 | any | Decrease Preset |
1 | any | Increase Preset |
2, 3, 4, 5, 6 | 0-41 | Bypass Loop A, B, C, D or E |
2, 3, 4, 5, 6 | 42-84 | Toggle Loops A, B, C, D or E |
2, 3, 4, 5, 6 | 85-127 | Engage Loops A, B, C, D or E |
10 | 0-127 | Set Loop Order (See Loop Order Table) |
11 | 0-127 | Set Loop Order but do not update connection until CC#12 is sent |
12 | 0-31 | Set Loop Bypass (See Binary Table). There was a bug in the release firmware. If sending a CC#12 message does nothing to your ML5R, please download the firmware here. The backplate can be removed and a micro-USB port will be visible. Please follow the standard upload process. |
20 | 0-127 | Enable Persist Loop Bypass. 0-63: Off This setting is only temporary and not persisted on power cycle. |
21 | 0-127 | Mute 0-63: Off |
126 | any | Show Loop Order |
127 | any | Save Preset with current settings. There is a timeout of 3 seconds after saving. |
ML5R Message Type
Only available when the v3.13 firmware is released for our MIDI Controllers
The ML5R Message Type allows you to quickly set the Loop Order, Trails and Bypass setting for your ML5R from a Morningstar MIDI Controller.
Loop Order Table
Value | Order |
|---|---|
0 | A → B → C → D → E |
1 | A → B → C → E → D |
2 | A → B → D → C → E |
3 | A → B → D → E → C |
4 | A → B → E → C → D |
5 | A → B → E → D → C |
6 | A → C → B → D → E |
7 | A → C → B → E → D |
8 | A → C → D → B → E |
9 | A → C → D → E → B |
10 | A → C → E → B → D |
11 | A → C → E → D → B |
12 | A → D → B → C → E |
13 | A → D → B → E → C |
14 | A → D → C → B → E |
15 | A → D → C → E → B |
16 | A → D → E → B → C |
17 | A → D → E → C → B |
18 | A → E → B → C → D |
19 | A → E → B → D → C |
20 | A → E → C → B → D |
21 | A → E → C → D → B |
22 | A → E → D → B → C |
23 | A → E → D → C → B |
24 | B → A → C → D → E |
25 | B → A → C → E → D |
26 | B → A → D → C → E |
27 | B → A → D → E → C |
28 | B → A → E → C → D |
29 | B → A → E → D → C |
30 | B → C → A → D → E |
31 | B → C → A → E → D |
32 | B → C → D → A → E |
33 | B → C → D → E → A |
34 | B → C → E → A → D |
35 | B → C → E → D → A |
36 | B → D → A → C → E |
37 | B → D → A → E → C |
38 | B → D → C → A → E |
39 | B → D → C → E → A |
40 | B → D → E → A → C |
41 | B → D → E → C → A |
42 | B → E → A → C → D |
43 | B → E → A → D → C |
44 | B → E → C → A → D |
45 | B → E → C → D → A |
46 | B → E → D → A → C |
47 | B → E → D → C → A |
48 | C → A → B → D → E |
49 | C → A → B → E → D |
50 | C → A → D → B → E |
51 | C → A → D → E → B |
52 | C → A → E → B → D |
53 | C → A → E → D → B |
54 | C → B → A → D → E |
55 | C → B → A → E → D |
56 | C → B → D → A → E |
57 | C → B → D → E → A |
58 | C → B → E → A → D |
59 | C → B → E → D → A |
60 | C → D → A → B → E |
61 | C → D → A → E → B |
62 | C → D → B → A → E |
63 | C → D → B → E → A |
64 | C → D → E → A → B |
65 | C → D → E → B → A |
66 | C → E → A → B → D |
67 | C → E → A → D → B |
68 | C → E → B → A → D |
69 | C → E → B → D → A |
70 | C → E → D → A → B |
71 | C → E → D → B → A |
72 | D → A → B → C → E |
73 | D → A → B → E → C |
74 | D → A → C → B → E |
75 | D → A → C → E → B |
76 | D → A → E → B → C |
77 | D → A → E → C → B |
78 | D → B → A → C → E |
79 | D → B → A → E → C |
80 | D → B → C → A → E |
81 | D → B → C → E → A |
82 | D → B → E → A → C |
83 | D → B → E → C → A |
84 | D → C → A → B → E |
85 | D → C → A → E → B |
86 | D → C → B → A → E |
87 | D → C → B → E → A |
88 | D → C → E → A → B |
89 | D → C → E → B → A |
90 | D → E → A → B → C |
91 | D → E → A → C → B |
92 | D → E → B → A → C |
93 | D → E → B → C → A |
94 | D → E → C → A → B |
95 | D → E → C → B → A |
96 | E → A → B → C → D |
97 | E → A → B → D → C |
98 | E → A → C → B → D |
99 | E → A → C → D → B |
100 | E → A → D → B → C |
101 | E → A → D → C → B |
102 | E → B → A → C → D |
103 | E → B → A → D → C |
104 | E → B → C → A → D |
105 | E → B → C → D → A |
106 | E → B → D → A → C |
107 | E → B → D → C → A |
108 | E → C → A → B → D |
109 | E → C → A → D → B |
110 | E → C → B → A → D |
111 | E → C → B → D → A |
112 | E → C → D → A → B |
113 | E → C → D → B → A |
114 | E → D → A → B → C |
115 | E → D → A → C → B |
116 | E → D → B → A → C |
117 | E → D → B → C → A |
118 | E → D → C → A → B |
119 | E → D → C → B → A |
Binary Table
Value | Loop |
|---|---|
0 | - - - - - |
1 | - - - - A |
2 | - - - B - |
3 | - - - B A |
4 | - - C - - |
5 | - - C - A |
6 | - - C B - |
7 | - - C B A |
8 | - D - - - |
9 | - D - - A |
10 | - D - B - |
11 | - D - B A |
12 | - D C - - |
13 | - D C - A |
14 | - D C B - |
15 | - D C B A |
16 | E - - - - |
17 | E - - - A |
18 | E - - B - |
19 | E - - B A |
20 | E - C - - |
21 | E - C - A |
22 | E - C B - |
23 | E - C B A |
24 | E D - - - |
25 | E D - - A |
26 | E D - B - |
27 | E D - B A |
28 | E D C - - |
29 | E D C - A |
30 | E D C B - |
31 | E D C B A |