
MC6 PRO User Manual
This user manual is not kept up to date. For the most updated manual, please access user manuals via our new knowledge base.
To download a PDF copy of this manual, print this page and select Save as PDF.
Introduction
With MC6 PRO, you can control any device that accepts MIDI, regardless of brand or model. Each switch on your Morningstar controller can be programmed to perform any function you want.
We take joy in creating the most powerful and intuitive programmable MIDI controllers available. If you have any questions that this manual cannot answer, please send us an email at help@morningstarfx.com. We are always happy to help.
Power Requirements
You can power your MC6 PRO in any of the following ways.
9-12V DC (centre negative) Power Supply
Connect a 9-12V DC centre negative power supply to the DC power input.
MC6 PRO requires at least 250mA of power at 9VDC.
More power is required if you are using the USB Host port to power other devices. If you are using the TRS Relay ports, you will require an additional 100mA. You can reduce the current requirements by reducing the screen brightness setting. Conversely, MC6 PRO will require more current for increased brightness.
Do NOT use more 12V! It will damage the controller.
USB Power
Connect a USB cable from your computer, mobile device, USB adaptor or power bank to the MC6 PRO. The MC6 PRO is capable of being powered fully by USB.
Phantom Power (9-12v AC or DC)
Connect a 7-pin MIDI cable to the MIDI Out port of the MC6 PRO. Phantom power can be supplied to the MC6 PRO through pins 6 and 7 of the MIDI OUT port. When receiving DC power via phantom power, polarity does not matter.
Phantom Power from the MIDI OUT port pins 6&7 is no longer chained to Pins 6&7 on the MIDI IN port
Connections
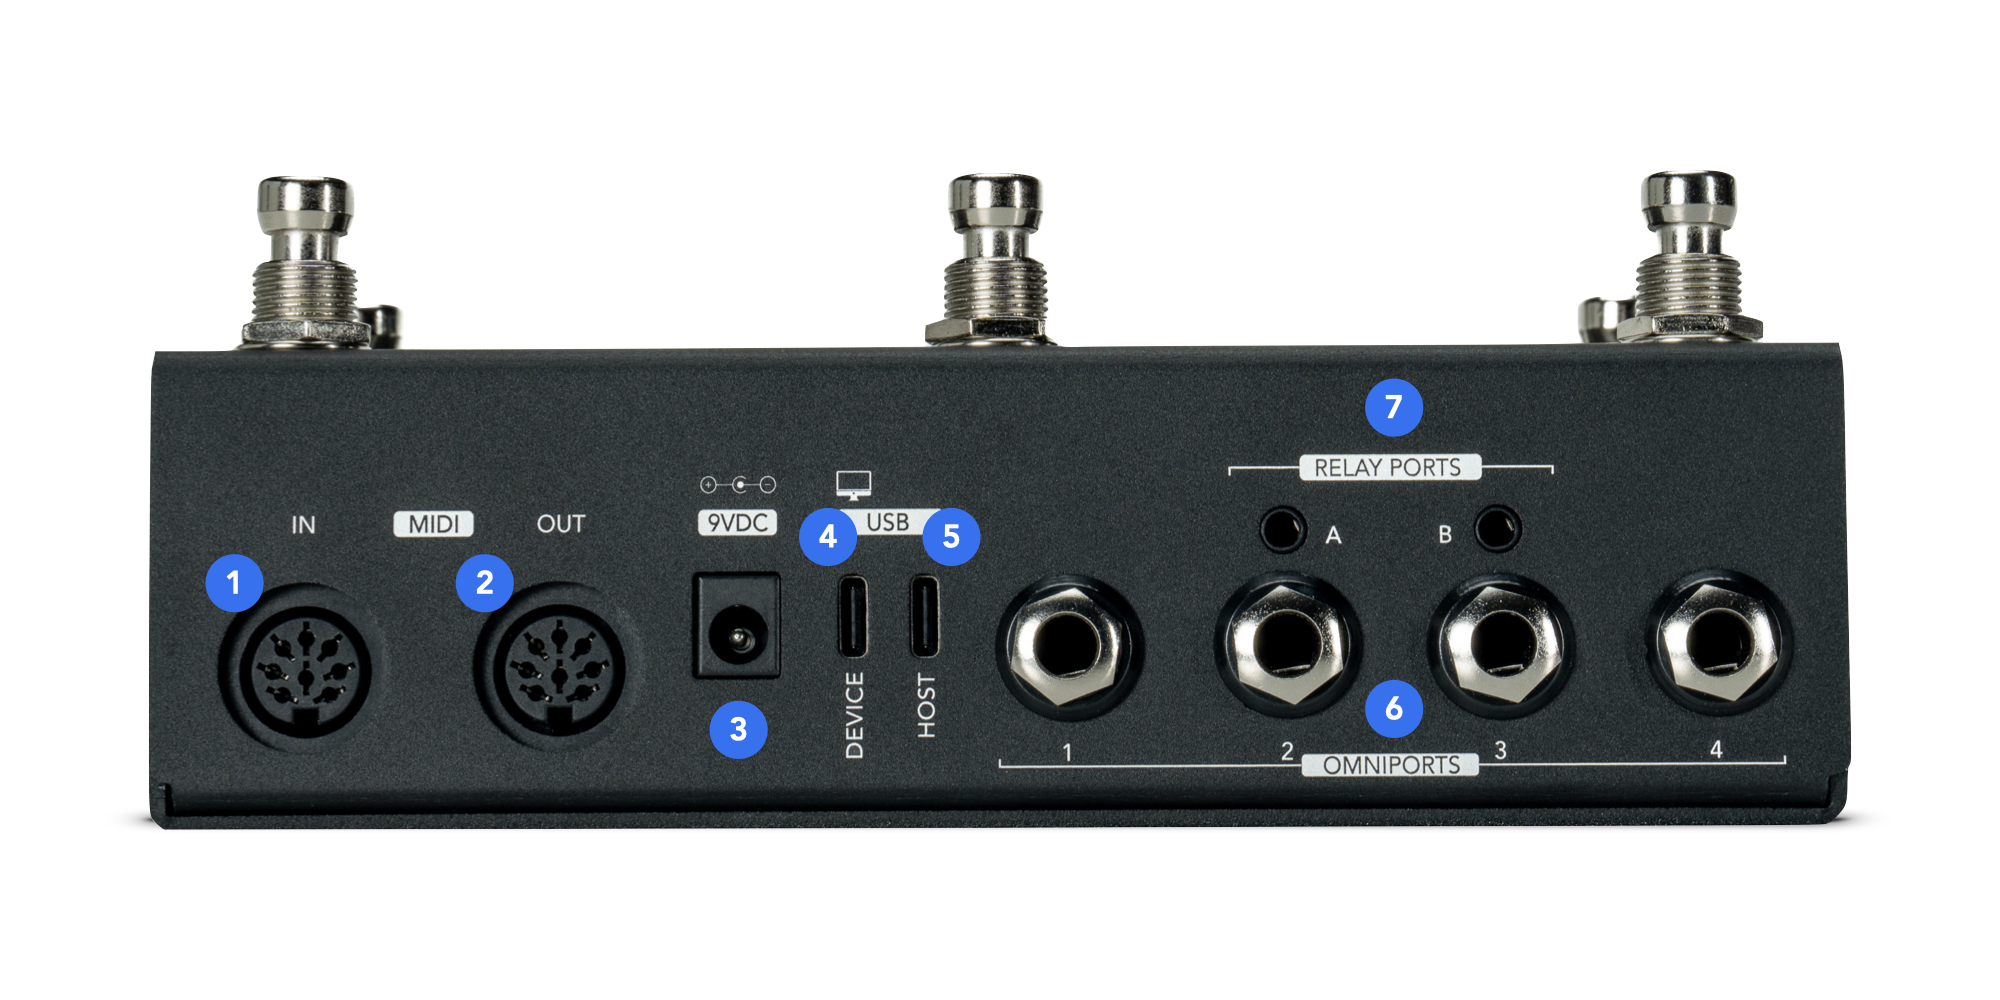
DIN5 MIDI In - Receive MIDI data from other devices.
DIN5 MIDI Out - Send MIDI data to other devices with a 5-pin MIDI cable. Also receives phantom power via a 7-pin MIDI cable from a device that supplies phantom power on pins 6 and 7.
9V DC - Power input for 9-12V DC power. Applying more than 12V will irreversibly damage the MC6 PRO.
USB Device - Connect to your computer, phone or tablet to access the Morningstar Editor or control music software.
USB Host - Control USB MIDI devices like the Nano Cortex, Valeton GP-5 and Source Audio C4.
Omniports 1-4 - Multi-purpose ports that can function as TRS MIDI Outputs, Expression Pedal Inputs or Aux Switch Inputs.
Relay Ports - Control non-MIDI devices such as switching amp channels and effects, analog tap tempo and JHS Red Remote switching.
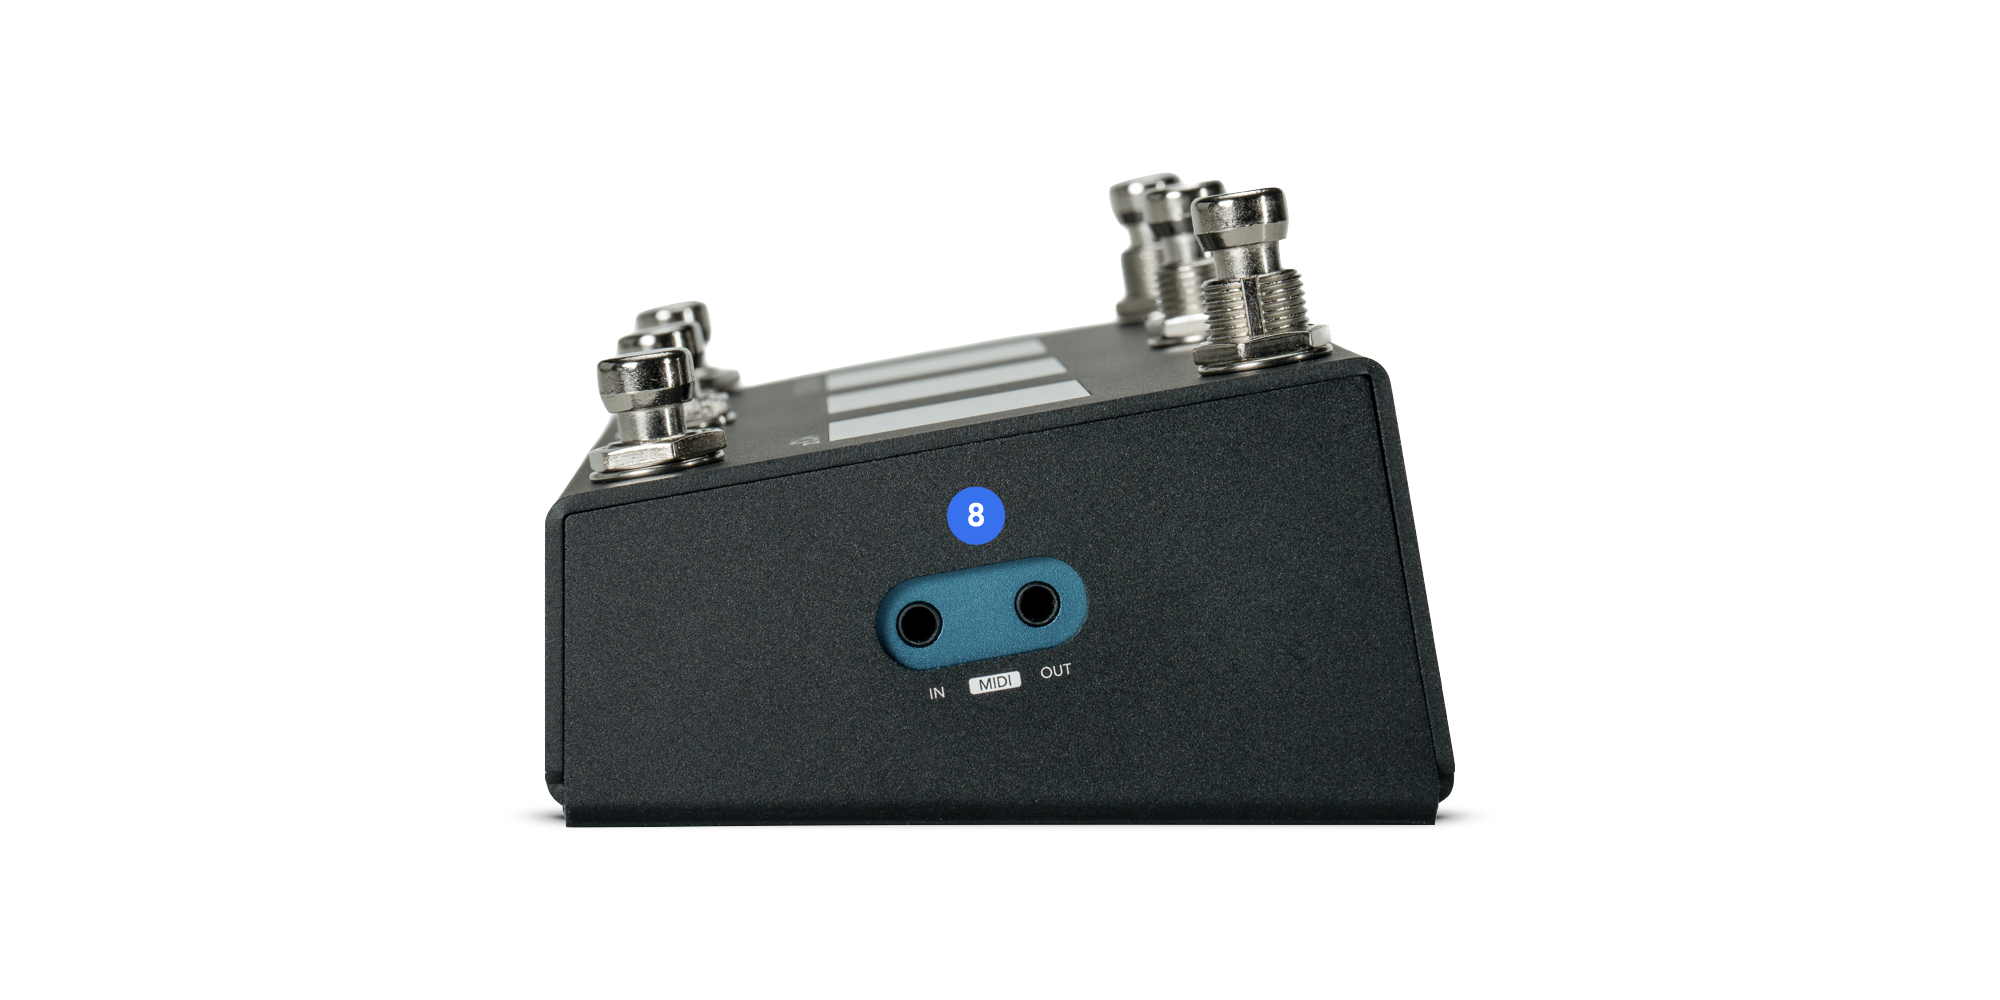
3.5mm TRS MIDI In and Out - Connect directly to devices with 3.5mm TRS MIDI ports. This is Type A only. If you need Type B, please use an Omniport or a modified cable with Tip and Ring swapped on one end.
Navigation
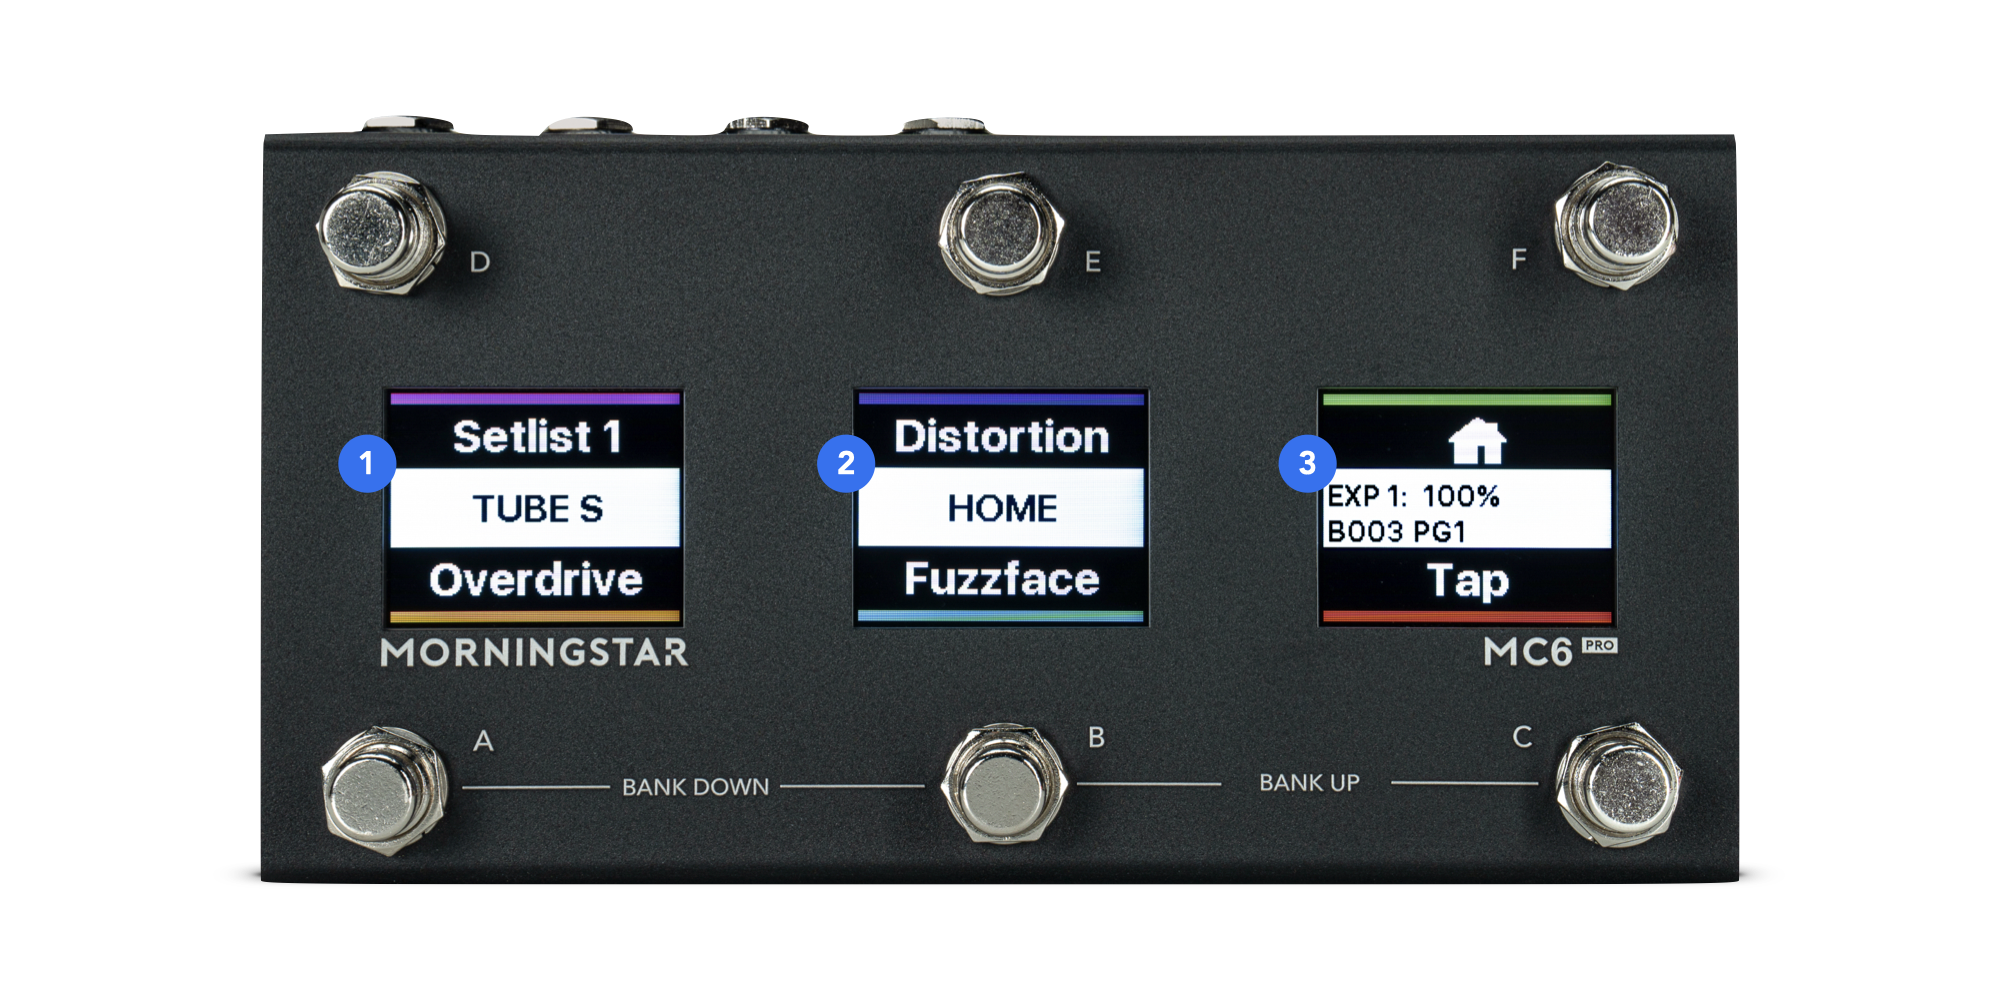
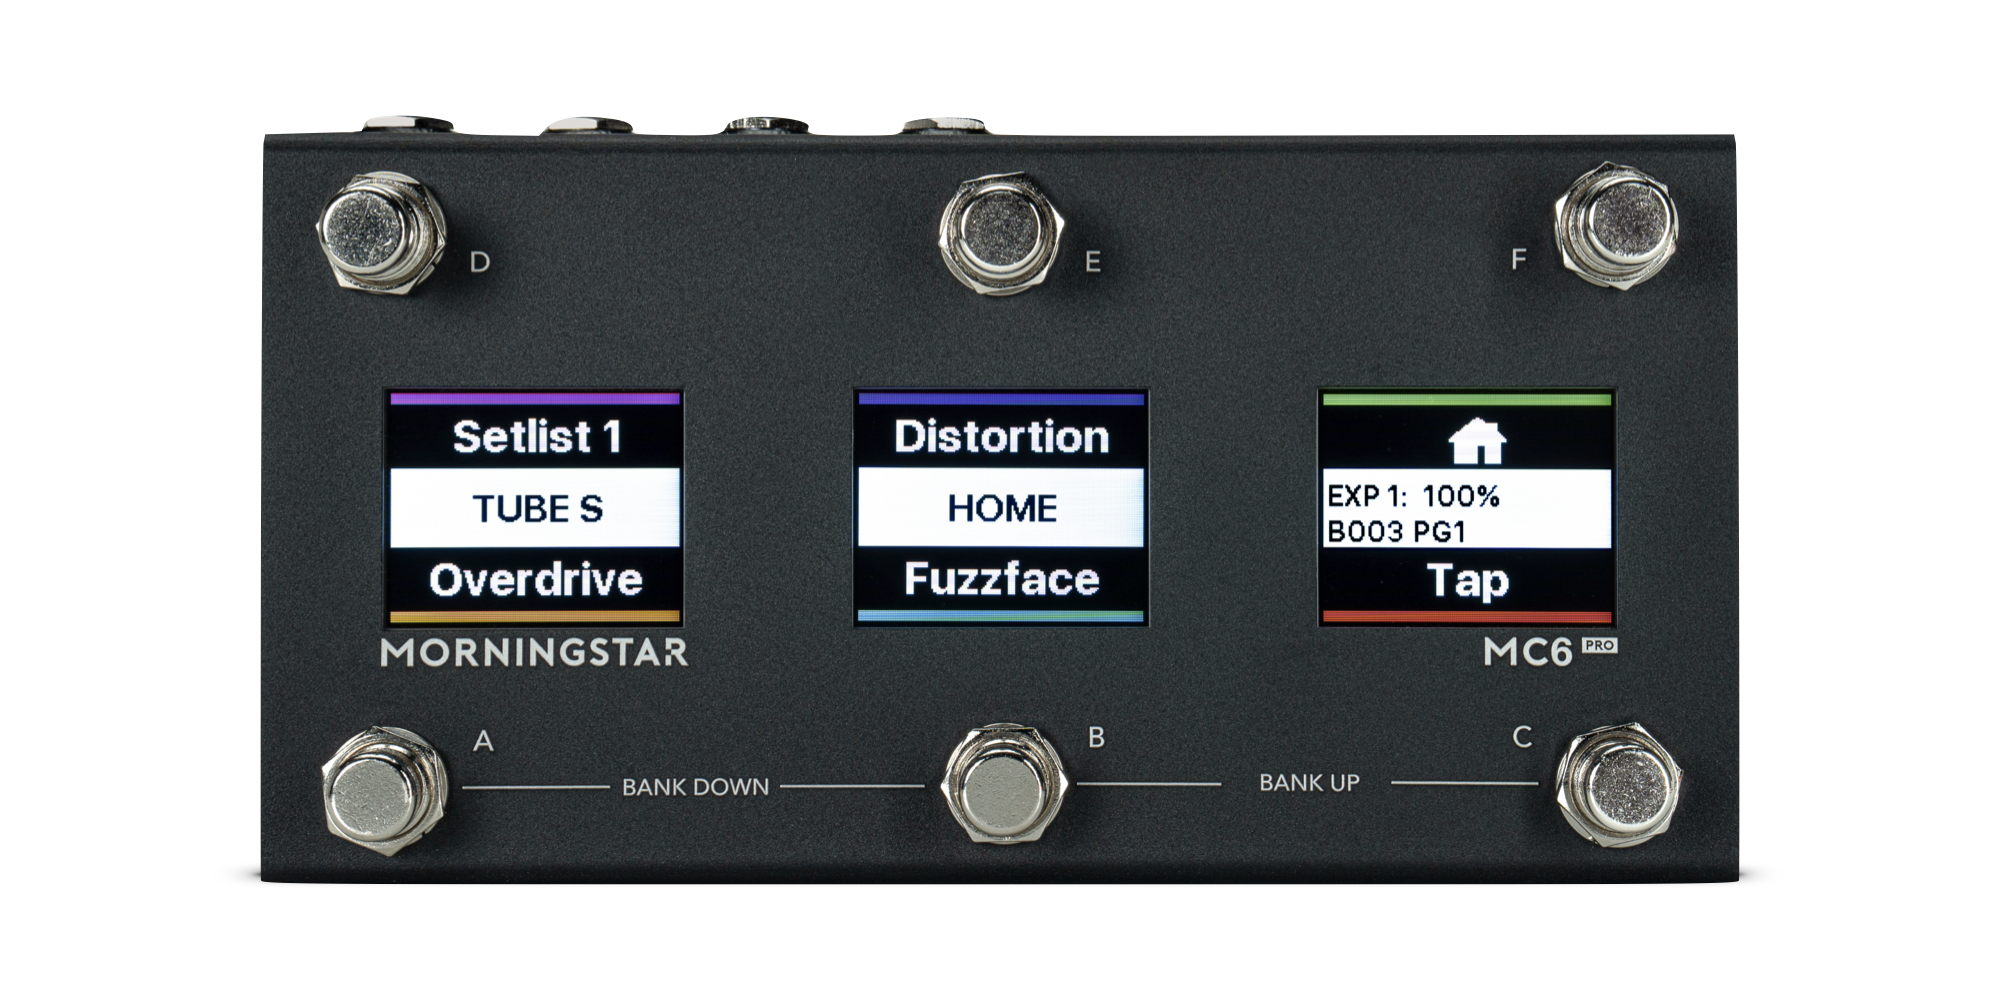
Front Panel
MC6 PRO has 6 foot switches A to F. Each switch corresponds with the preset name closest to it on the LCD display.
LCD Displays
3 color LCD screens deliver timely and clear visual feedback. Each center section displays essential information:
Bank and Page Number
Bank Name
Last-pressed Switch Long Name
Expression Pedal Position and MIDI Clock BPM (with blinking indicator)
Bank Up and Down
B+C - Bank Up
A+B - Bank Down
Hold these switch combinations to continuously scroll through banks.
Page Up and Down
E+F - Page Up
D+E - Page Down
Hold these switch combinations to continuously scroll through pages.
Enter System Menu
D+F - Open the System mMenu
You can then use the switches to navigate through the controller settings.
Profiles
The MC6 PRO has 8 separate profiles. Each profile gives you access to a unique set of 128 Banks. Most of the time, 128 banks is more than enough, and it is highly likely that 1 profile is all you will use. However, if you do need more banks and presets, many more are available to you.
Profiles are completely independent and cannot interact with each other. For example, you cannot engage a preset in Profile 2 from Profile 1, or jump from a bank in Profile 1 to a bank in Profile 2.
You can only switch Profiles on the controller itself:
Press switch D+F to access the menu.
Scroll to Select Profile and select the profile you want to use.
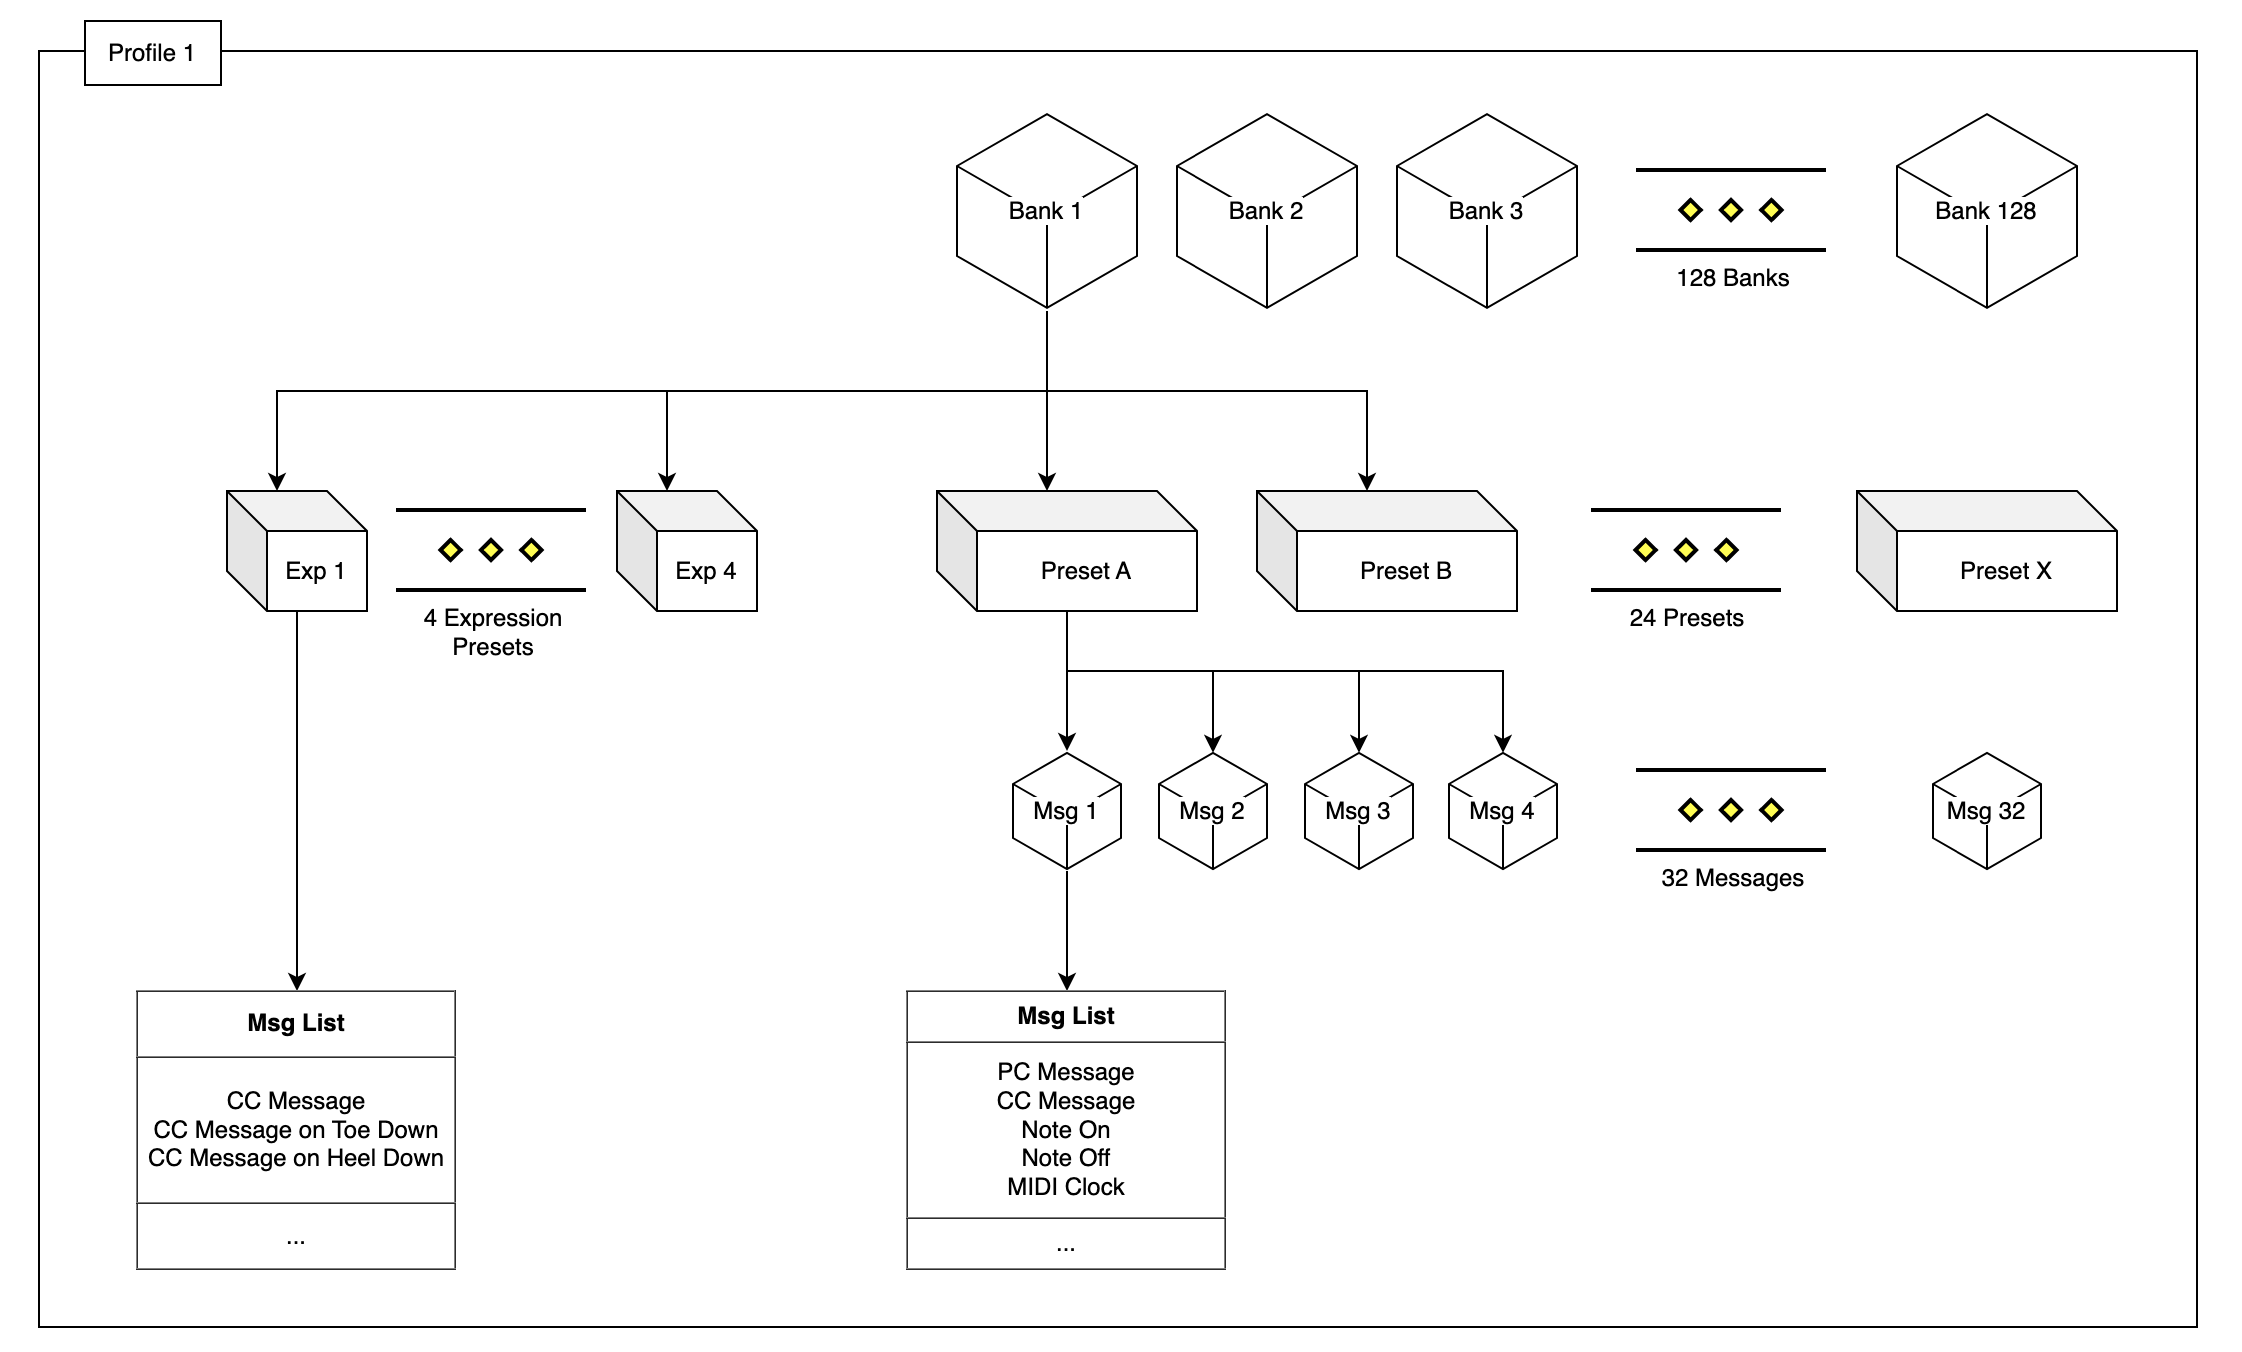
Bank, Page & Preset Organization
Banks
MC6 PRO has 128 banks.
Pages
Each bank contains 4 pages
Switch Presets
Each page contains 6 switch presets.
Expression Presets
Each bank also contains 4 expression pedal presets, which we explain in the Expression Pedals section.
The flow chart below shows you a visual overview of the MC6 PRO bank and preset architecture.
Connecting to the Editor
The MC6 PRO is designed to be used with the Morningstar Editor, which offers the best way to edit your banks and presets. With its powerful, flexible and user-friendly user, you’ll get your MIDI controller doing exactly what you want in no time.
Online Use
The Morningstar Editor web app is compatible with Google Chrome, Opera and Brave browsers only. However, you do not need to use a browser if you prefer downloading the Editor for offline use.
Offline Use
You can download and install the Editor for offline use if you do not have Internet access. There are the two ways you can do this:
Install the Editor as a web app from Chrome or Brave browser. Instructions: Installing the Editor for Offline Use
Download the Morningstar Editor application and install it.
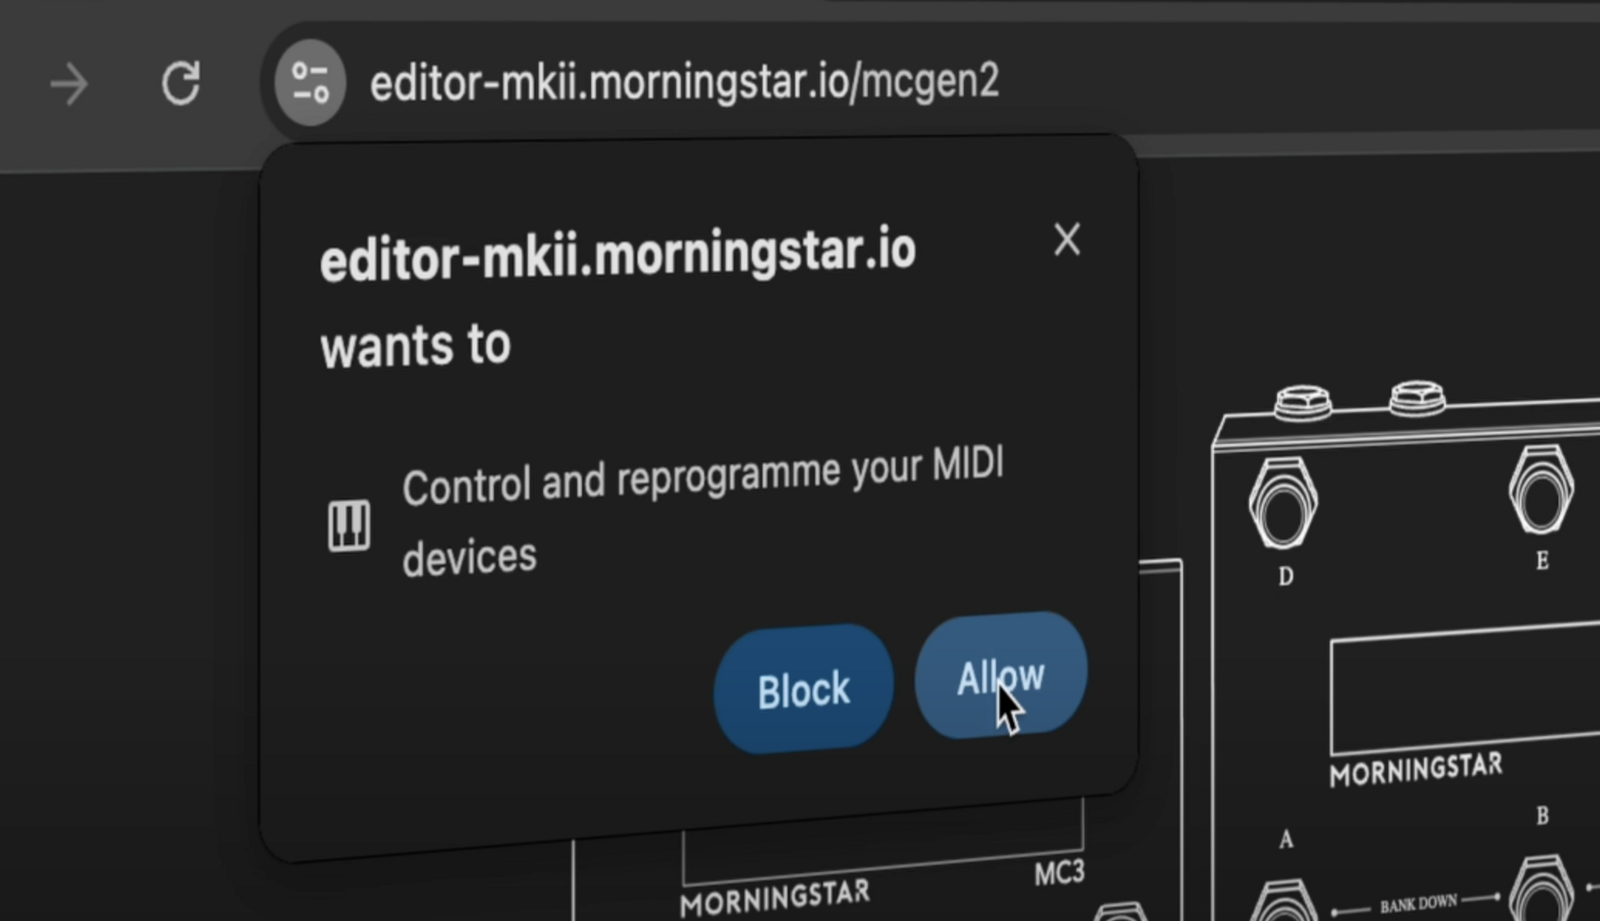
Allow MIDI Access
When connecting to the Editor for the first time, Your browser will request permission for MIDI communication with connected MIDI devices. Click on Allow. You can access this setting via the icon next to the URL anytime.
Connect
With your controller connected to your computer via USB and the Editor open, click on ‘Connect’ in the first row to establish connection.
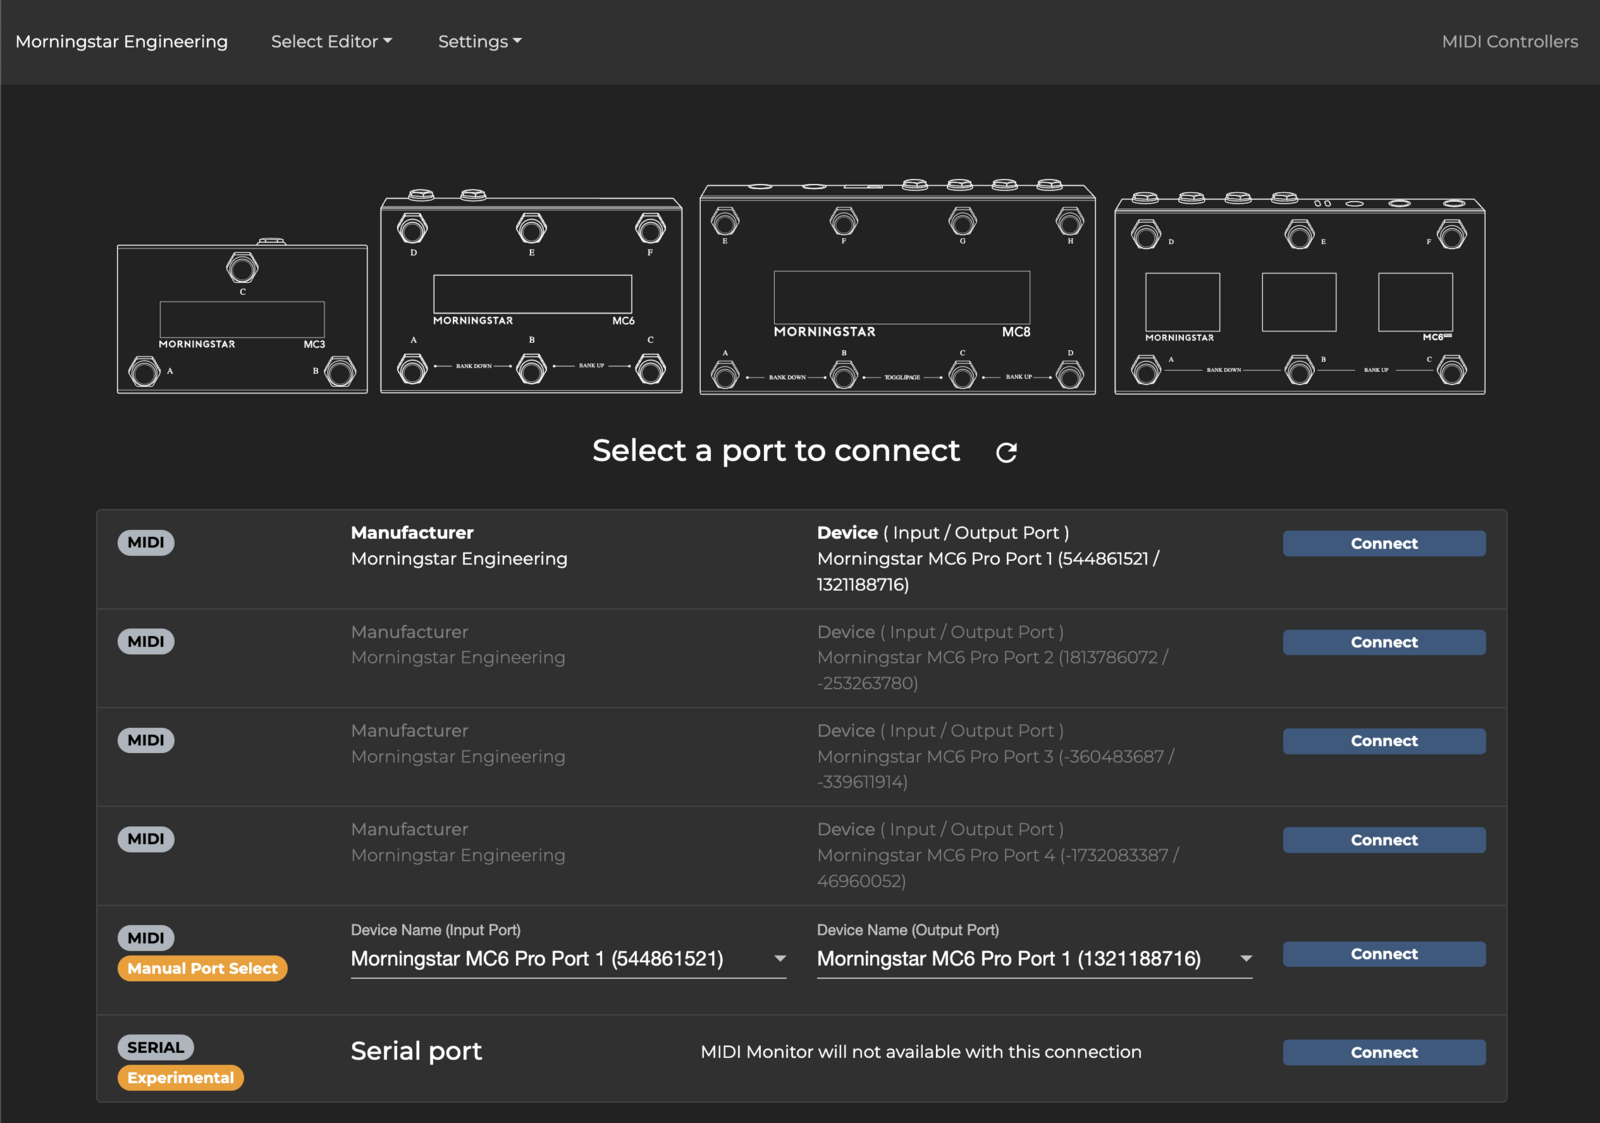
If no device is detected, click on Refresh list. If your controller is still not being detected, please follow these troubleshooting steps.
Controller Settings
Access Global/General Settings on MC6 PRO itself by pressing D+F > Global Config, or via the Morningstar Editor Controller Settings tab > General Configuration.
LCD Brightness
Adjust screen brightness to taste from 30 to 100%.
MIDI Channel
Set the MIDI channel on which MC6 PRO receives MIDI.
Switch Sensitivity
Set foot switch sensitivity for the controller. Higher sensitivity offers faster response time when a switch is pressed, but dual switch presses will require more precision to execute.
MIDI Clock Persist
Enabled - MIDI Clock will continue being sent until a Stop Clock command is given.
Disabled - MIDI Clock will stop sending when any other event, such as a switch press or expression pedal movement occurs.
Show Preset Labels
When enabled, Preset letters will be indicated on each switch.
Preset Name Max Font Size
Set the maximum font size for Preset name labels.
Bank Name / Preset Long Name Font Size
Set font size for Bank Name and Preset Long Name shown in the middle section of the displays.
Bank Number / Page Number Font Size
Set font size for Bank and Page Number indicator shown in the middle section of the displays.
Ignore MIDI Clock
Enabled - Incoming MIDI clock data is ignored.
Disabled - Incoming MIDI clock data overwrites and sets internal MIDI clock.
Mirror USB Host
Only applicable when using a USB hub connected to the USB Host port. When enabled, data received via one USB port will be sent out to the other USB ports.
Load Last Used Bank on Power Up
When enabled, controller will power up to the last used bank before power off. If disabled, controller will power up to Bank 1 by default.
Remember Toggle States
Enabled - Switch preset toggle states are preserved when you scroll through banks.
Disabled - Switch preset toggle states are reset to Position 1 when you leave a bank.
Dual Switch Lock
When enabled, dual switch presses are disabled. For example, pressing switches A+B to bank down will not work.
Bank Change Delay Time
Delay time (in milliseconds) between bank changes. Adjust this if you need a longer delay time when scrolling between banks.
Long Press Time
The amount of time (in milliseconds) that a switch must be held down for a Long Press action to execute.
USB Virtual MIDI Ports
The MC6 PRO has 4 virtual MIDI ports when connected via USB. This setting determines how many ports are active. For example, if set to 1, only Port 1 will send MIDI data, while the rest will not. If set to 2, Port 1 and Port 2 will be active, while ports 3 and 4 are disabled.
MIDI Send Delay (ms)
The amount of delay in milliseconds between each MIDI message sent. Ideally, this should be set to 0. Some MIDI devices cannot process incoming MIDI messages quickly enough and may miss some messages. If this happens, a longer delay should be used, only if required.
MIDI Clock Port Settings
Select which MIDI outputs send out MIDI clock data. When checked, MIDI clock will send out through a port. If unchecked, MIDI clock will not send from a port.
MIDI Thru Settings Matrix
Set which pathways allow MIDI to be relayed through the controller.
Edit Bank
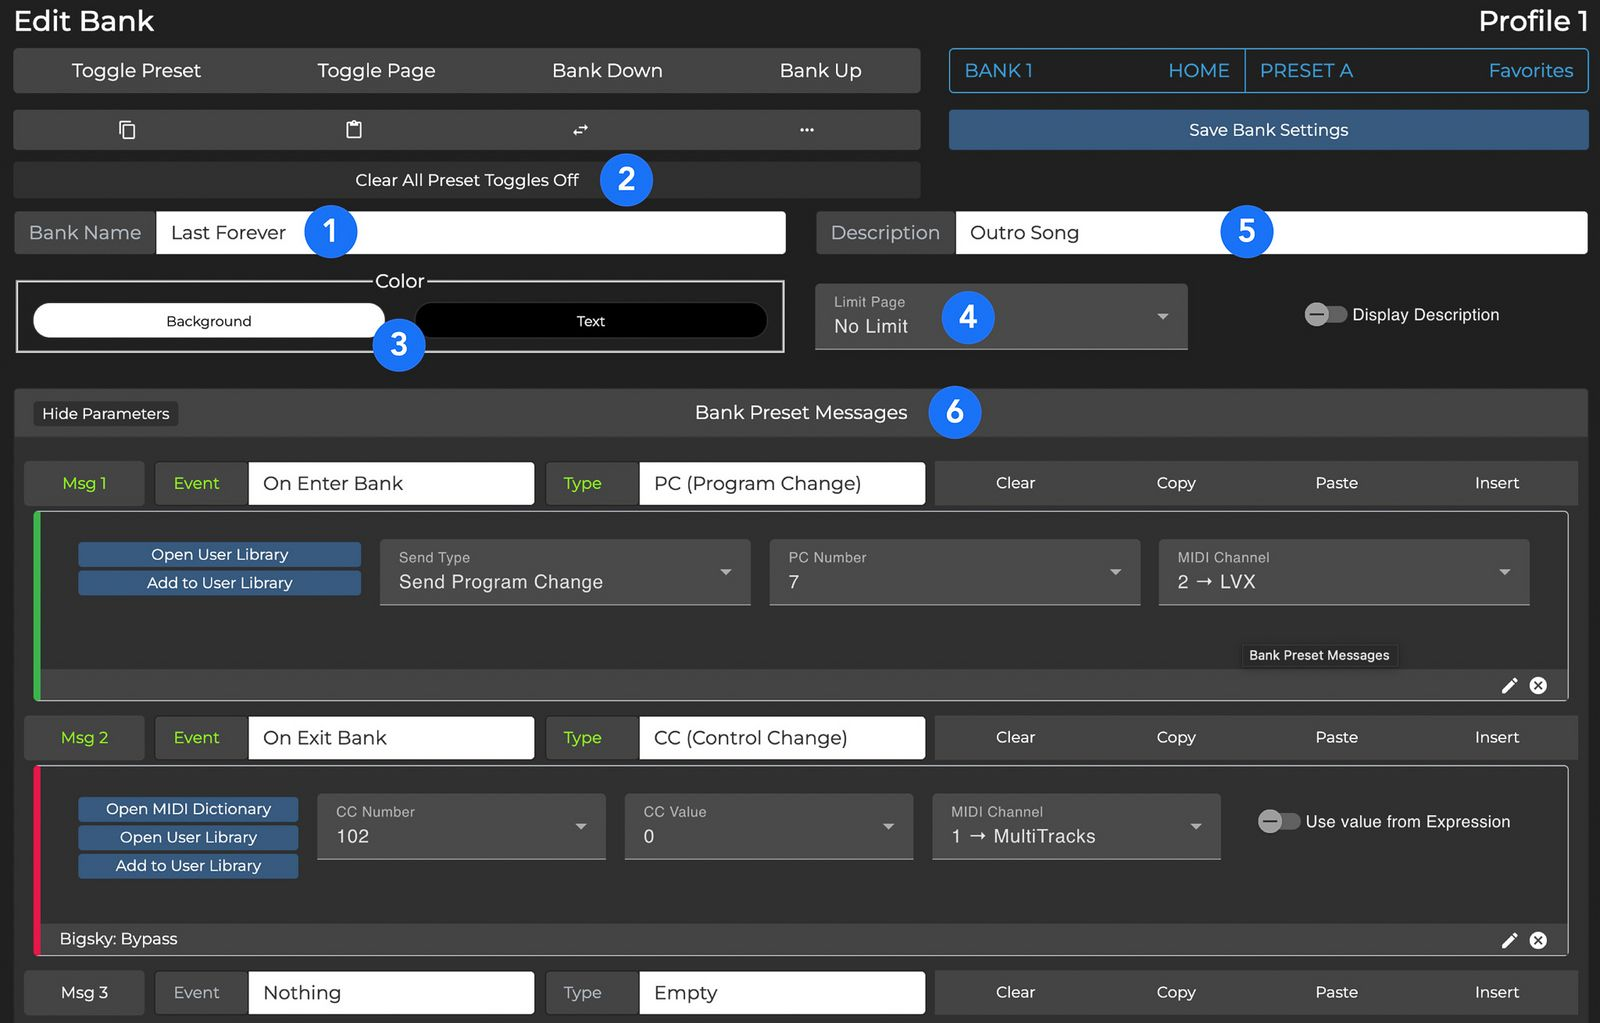
Bank Name - Displayed on Screen 2. You can split text into 2 lines by typing ‘\n’.
Clear All Preset Toggles - If ON, pressing one switch will reset the toggle states all other switches within the bank to Position 1. This is useful if you only want one preset to be in Position 2 at any one time, to indicate which Preset is active.
Color - Customize Bank Name text and background colors.
Limit Page - By default MC6 PRO presents 4 pages of 6 switch presets in a bank. You can limit how many pages are presented for a particular bank.
Description - When 'Display Description' is enabled, description text will be displayed on Screen 3.
Bank Preset Messages - You can send/execute messages on entering or exiting a bank. More information in the Bank Presets section.
Bank Presets
With a Bank Preset, you can send/execute messages on entering or exiting a bank. For example, you can send a PC message on entering a bank, and send a CC message on exiting the Bank (as shown in the image above). You can add up to 32 different messages.
Pages Within a Bank
The 24 switch presets in each Bank are spread across 4 pages of 6 presets each:
Page 1: Presets A-F
Page 2: Presets G-L
Page 3: Presets M-R
Page 4: Presets S-X
Press E+F to page up and D+E to page down within a bank. Hold these switch combinations to continuously scroll through pages. If you want to only toggle between 2 different pages, you can either set Page Limit to 2 or use the Toggle Page message type.
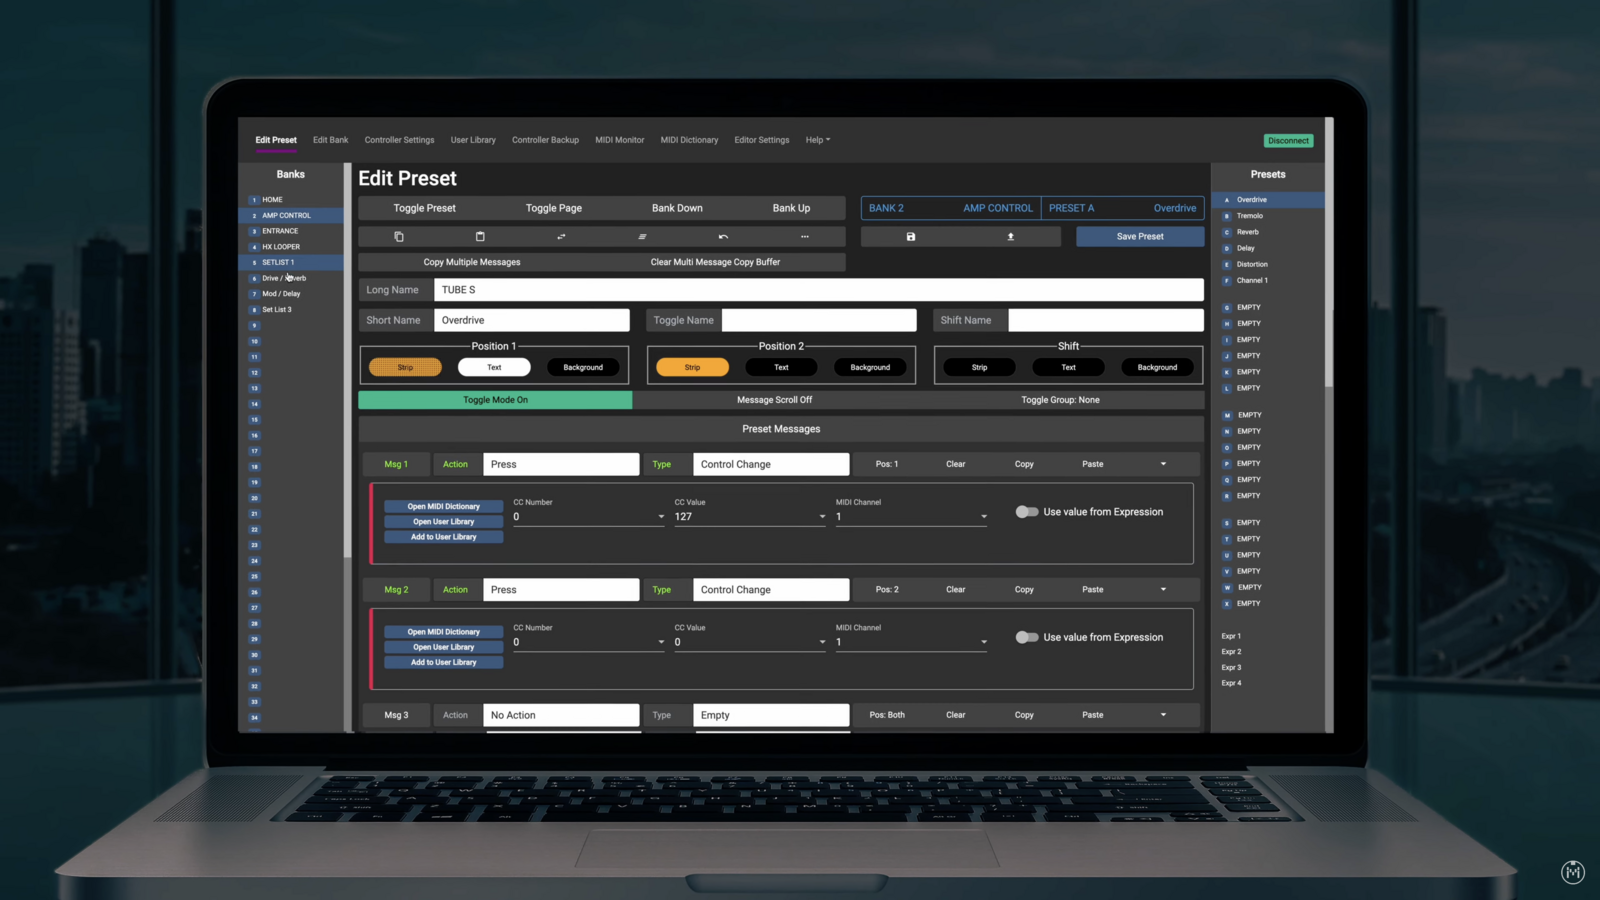
Edit Switch Preset
Out of the factory, all switches are labelled EMPTY and do not send any MIDI messages. It’s up to you to label each switch and decide what it does! The combination of messages executed and sent by a switch is called a Switch Preset. With 16 different MIDI channels, each preset is capable of controlling up to 16 different MIDI devices at simultaneously.
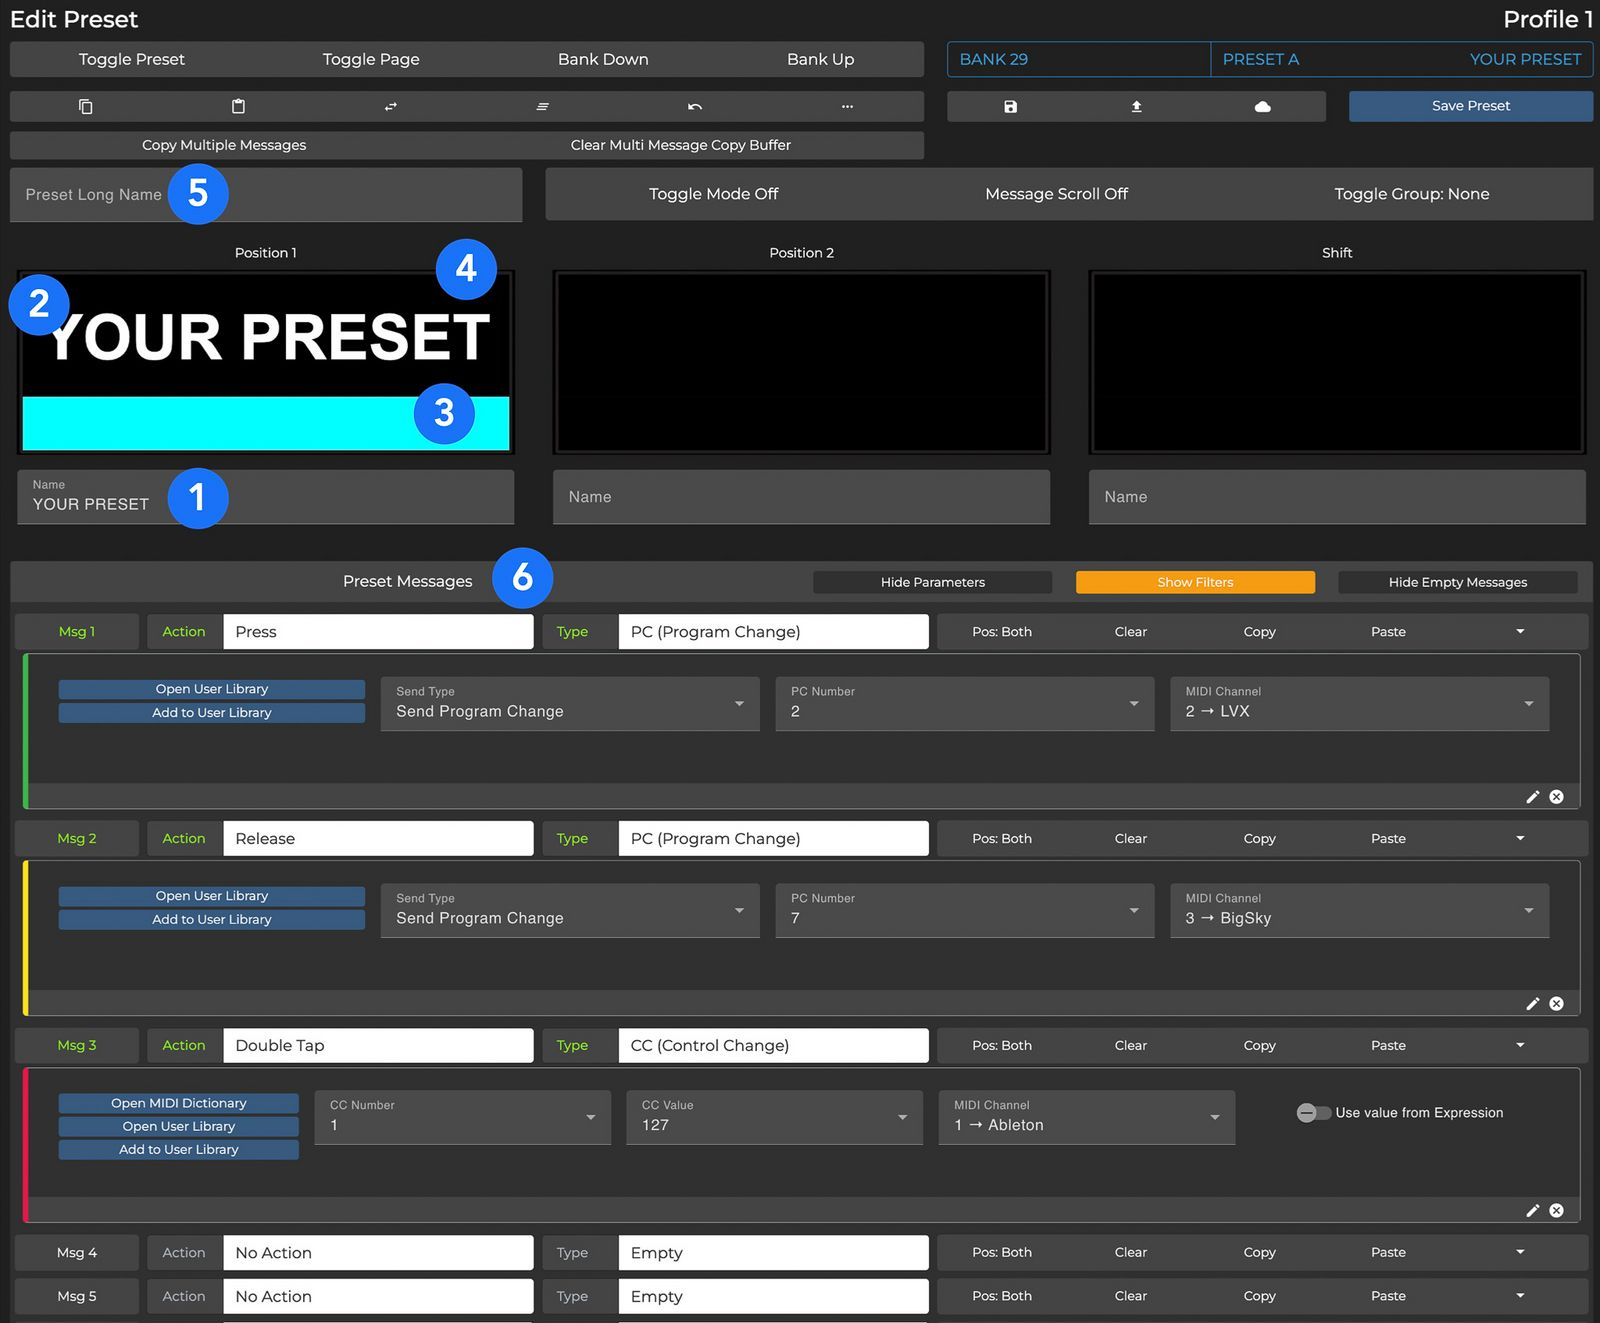
Name - Give your switch a name so you always know what purpose it serves.
Long Name - Longer name for preset. Displayed in the center section only when the preset is engaged.
Text Color - Click on the rendered text to change text color. Customizable for each toggle position (Position 1, Position 2 and Shift, which are explained later).
Strip Color - Click on the bottom portion under the preset name to add a color strip. Available for each state (Position 1, Position 2, Shift).
Background Color The color for the background of the Short Name. Available for each state (Position 1, Position 2, Shift)
Preset Messages - Each switch on your Morningstar controller can send/execute any combination of up to 32 different MIDI messages of your choice. Choose the Action you want to use to trigger a message, message type and input your desired message parameters. In the screenshot above, Msg 1 is trigger by a Press and sends a PC (Program Change) via MIDI channel 2.
Message Types
MIDI
Morningstar controllers can send virtually any type of MIDI message you need. From standard PC (Program Change) and CC (Control Change) messages to MIDI Clock, Note, SysEx, MMC, Realtime and more.
Keystrokes
Morningstar controllers can also send keystroke commands, allow you to mimic using a computer keyboard with your feet. This is especially useful for DAW control, which often utilises hotkeys and keyboard shortcuts.
Device Messages
You can also program switches on your controller to execute device functions such as jumping to specified banks, scrolling up/down through pages/banks, engaging other switch presets and more.
For all the available Message types and descriptions of what each does, please refer to the Message Type List.
Action Types
You can send different MIDI messages depending on what action you perform on a switch. You can assign each message to an action including Press, Double Tap, Release or Long Press (and more). This allows you to group MIDI messages by actions so a single switch can perform multiple functions.
You can also use actions to create a momentary switch effect. For example, you can trigger CC#1 with value 127 with a Press action, and CC#1 with value 0 with a Release action. When the switch is pressed, value 127 will be sent, and when the switch is released, a value 0 will be sent. This could for example allow to you to trigger an effect while holding down a switch, and stop it upon release.
For all the available Action types and their descriptions, please refer to the Action Type List.
Switch Toggle Positions
A Preset has 2 toggle positions and a temporary shift position. It can send different messages depending on which position it is in.
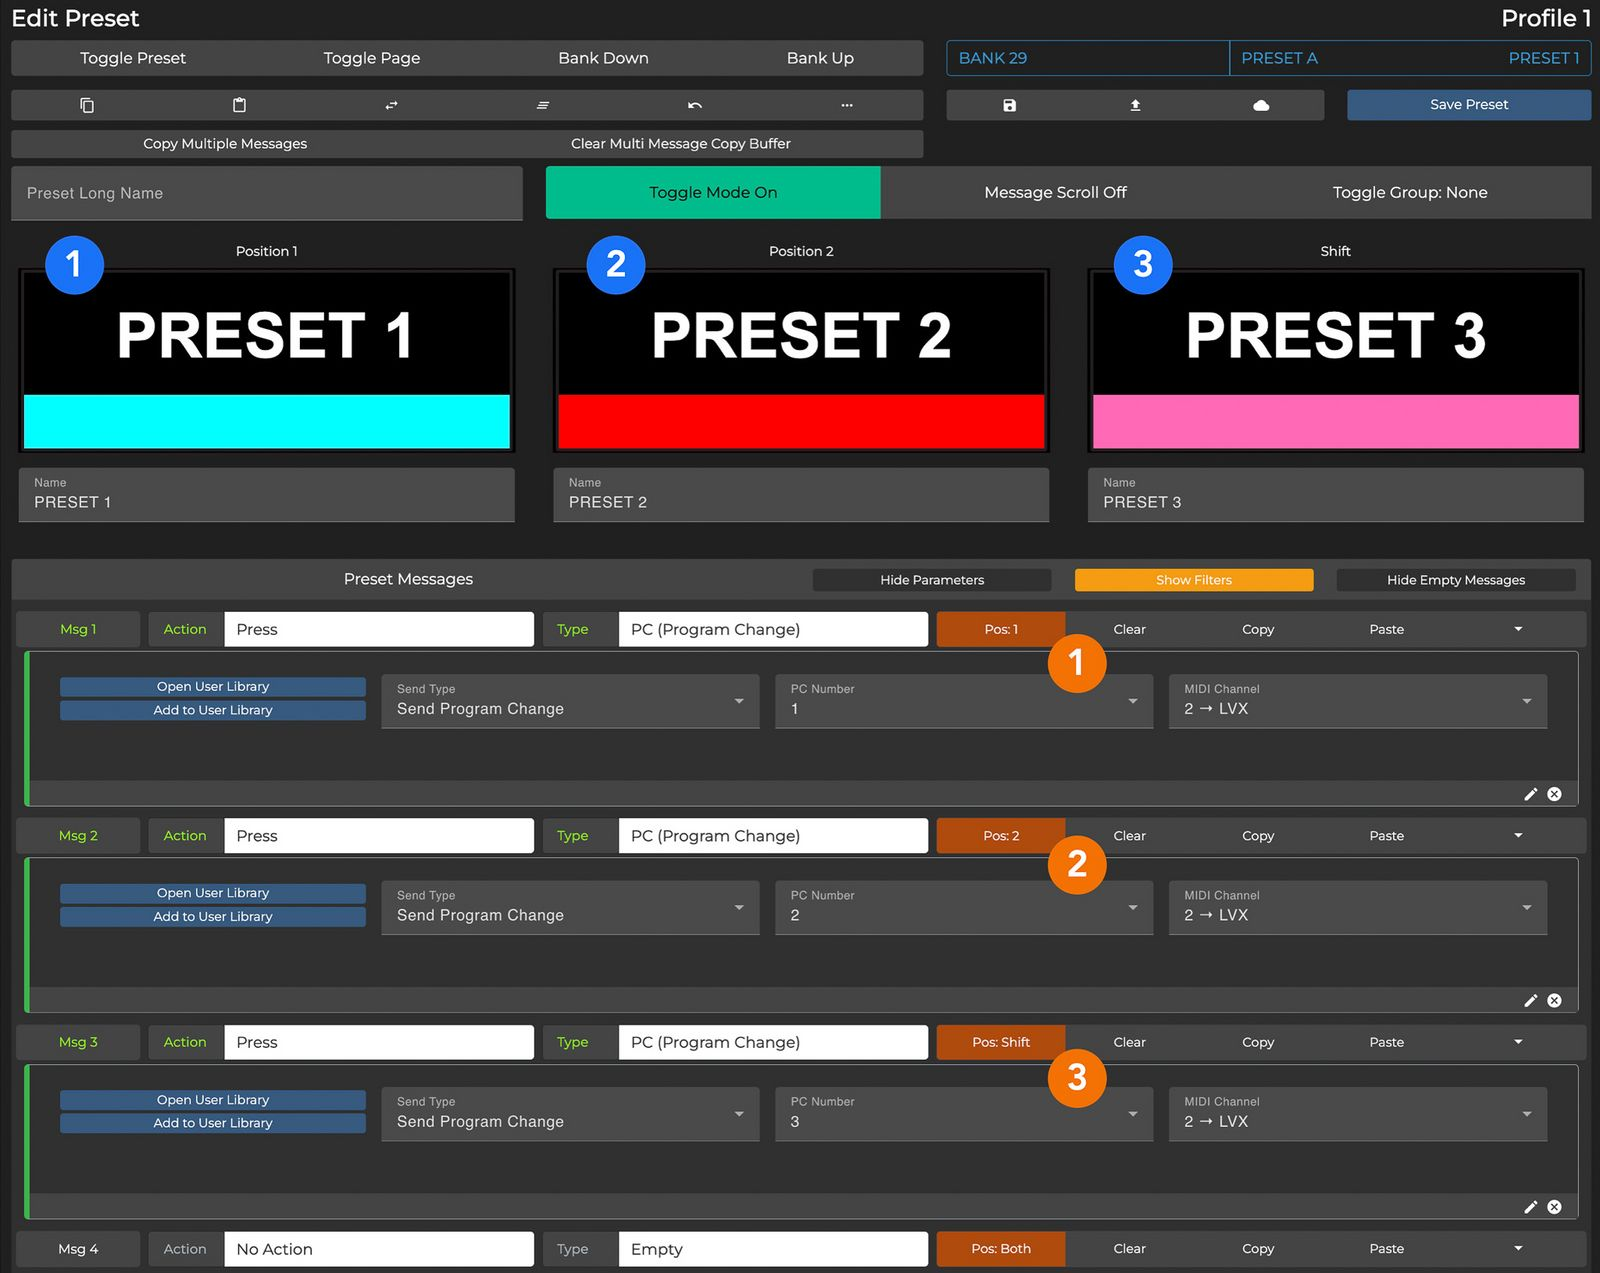
The 3 unique positions are:
Position 1 - The default position for all presets. In the example above, Msg 1 gets sent when the switch is pressed when in Position 1. Take note of the toggle position assigned to each message (highlighted in orange).
Position 2 - This is the position a preset will be in if it is toggled. In the example above, Msg 2 gets sent when the switch is pressed when in Position 2.
Shift - The third and temporary position. A preset will only be in the Shift position if it is shifted by you. After a Shifted Preset is engaged, the Preset will return to its prior Toggle Position. In the example above, Msg 3 gets sent when the switch is pressed in the Shift position.
Toggling Presets
There are 2 ways to get a preset to toggle between Position 1 and Position 2:
Toggle Mode - Enable Toggle Mode (highlighted green in the above screenshot). When Toggle Mode is enabled, the switch preset will toggle between Position 1 and Position 2 whenever it is engaged.
Toggle Preset Message Type - Add a 'Toggle Preset' message that is triggered by your desired action. With this method, the preset will toggle only when that specific action is performed. It will not toggle if other actions are performed. For example, if you choose Double Tap to execute the Toggle Preset message, the switch preset will not toggle when pressed, released or long pressed.
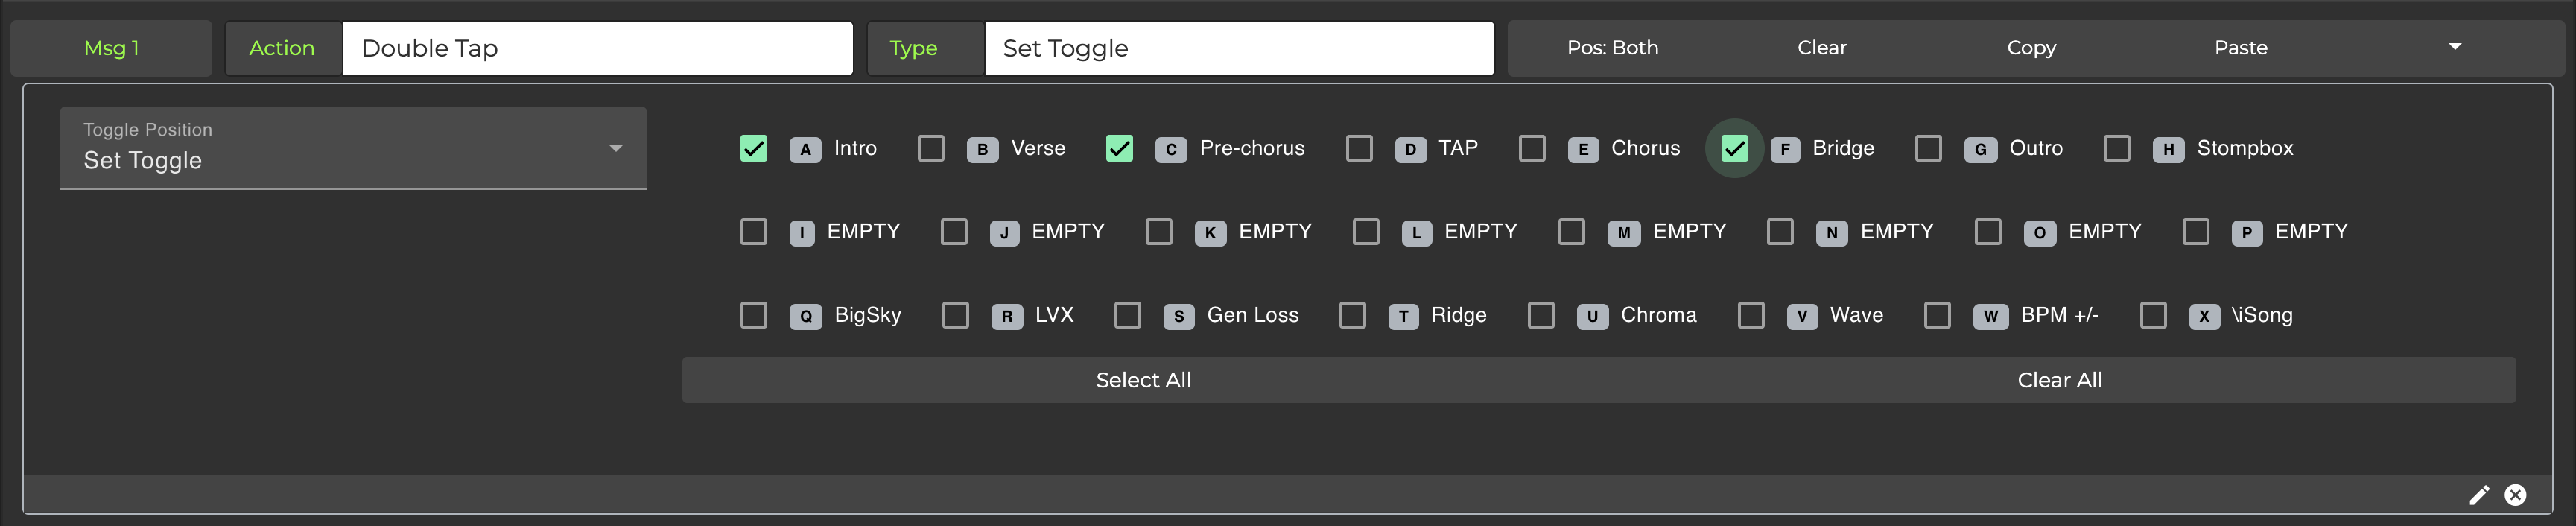
Shifting Presets
A Preset can be shifted by using the Set Toggle message type.
What is Shift?
Similar to Toggle Position 1 and 2, Shift is a state which the preset is in (similar to holding down the Shift key on your keyboard, but for this you don’t need to hold it down). Preset messages can then be set to execute only when the Preset “Shifted”. Once the Preset executes, the Preset will revert to the original (unshifted) state.
This gives you more flexibility in deciding what messages to send. For example, you can program a double-tap to shift the preset, and then have a Press action to send a CC#0 command, for example. After which, subsequent Press actions can be programmed to send a different message, until the Preset is shifted again.
How do I get the Preset to the Shift state?
Use the Set Toggle message type to shift a preset. Select Shift from the dropdown options.
🎬 Watch Shift State Video Tutorial
Toggle State Indicators
For each preset, you can have a different Name, Text Color, Background Color or Strip Color depending on which position the preset is in. This way you can tell if a preset is active, or if an effect is engaged or bypassed.
Using One Switch to Set the Toggle State of Another
You can have switches interact with each other for optimal visual feedback and control over your effects. For example, you may have two switches each in a different bank used to toggle on/off the same effect. In this case, you would want the toggle states of both these switches to be in sync at all times.
In another scenario, you may have switches within a bank programmed to recall preset patches. In this case, you would only want one switch to appear engaged at any one time, so you know which preset is active.
Toggle Groups & Toggle Reset Groups
The simplest and most effective method to achieve the above would be to use Toggle Groups and Toggle Reset Groups.
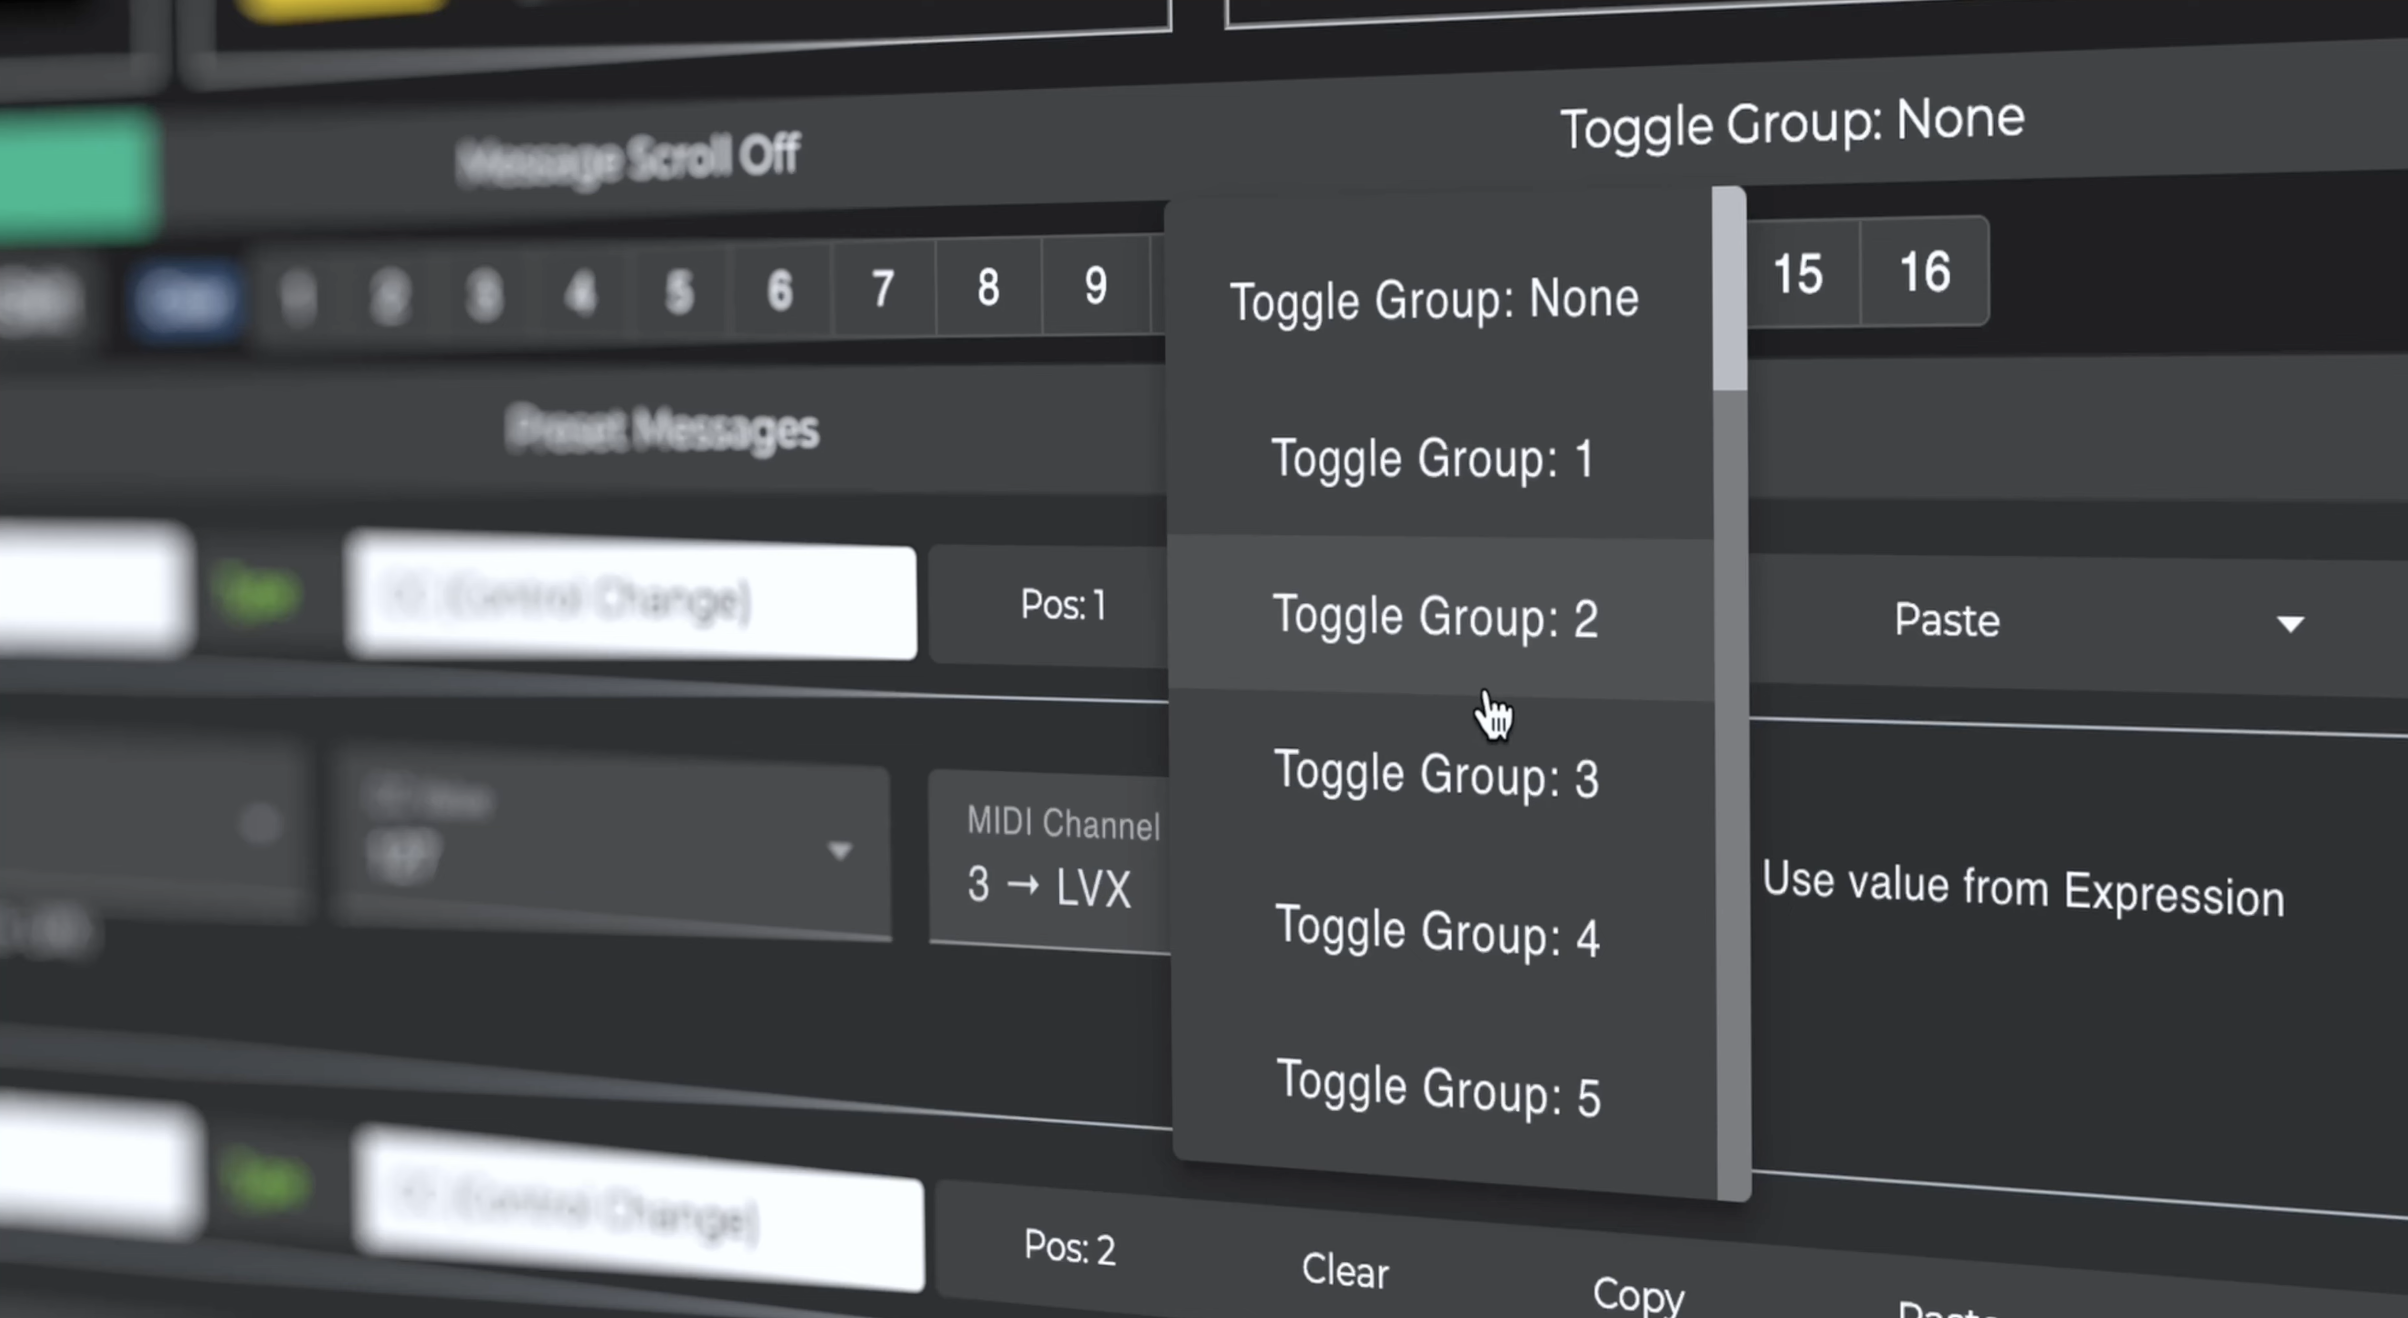
Switches that are added to the same Toggle Group will always have their toggle states matching and kept in sync.
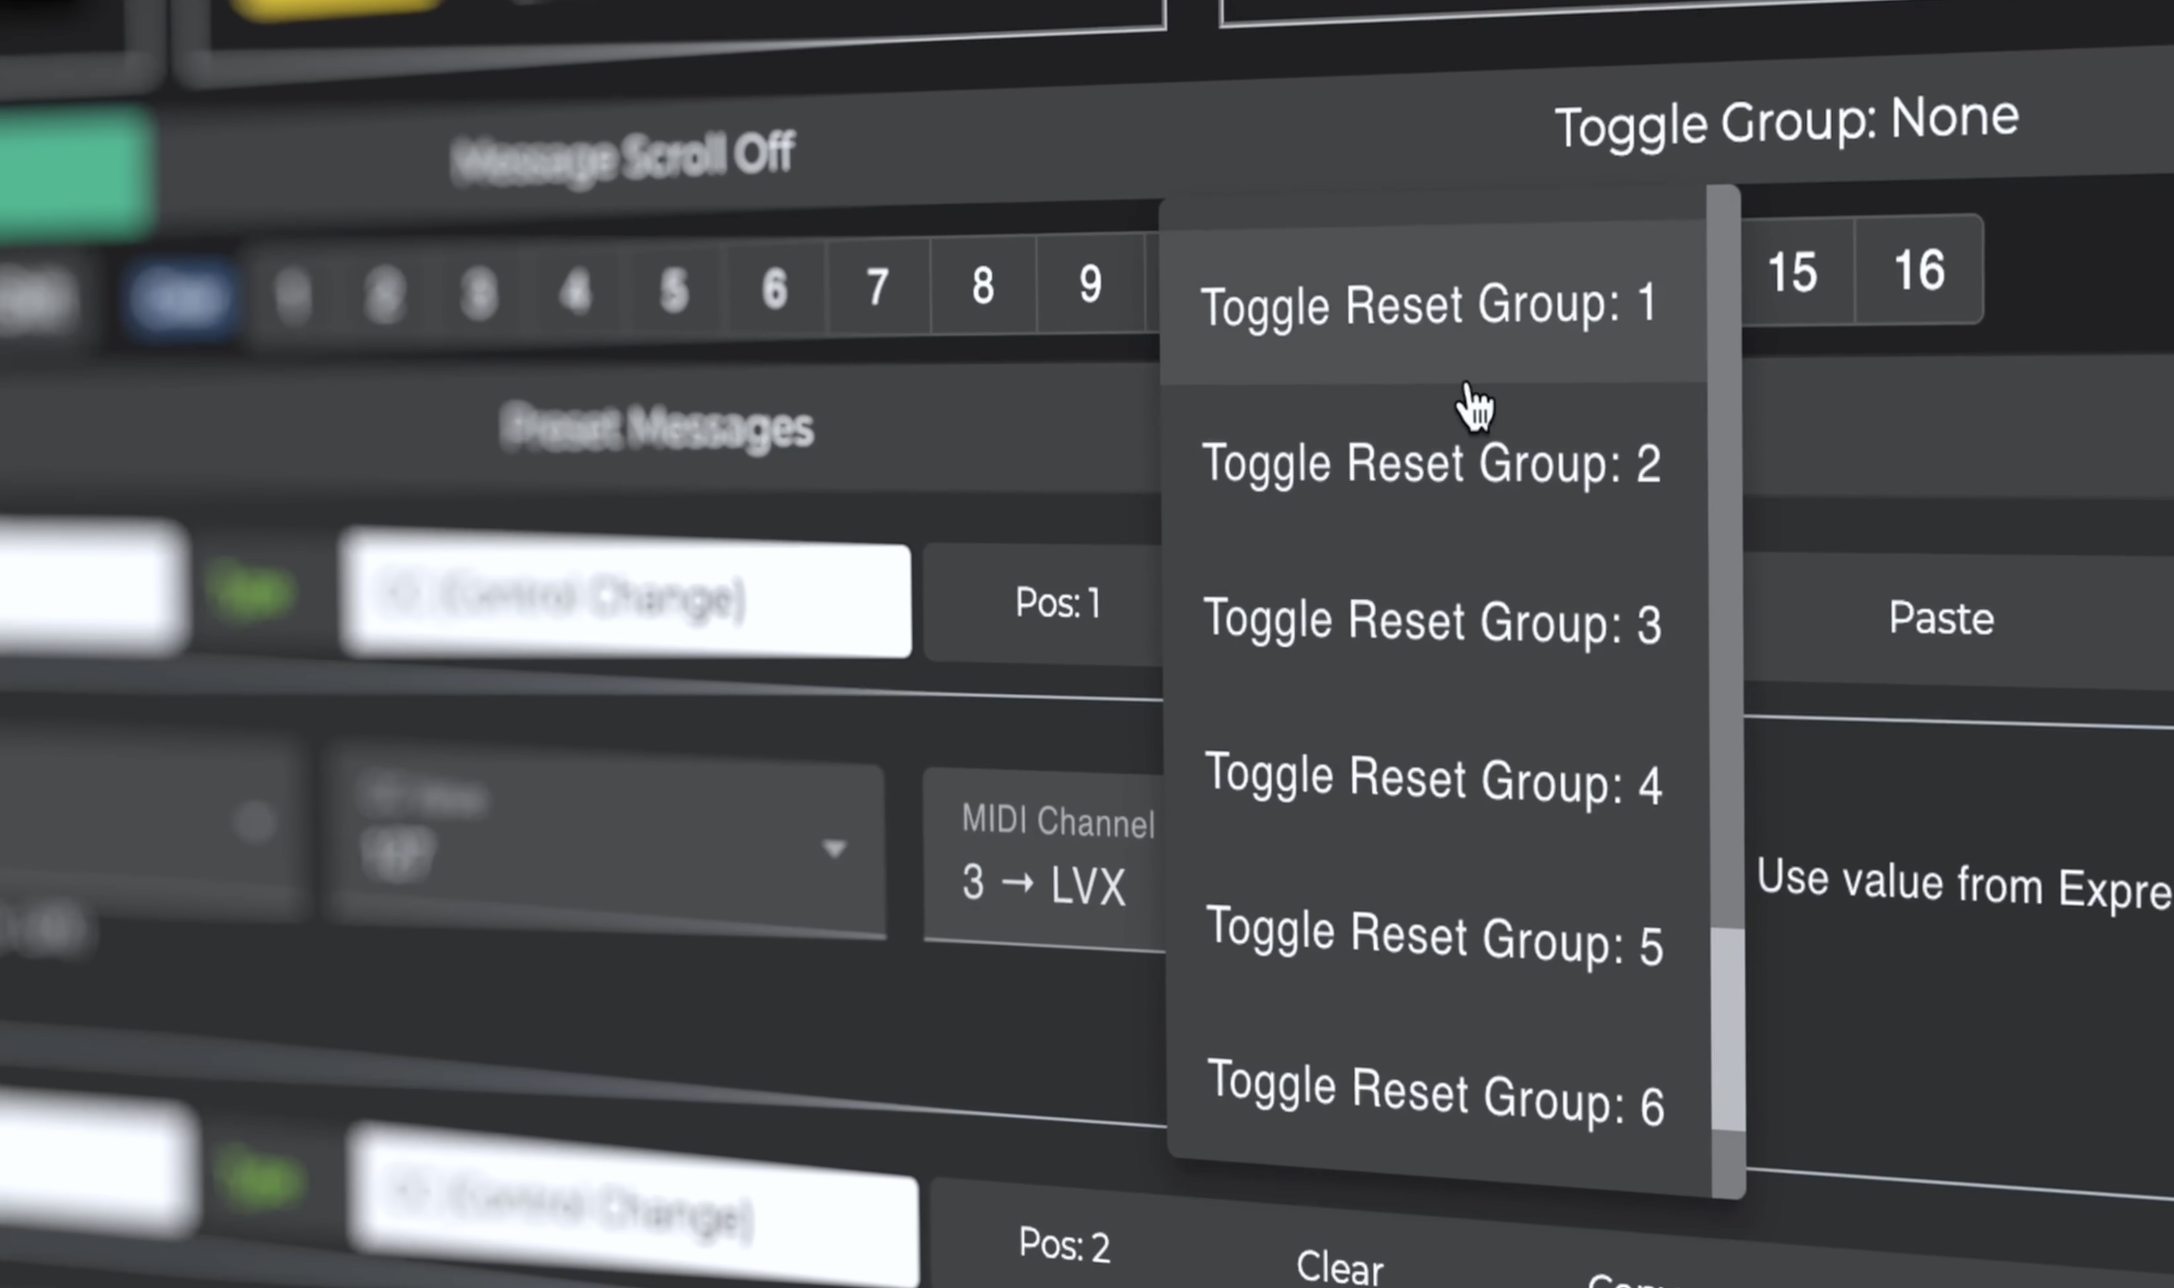
Switches added to the same Toggle Reset group will have their toggle states reset to Position 1 whenever another switch in the same group is pressed.
🎬 Watch Toggle & Toggle Reset Groups Video Tutorial
Set Toggle Message Type
You can also manually program one switch to set the toggle state of other switches with the Set Toggle message type. More information about this can be found in the Message Type List.
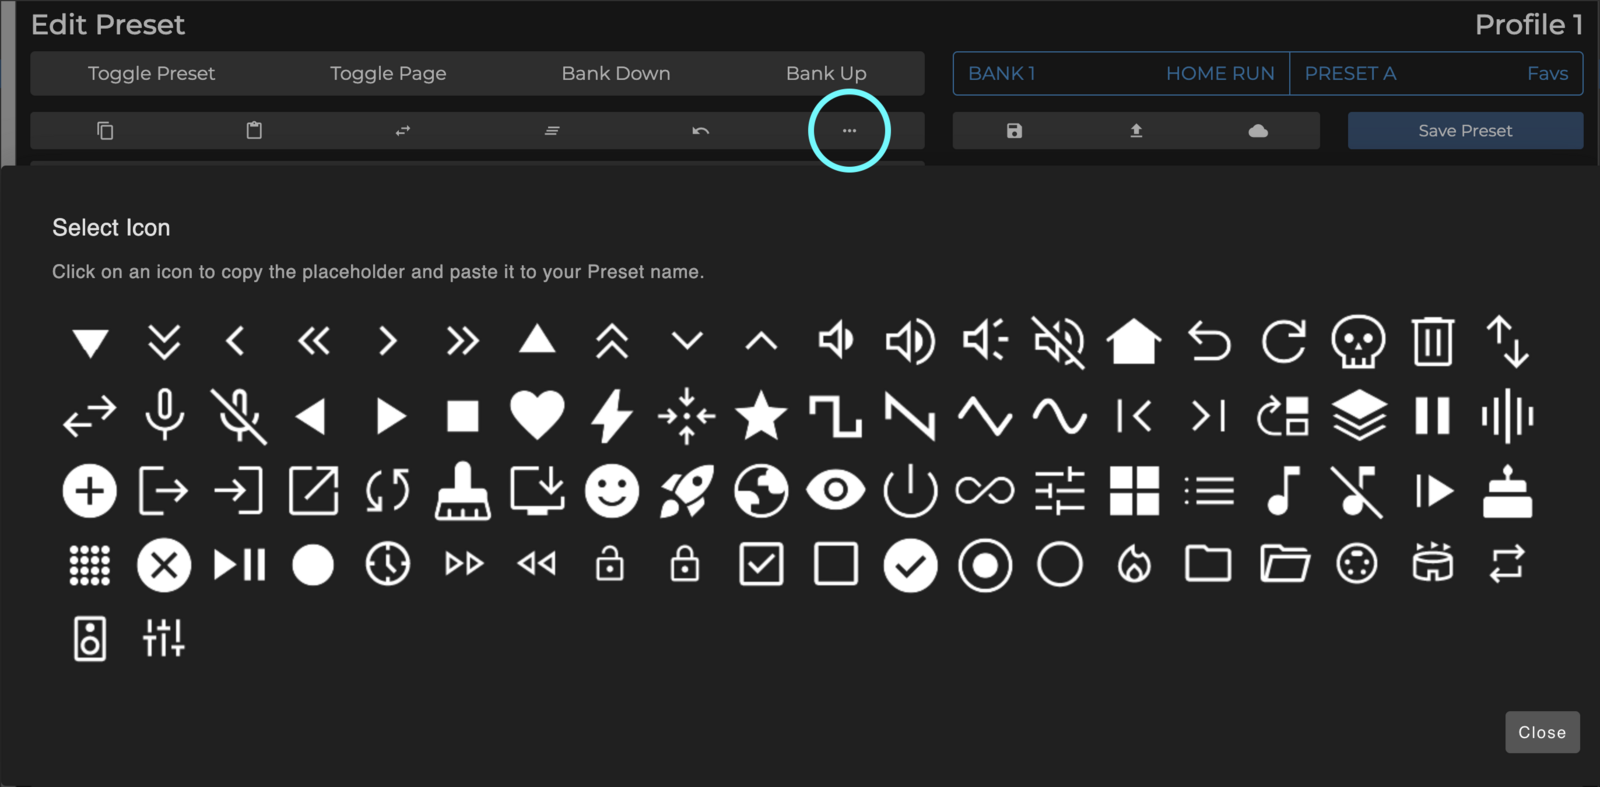
Adding Icons to Names
Icons are a fun and intuitive way to mark your presets, so you know what a switch does, at a glance. For example, you can add transport icons such as Play, Pause, Stop, Forward and Back. From the Edit Preset tab, click on the ' ... ' icon next to the undo button. The icon library will pop up. Clicking on an icon will copy it to clipboard. You can then paste it onto your preset or bank name to add it.
Controlling DAWs and Music Software
All Morningstar MIDI controllers are USB class compliant and are compatible with macOS, iOS, Windows and Android. You can use your controller to control any DAW or music software that accepts MIDI, whether you're on a computer or mobile device. Just program each switch on your controller to send a unique CC message and MIDI map it to your software controls.
🎬 Watch Ableton Control Video Tutorial
As the USB Device port is a high speed USB port, it will not work with the CME WIDI uHost which only accepts full speed USB devices. The WIDI uHost can be used with the USB Host port on the MC6 PRO.
Omniports 1 - 4
Omniports are multi-function ports found on your MIDI controller.
Omniport Functions
Each port can be configured to work as any of the following:
TRS MIDI Output (configurable to send MIDI via the tip or ring to suit most pedals) OR
Expression Pedal Input OR
TRS Aux Switch Input
Omniports cannot be used to control functions like amp switching, sending analog tap tempo or for Control Voltage. Applying power to the Omniports may damage your Morningstar controller. Only connect expression pedals, aux switches and MIDI devices to the Omniports.
TRS MIDI Out
There are 3 TRS MIDI configurations available when using an Omniport as a MIDI output:
MIDI Out - Standard: Send MIDI via the Tip and the Ring is powered
MIDI Out - Tip Active: Send MIDI via the Tip and Ring is unpowered (floating)
MIDI Out - Ring Active: Send MIDI via the Ring and Tip is unpowered (floating)
MIDI Out - Type B: Send MIDI via the Ring and Tip is powered
Connecting to a MIDI device
Before connecting to a MIDI device, make sure that the Ommiport you are using is set to function as a TRS MIDI Output. You can set this in the Controller Settings > Configure Omniports > MIDI Out.
You should only use stereo TRS cables. Mono cables will not work. Omniports are not able to send Sysex (System Exclusive) messages.
Some Chase Bliss Audio models are not compatible with the Omniports, as they require the Tip to be completely left floating.
The solution for this is to:
Make a custom cable with the Tip disconnected, and then use the Ring Active Omniport MIDI Out setting OR
Use a Stereo to Mono adaptor. Connect the Stereo TRS side to the Chase Bliss MIDI Input, and the Mono Ring side to the Omniport, and then send MIDI on Tip Active.
Expression Pedals
Connect an expression pedal to an Omniport for smooth continuous control over MIDI CC values. This allows you to use an expression pedal to control volume, wah, effect mix, decay, feedback and more. You can have smooth continuous control over any MIDI-controllable parameter.
Connecting an Expression Pedal
Before connecting an expression pedal, make sure that the Ommiport you are using is set to accept an expression pedal. You can set this in the Controller Settings > Configure Omniports > Expression.
Expression pedal settings are bank specific. That means, your expression pedals can serve different purposes depending on which bank you are in. You can connect up to 4 expression pedals to the 4 Omniports. Each bank contains 4 expression pedal presets, each corresponding to the expression pedal connected to the respective Omniport. 🎬 Watch Expression Pedal Setup Tutorial
What Type of Expression Pedal to Use
Both TRS and TS expression pedals can be used. However, when calibrating your expression pedal, be sure to select the correct expression pedal read type. Voltage Divider for TRS pedals and Rheostat for TS pedals.
Expression pedals fitted with 10k ohm linear potentiometers give the most accurate and smoothest response, although 10k - 25k ohm linear potentiometers will work fine too.
After connecting an expression pedal, be sure to calibrate it before use. This is to set the correct heel and toe positions relative to CC values 0 and 127, allowing you to use the full sweep of your expression pedal.
Calibrating your Expression Pedal
Enter calibration mode either by pressing E+H to access the System Menu > Edit Expression Preset > Calibrate Expression, or in the Editor under Controller Settings > Configure Omniports > Expression > Calibrate Expression Pedal.
Follow the step-by-step instructions shown on the screen. First, select the correct expression type (Voltage Divider or Rheostat). Then, push your expression pedal into heel down position and press 'Next'. Then, go into toe down position and press 'Next' to complete and save your calibration settings. Once calibration is complete, the controller will automatically optimise its settings to best suit your expression pedal sweep.
Expression Pedal Sensitivity
Expression pedals not using 10k ohm potentiometers may experience jitter in expression pedal readout. If you experience this, go into your Omniport Configuration and adjust Expression Sensitivity to Medium or Low to eliminate the jitters.
External Aux Switches
External aux switches connected to your MIDI controller offer additional control. Aux switches can be set to function as bank-specific programmable switches (like the built-in ones) OR perform fixed global functions such as banking up/down, MIDI clock tap tempo and more.
You'll find the full list of options under Controller Settings > Configure Omniports > TRS Aux Switch. Set Tip, Ring and Tip+Ring to function as you desire.
Connecting Aux Switches
Before connecting an expression pedal, make sure that the Ommiport you are using is set to accept aux switches. You can set this in the Controller Settings > Configure Omniports > TRS Aux Switch.
What Type of Aux Switches to Use
Your MIDI controller requires aux switches that are momentary and normally open. They should be wired according to the schematic below. Tip is connected to the ground via an SPST Footswitch. The Ring is similarly wired too. Another switch can be added to connect both Tip and Ring to ground for a third foot switch. It has to be connected to an Omniport using a stereo TRS cable.
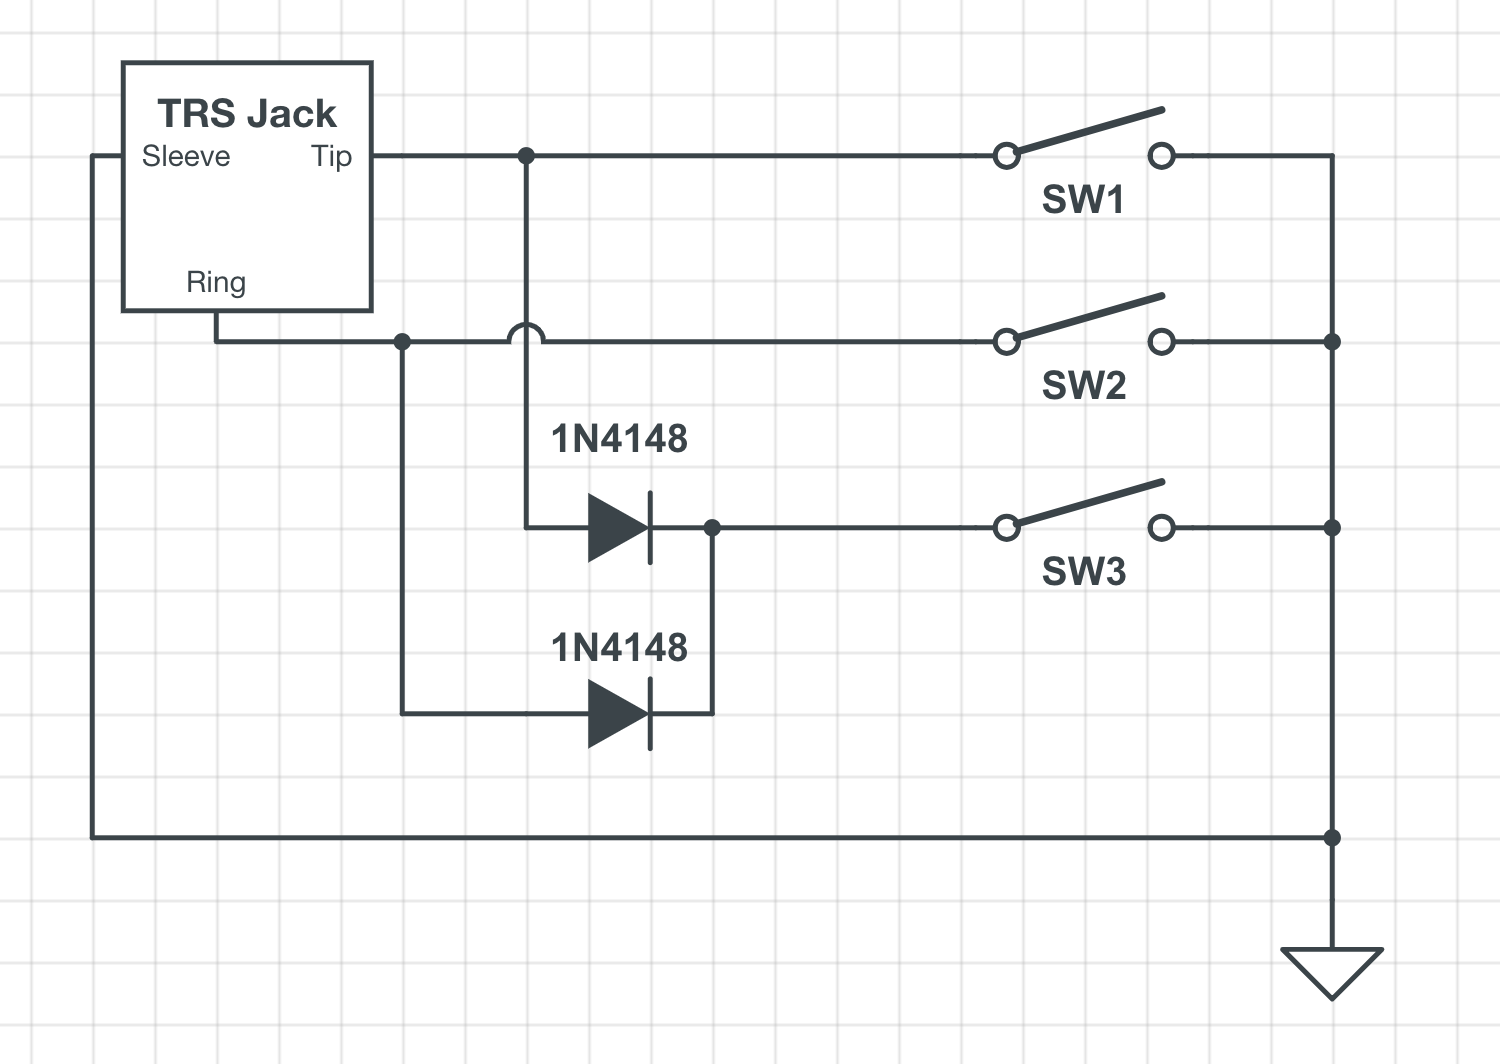
Below are a few builders that offer such switches. Click for link to their products. We are not affiliated with them.
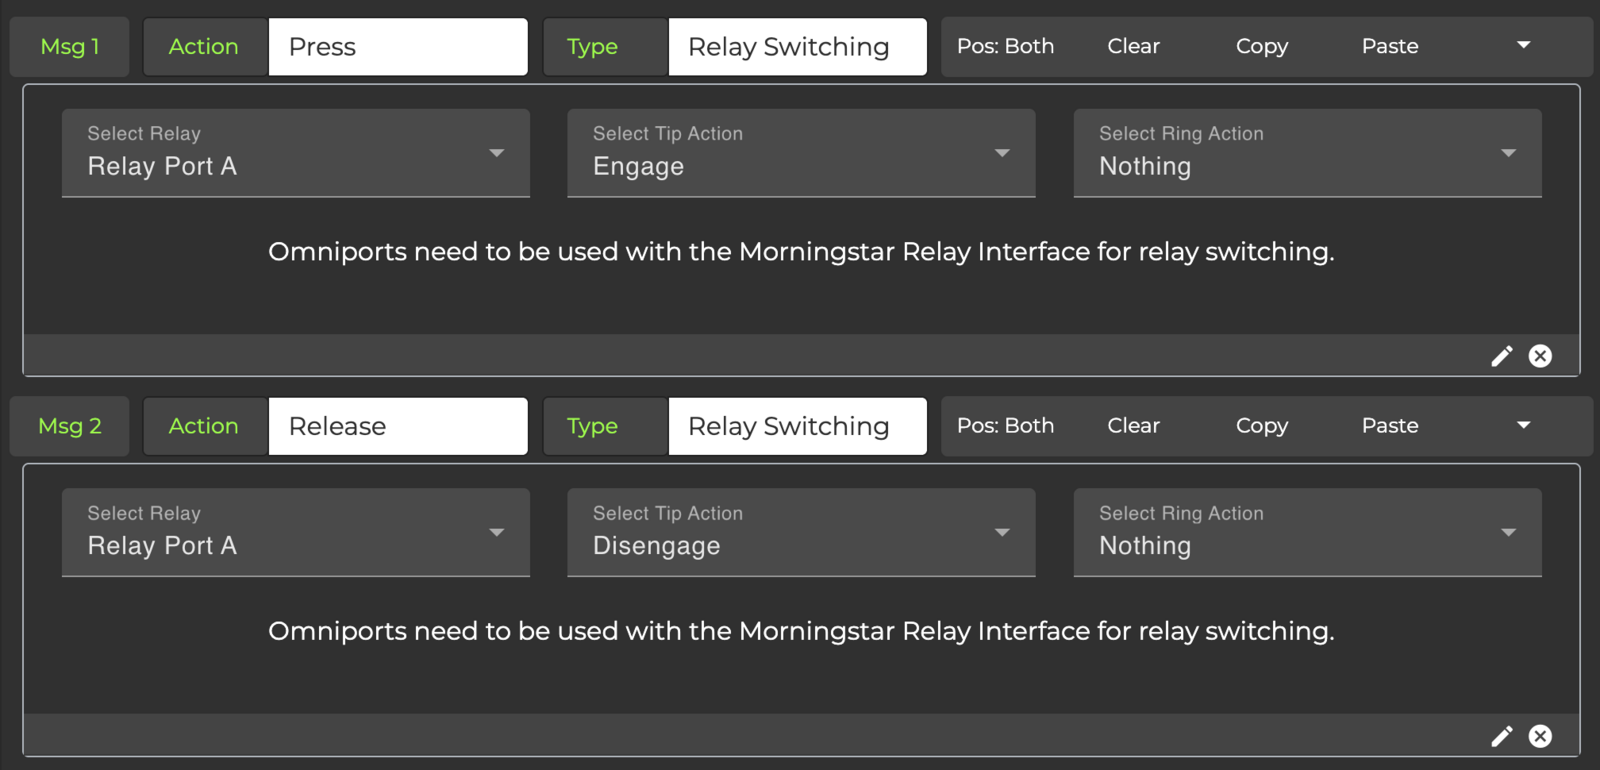
Relay Ports
Control non-MIDI devices such as switching amp channels and effects, analog tap tempo and JHS Red Remote switching. The default state of the Relay Ports can be set in Controller Settings either on the controller itself or through the Editor. You can set the Tip and Ring of each Port to be Normally Open or Normally Closed.
The Relay Ports can be triggered with the Relay Switching message type. In the example below. Pressing the switch engages the Tip of Relay Port A and releasing it disengages it, creating a momentary switch. You can also use Toggle Mode to toggle between engaging and disengaging a Relay. 🎬 Watch Relay Port Tutorial
USB Host Port
The Host port is capable of sending and receiving MIDI. Connect and control up to 4 USB MIDI devices at once. If connecting and powering multiple USB devices via the host port, you will need to use a powered USB hub.
Not all USB Hubs are compatible. Given the vast number of options available, we are unable to know for sure if the hub you have is compatible. Generally, hubs with added functions besides USB, like HDMI or SD Card functionalities, will not work
With a USB Device to the MC6 PRO's USB Host port, the USB Device may draw power from the USB Host port. If so, the MC6 PRO will also require more power from your power supply. Please ensure that you supply adequate power.
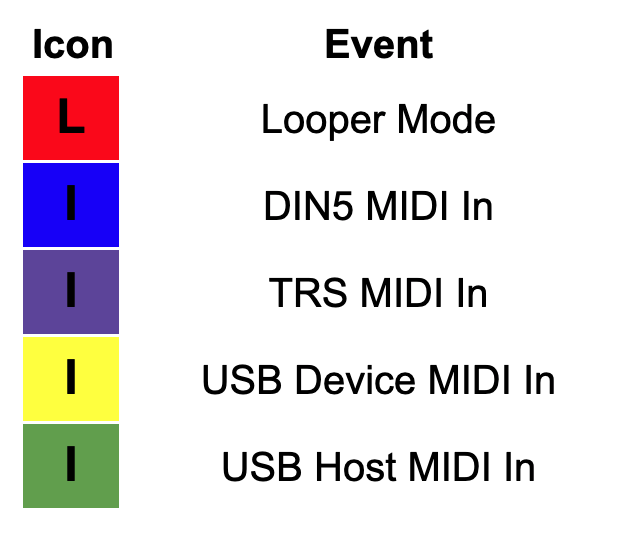
LCD Indicator Icons
The MC6 PRO flashes coloured icons when certain events occur. Please refer below for what each icon means.
MIDI Message Converter
The MIDI Message Convertor allows you to convert incoming MIDI messages to different MIDI messages. The newly converted messages can then be processed internally, or relayed on out through the controllers' MIDI outputs.
Access the MIDI Message Convertor on the Editor. Controller Settings > MIDI Message Convertor.

In the above example, an incoming PC#1 message on MIDI channel 1 is converted to CC#3 with value 127 and will be relayed out through the MIDI outputs via MIDI channel 2. The message is converted at the Output only, and as such the MIDI controller will only process it internally as the original MIDI message and not the converted message. Switch it to 'Convert at Input' if you would like your controller to process the converted message internally.
Dual Switch Press Functions
Dual switch press combinations allow you to control utility functions and access hidden presets beyond the first 16 presets in a bank.
Switch Press | Utility Function |
|---|---|
A + B | Bank Down |
C + D | Bank Up |
E + F | PageDown |
G + H | Page Up |
A + E | Engage Preset J |
B + F | Engage Preset K |
C + G | Engage Preset M |
D + H | Engage Preset N |
MIDI Implementation
The MC6 PRO can be controlled by external MIDI PC and CC messages. Please refer to the charts below for the required messages and their corresponding functions.
PC Messages
Incoming PC messages will change banks on the MC6 PRO.
PC Number | Recall Bank |
|---|---|
0 | 1 |
1 | 2 |
2 | 3 |
... | ... |
127 | 128 |
CC Messages
Incoming CC messages allow you to navigate through the MC6 PRO, engage presets and change preset toggle states.
Function | CC# | Value |
|---|---|---|
Bank Up | 0 | any |
Bank Down | 1 | any |
Set Toggle (All) | 2 | 127 |
Set Toggle (Individual) | 2 | 0 = Preset A . . |
Clear Toggle (All) | 3 | 127 |
Clear Toggle (Individual) | 3 | 0 = Preset A . . . |
Toggle Page | 4 | 0 = Toggle Page |
Engage Preset | 10 = Preset A . . | 0 = Do Nothing |
Set MIDI BPM (MSB 2 bits) | 5 | 0-127 |
Set MIDI BPM (LSB 7 bits) | 6 | 0-127 |
Looper Mode | 7 | 0-127 |
MIDI Clock Tap | 8 | 0-127 |
Jump to last used bank/page | 9 | 127 = Last used Bank. Execute bank presets 1 = Last used Bank/Page. Ignore bank presets |
Control Relay A Tip | 40 | 1 = Tap, Normally Open |
Control Relay A Ring | 41 | “ |
Control Relay B Tip | 42 | “ |
Control Relay B Ring | 43 | “ |
Engage Expression 1 | 51 | 0-127 |
Engage Expression 2 | 52 | 0-127 |
Engage Expression 3 | 53 | 0-127 |
Engage Expression 4 | 54 | 0-127 |
Backing Up Your Controller
You can easily back up controller data to your computer. This great not only for keeping a backup copy of your banks and presets, but also makes upgrading from one Morningstar controller to another so much more convenient. You can backup your controller banks and presets and upload them to a different Morningstar controller model.
To back up your controller, simply click on the Controller Backup tab in the Editor. From there you have the option to back up only the Current Bank or All Banks (including controller settings). If you'd like to share only one bank with someone else, back up the Current Bank. If you'd like to backup your entire controller with its settings, back up All Banks.
Firmware Updates
Back up your entire controller's data to a .json file before performing a firmware update. Updates usually go smoothly, but it's better to be safe than sorry! Back up your controller from the 'Controller Backup' tab in the Editor.
To deliver the best experience and value, we regularly release new updates for our controllers that contain new features, performance improvements and bug fixes.
Here's how to update your controller firmware:
Click on the Firmware Update tab in the Editor. Select the latest firmware version from the dropdown list and click on 'Next'.
You will then be presented with 2 methods for updating.
Method 1 - Select the latest firmware version. Download the .hex firmware file and the Firmware Uploader Software. Install the Firmware Uploaded software and use it to upload the .hex file to your controller via USB.
Method 2 - Select the latest firmware version. Click on 'Upload Firmware to Controller'. Once the firmware has been uploaded, you will be prompted on the MC6 PRO screen to press switch A to perform the update.
Factory Reset
To reset your MC6 PRO to its factory settings, press switches D+F. Scroll to 'Factory Reset' and select 'Reset Current Profile'.
Troubleshooting
Bricked Device
If the MC6 PRO seems like it is bricked and unresponsive (i.e. screens are all white on power up and the firmware updater software does not detect the device), you can use the hard reset button on the right side of the enclosure (beside the 3.5mm MIDI In & Out ports). You will need a sharp object like a pin to press the button.
This will load the bootloader and your device should appear in the firmware updater software. You can then re-upload the firmware file into the MC6 PRO. You can find more information here.
The button loads the bootloader to assist in a firmware update. It does not reset your device or erase your data.
Controller Hanged
It is possible to hang the controller if you program it wrongly and create an infinite loop. To get around this, you can power up the controller in Safe Mode by holding down Switch B while powering up. While in Safe Mode, the controller does not execute any messages and you will then be able to edit the Banks and Presets responsible for the infinite loop.
Miscellaneous Features
Control MC6 PRO with a Keyboard
A computer Keyboard can be connected to the USB Host port to give you enhanced control over your MC6 PRO. Pressing the LEFT, RIGHT, UP and DOWN arrow keys allows you to bank up/down or page up/down.
Each Letter key directly engages the corresponding Preset. For example, double tapping the A key will execute a double tap on Preset A.
SysEx API for External Applications
For more advanced usage, the MC6 PRO can also be controlled via SysEx. You can view the SysEx API here.