
MC3
To download a PDF copy of this manual, print this page and select Save as PDF.
Table of Contents
Introduction
Welcome to your MC3 MIDI Controller. With this, you are able to control any device that accepts MIDI, regardless of brand or model. Each switch on your Morningstar controller can be programmed to perform any function you want.
We pride ourselves on making the easiest-to-use programmable MIDI controllers on the market. If you have any questions that this manual cannot answer, please send us an email at help@morningstarfx.com. We are happy to help.
Power Requirements
You can power your MC3 in any of the following ways.
9V DC (centre negative) Power Supply
Connect a 9VDC centre negative power supply to the power input of the MC3.
The MC3 requires at least 80mA of power at 9VDC.
USB Power
Connect a USB cable from your computer, mobile device, USB adaptor or power bank to the MC3. The MC3 is capable of being powered fully by USB.
Connections

3.5mm TRS MIDI OUT - Ports 1 to 4
The MC3 has four 3.5mm isolated TRS MIDI outputs to send MIDI data to your other devices.
Ports 1 and 2 are fixed and wired according to the standard MIDI configuration (Type A). Each sends MIDI via the Tip with the Ring powered. You can read more about the TRS MIDI standards here if you are interested: https://minimidi.world/.
By using the internal dip switches, Ports 3 and 4 are switchable and can be configured to send MIDI via the Tip or Ring. You can also set each port to have its Ring powered or unpowered, according to what your receiving device needs. This makes the MC3 compatible with all types of TRS MIDI devices regardless of how they are wired.
To access the internal dip switches, remove the backplate of the MC3. You will see the switches configured as follows by default:
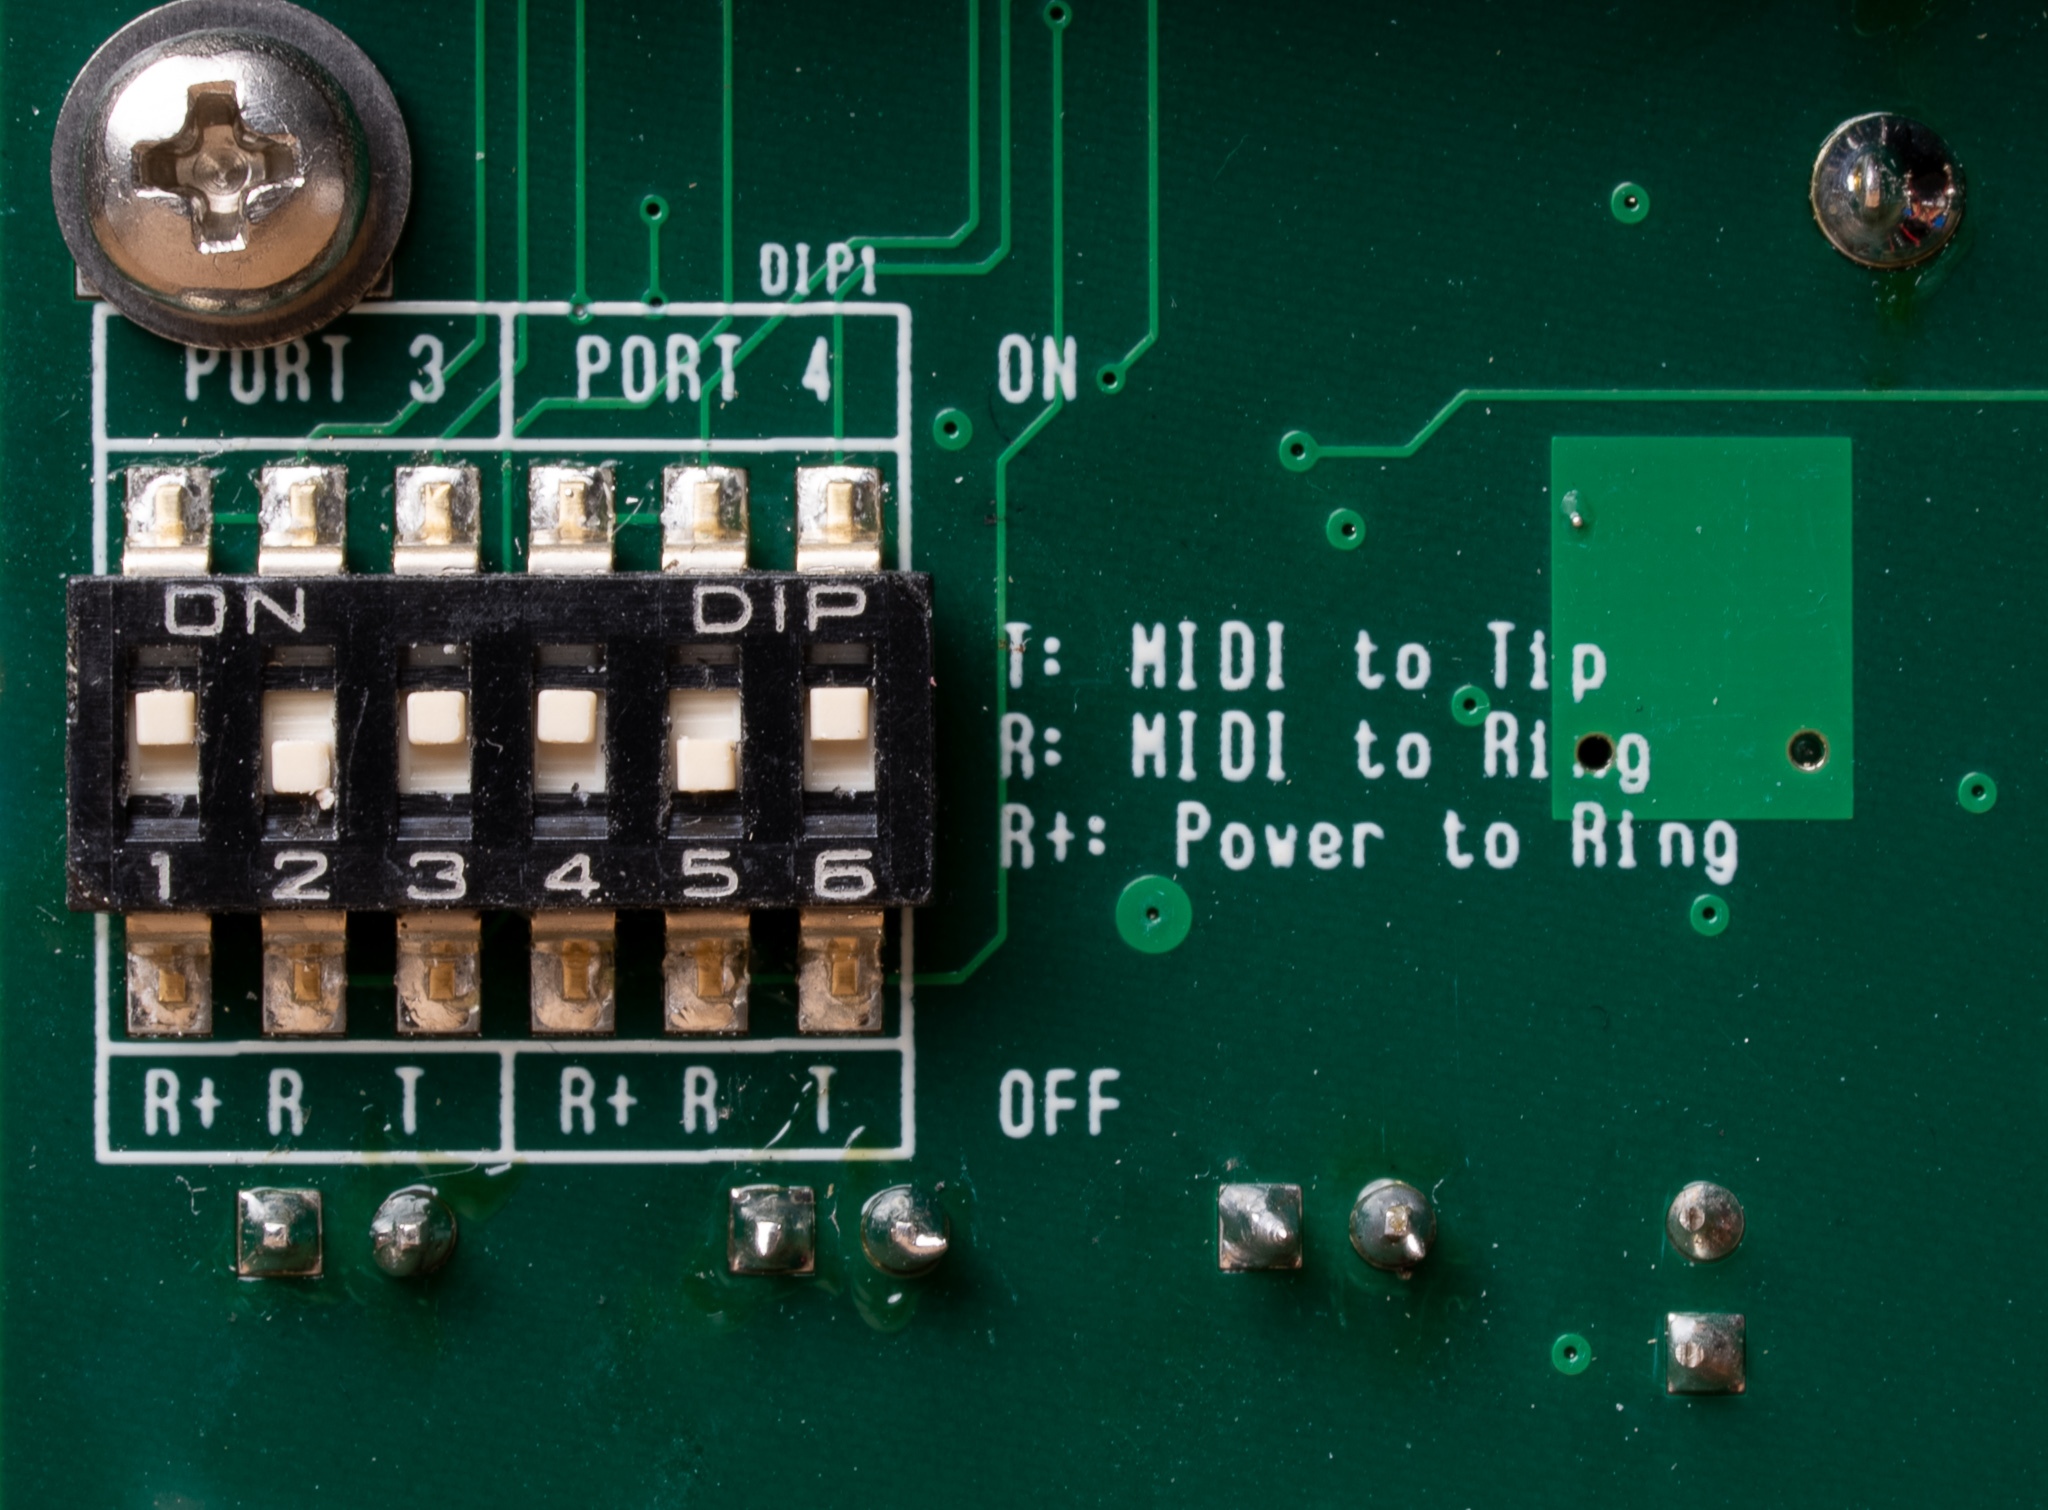
The first three switches on the left affect Port 3 while the three switches on the right affect Port 4.
The switches perform the following functions:
R+ - Ring Power. When switch is in up position, the ring will be powered. When switch is in down position, the ring will be unpowered (floating).
R - Ring Data. When switch is in up position, MIDI data will be sent via the ring. When switch is in down position, no data will be sent via the ring.
T - Tip Data. When switch is in up position, MIDI data will be sent via the tip. When switch is in down position, no data will be sent via the tip.
Pedals that follow the MIDI Standard - Including Strymon, Boss and Jackson
Pedals that comply with the MIDI standard receive MIDI via the Tip and need the Ring powered. So to connect to these pedals, the switches should be in the following positions:
R+ Up
R Down
T Up
Chase Bliss Pedals
Chase Bliss pedals receive MIDI via the Ring and need the Ring should not be powered. So to connect to Chase Bliss pedals, the switches should be in the following positions:
R+ Down
R Up
T Down
Meris / Empress Pedals
Mesris and Empress pedals receive MIDI via the Tip and need the Ring floating (unpowered). So to connect to these pedals, the switches should be in the following positions:
R+ Down
R Down
T Up
EXP 1 - Omniport
Omniports are 1/4 inch multi-function ports found on Morningstar MIDI controllers. The Omniport on the MC3 can be configured to work as any of the following:
TRS MIDI Output (configurable to send via the tip or ring to suit all pedals) or
TRS Expression Pedal Input or
TRS Aux Switch Input (up to 3 switches per port)
The Omniports are not designed to send MIDI Clock messages accurately when a large stream of MIDI messages are being sent (for example, CC messages using the expression pedal). For the best possible use of MIDI clock, connect your MIDI clock capable devices to the DIN5 MIDI OUT port.
You should only use stereo TRS cables. Using Mono cables will cause the device not to work as intended.
Please note that these ports cannot be used to control functions like amp switching, sending analog tap tempo or for Control Voltage. You should only be connecting expression pedals, aux switches and MIDI devices to these ports.
Some Chase Bliss models are not compatible with the Omniports, as they require the Tip to be completely left floating. The solution for this is to
Make a custom cable with the Tip disconnected, and then use the Ring Active Omniport MIDI Out setting.
Use the Stereo to Mono adaptor. Connect the Stereo TRS side to the Chase Bliss MIDI Input, and the Mono Ring side to the Omniport, and then send MIDI on Tip Active.
Applying power to the Omniports may damage your Morningstar controller.
USB
Send and receive MIDI via USB. This allows you to control your DAWs, plugins and other music software. All Morningstar controllers are USB class compliant devices and compatible with Windows, macOS, Android and iOS.
The MC3 can receive MIDI messages (only PC, CC, Note and MIDI Clock) via USB and relay them out through its 5-pin and 1/4 inch MIDI outputs.
The MC3 is a USB device, and the USB B port can only be connected to a USB Host. You cannot connect a USB device to another USB device.
9VDC
Where the MC3 receives 9v DC centre negative power. The MC3 requires at least 80mA of power.
MIDI Out
Where MIDI data is sent from the MC3 to other devices. Use a standard 5-pin MIDI cable.
Navigation
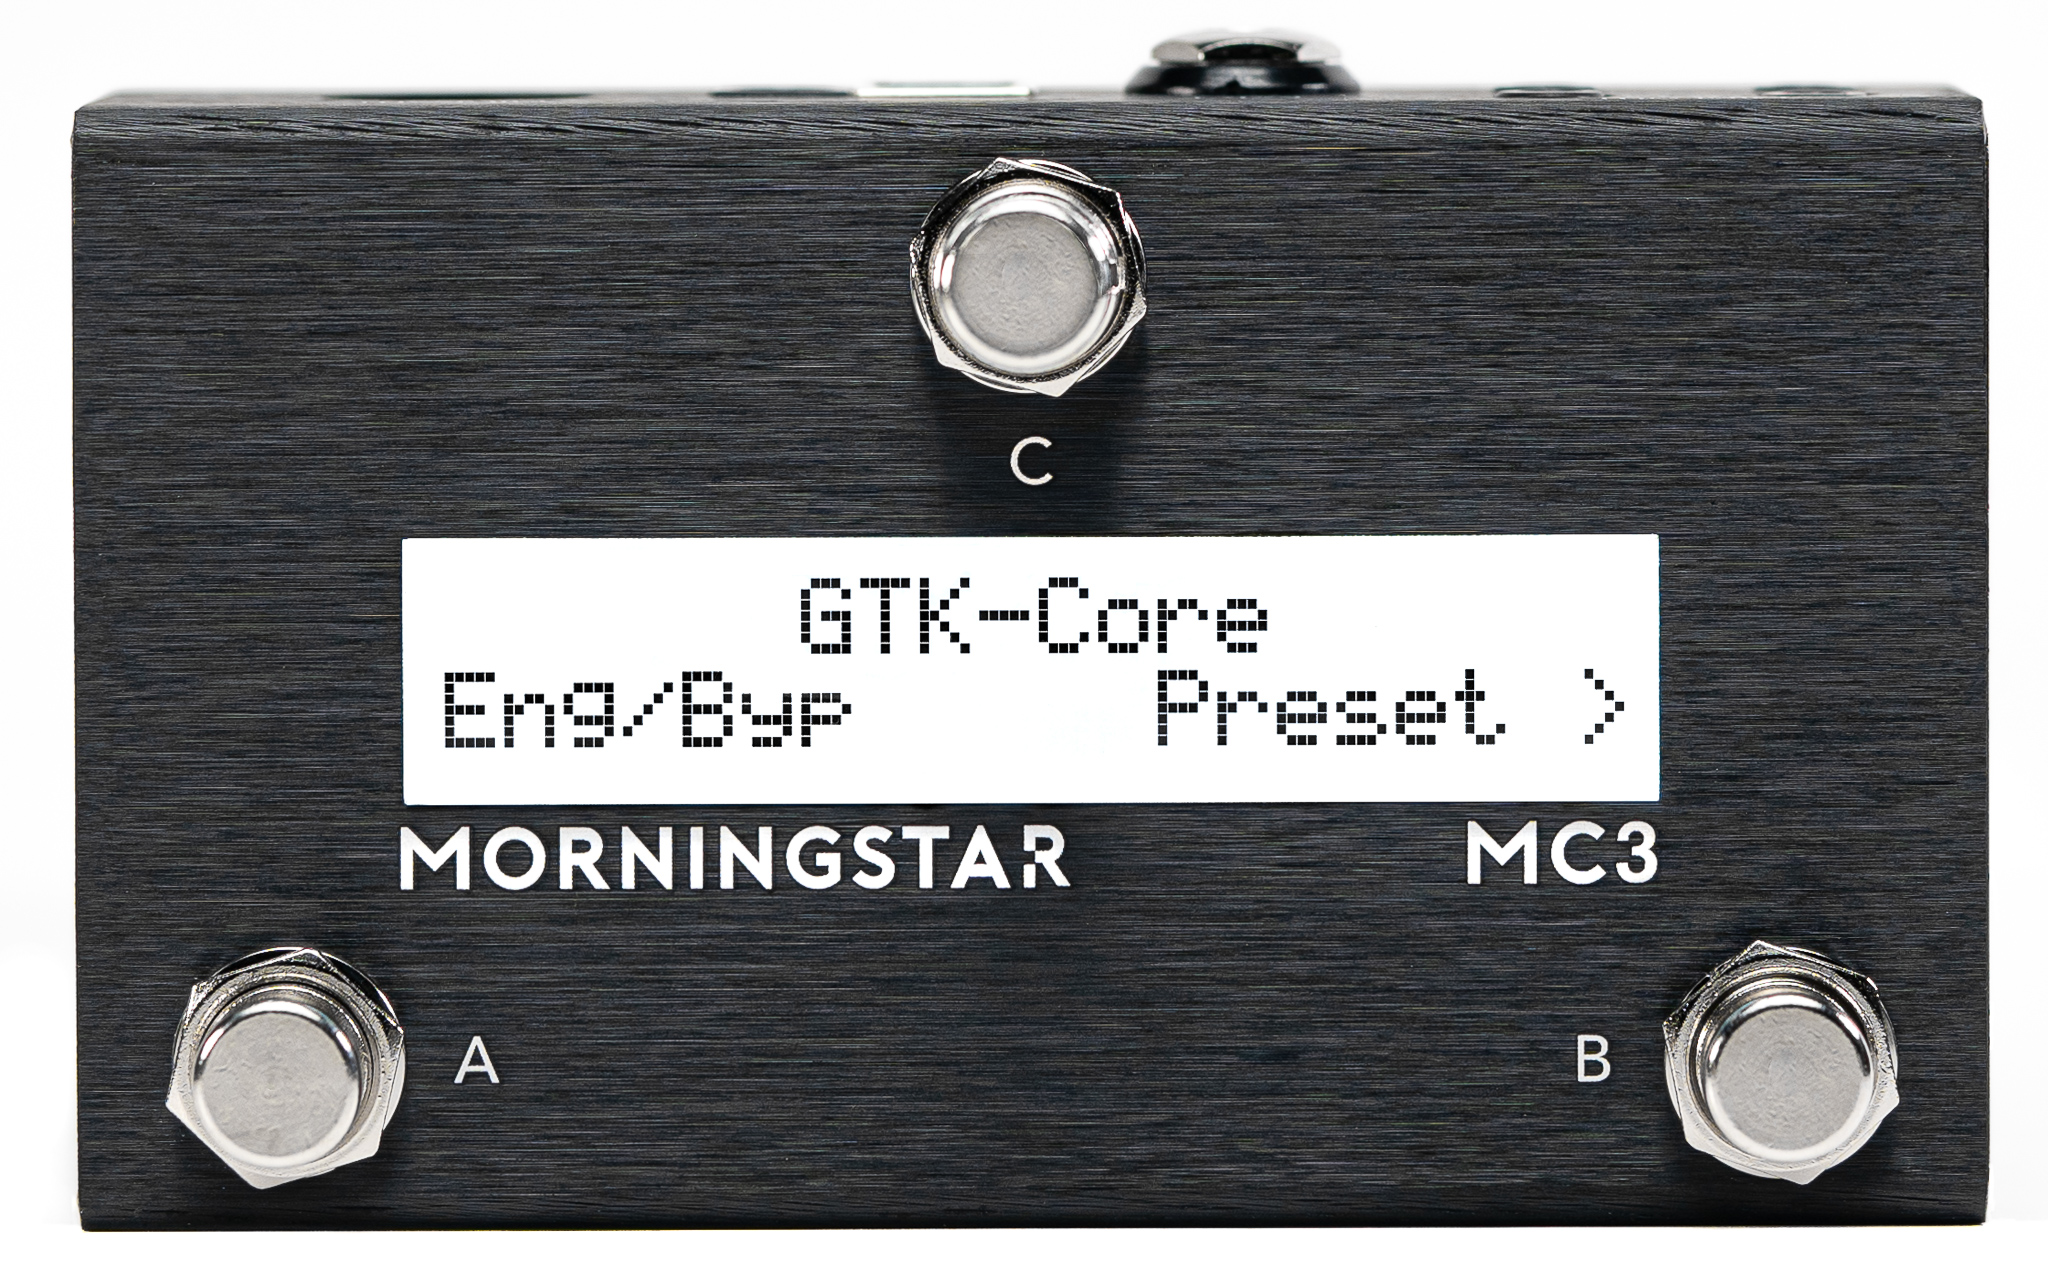
Front Panel
The MC3 has 3 foot switches A, B and C. Each switch corresponds with the text closest to it on the LCD display. Each switch on your Morningstar controller can send any combination of up to 16 different MIDI messages of your choice. By default all switches are EMPTY and not programmed to send any MIDI messages. It’s up to you to decide what you want!
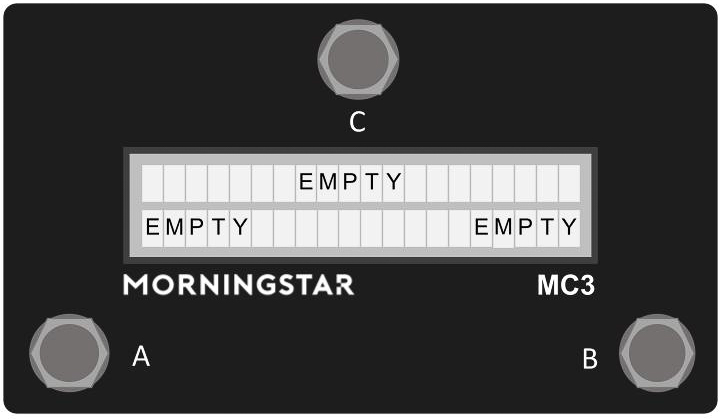
Preset Short Names – The “EMPTY” text you see are the default short names given to unused switches. You can give each switch any name you want, so you always know what it does before you press it.
Banks and Presets
The MC3 has 30 banks, each containing 6 switch presets and 1 expression pedal preset.
To bank up, press switches [C+B]. And to bank down, press [A+C]. Holding down either of these switch combinations will continuously scroll up/down through the banks.
Each bank has 2 pages. The first 3 switch presets (A, B, C) are accessible on page 1 and the next 3 (D, E, F) are accessible on page 2. You can toggle between both pages by pressing switches [A+B] or assigning a Toggle Page function to any of the switches (we recommend using a Double Tap action for that so you can still use that switch for other purposes with a normal Press action.
Presets D, E and F in each bank are also accessible by connecting external aux switches to your MC3. You can learn more about this in the Using External Aux Switches section of this manual.
A preset is any combination of MIDI messages/commands that you program a switch on the MIDI controller to send. Each preset can be programmed to send 16 different messages of your choice. And with 16 different MIDI channels, each preset is capable of controlling up to 16 different MIDI devices at once.
The flow chart below shows you an overview of the MC3 bank and preset architecture.

MIDI Message Types
Morningstar controllers can send virtually any type of MIDI messages you need.
From standard PC (Program Change) and CC (Control Change) messages to Note, SySex, Realtime, Keystroke commands and many more – your Morningstar controller has you covered.
For all the available MIDI message types and descriptions of what they do, please refer to our Message Type List. It gets continually updated as we add more features.
Action Types
You have the ability to send different MIDI messages by performing different actions on a switch. Such as Press, Double Tap, Release or Long Press (and more). This allows you to group MIDI messages by actions so a single switch can perform multiple functions.
For example, you can map a PC#1 message to a Press action, and a PC#2 message to a Release action. When the switch is pressed, a PC#1 message will be sent, and when the switch is released, a PC#2 messages will be sent.
For all the available Action types and their descriptions, please refer to the Action Type List.
Programming Switches
All switches on your Morningstar controller come empty by default. It’s up to you to decide what you want each switch to do. Each switch can send up to 16 different MIDI messages simultaneously. The combination of MIDI messages sent by a switch, makes up a preset.
There are 2 ways you can program your switches. By using the Morningstar Device Editor or programming on the controller itself.
Using the Morningstar Device Editor
🎥 Watch https://youtu.be/NEl0EievXd0 for a demo and tutorial on how to use the Device Editor.
The fastest and easiest way to program your switches is to use the Morningstar Device Editor. This will probably be your most commonly used method, as it gives you a clear visual representation of all your presets, banks and the MIDI messages being sent by each switch.
It also gives you access to many other features such as Preset & Bank Re-ordering, Controller Backup (backup your controller to your computer), MIDI CC Waveform Generators, MIDI Dictionary and much more.
We have a separate Morningstar Editor manual for the Morningstar Device Editor. Please refer to that for more information.
When testing your programmed switches, always make sure to exit Editor Mode by clicking on ‘Disconnect Device’ on the Editor. To ensure a smooth editing experience, some functions such as Bank Jump, Bank Up/Down and Toggle Page are disabled when your device is in Editor Mode.
Programming on the Controller Itself
Editing MIDI Messages
Select which switch to edit
First, press the switch that you want to edit
Then press switches [A+B+C] to enter the editing menu. The switch you last pressed will be displayed in the menu. For eg. If your last pressed switch is switch A, you will see ‘Preset A’ in the menu
Press ‘Preset A’ to program switch A
Edit the messages being sent by this switch
Press ‘EditMsgs’ to edit the MIDI messages you want to send with this switch
Select which message you want to edit
Press [B+C] or [A+B] to scroll through the 16 MIDI messages you can send. By default, all of them are empty until you select a message
Once you’ve scrolled to the message you want to edit, press ‘Next’
Choose what action you want to use to send the message
Press [B+C] or [A+B] to scroll and choose what action (Press, Release, Double Tap, Long Press etc) you want to use to send this MIDI message. For all the available Action types and their descriptions, please refer to the Action Type List
Once you’re done, press ‘Next’
Choose which toggle position you want the message to be in
You only need to be concerned with this setting if you want to use this switch as a toggle switch. If you are not not, leave toggle position at 'Both'.
If Toggle Mode is activated for a particular switch (refer to the Toggle Mode section for how to activate it), messages in Position 1 will be sent with the first press of a switch and messages in Position 2 will be sent upon the second press of a switch. Messages that get sent will alternate between positions 1 and 2 with each press. Messages set to ‘Both' positions will get sent every time a switch is pressed, regardless of toggle position. If Toggle Mode is not activated, only messages in Position 1 or ‘Both’ will be sent.
Press [B+C] or [A+B] to scroll and choose which position you want this MIDI message to be in.
Once you’re done, press ‘Next’.
Choose what type of MIDI message you want
Morningstar controllers can send virtually any type of MIDI messages you need. For all the available MIDI message types and descriptions of what they do, please refer to the Message Type List. It gets continually updated as we add more features.
Press [B+C] or [A+B] to scroll and choose what type of MIDI message you want to send.
Once you’re done, press ‘Next’
Edit your message parameters
Press [B+C] or [A+B] to scroll and set the parameters for your chosen MIDI message type (eg. PC Number, CC Number, CC Value, Note Number, Note Velocity etc.)
Once you’re done, press ‘Next’
Select the MIDI Channel you want to send the message on
Press [B+C] or [A+B] to choose what MIDI channel you want to send this message on. It should be sent via the same channel that your receiving device is set to.
Once you’re done, press ‘Save’
Naming your Switches
While naming your switches on the controller itself is possible, we recommend using the Device Editor instead. If you wish to name your switches on the controller itself, do the following:
Select which switch to edit
First, press the switch that you want to edit
Then press switches [A+B+C] to enter the editing menu. The switch you last pressed will be displayed in the menu. For eg. If your last pressed switch is switch A, you will see ‘Preset A’ in the menu
Press ‘Preset A’ to name switch A
Press [NextPg] until you see ‘ShortName’
Then press ‘ShortName’ to edit your Switch’s short name or
continue scrolling to ‘ToggleName’ to edit your Switch’s short name in toggle position 2 or
continue scrolling to ’FullName' to edit your Switch’s long Name
Input your desired name
Use the Left and Right switches to move through the name’s characters
Press switch A to scroll Up and [A+B] to scroll down to select your desired character
Save the name
Press [C+B] to save and exit or
Press [A+B] to exit without saving
Toggle Mode
Toggle Mode allows each switch on your Morningstar MIDI controller to send different MIDI messages with each alternate press. This allows you to control your pedals and devices in useful and creative ways.
🎥 Watch https://youtu.be/VEr0TB58EgA for a demo and tutorial on how to use Toggle Mode
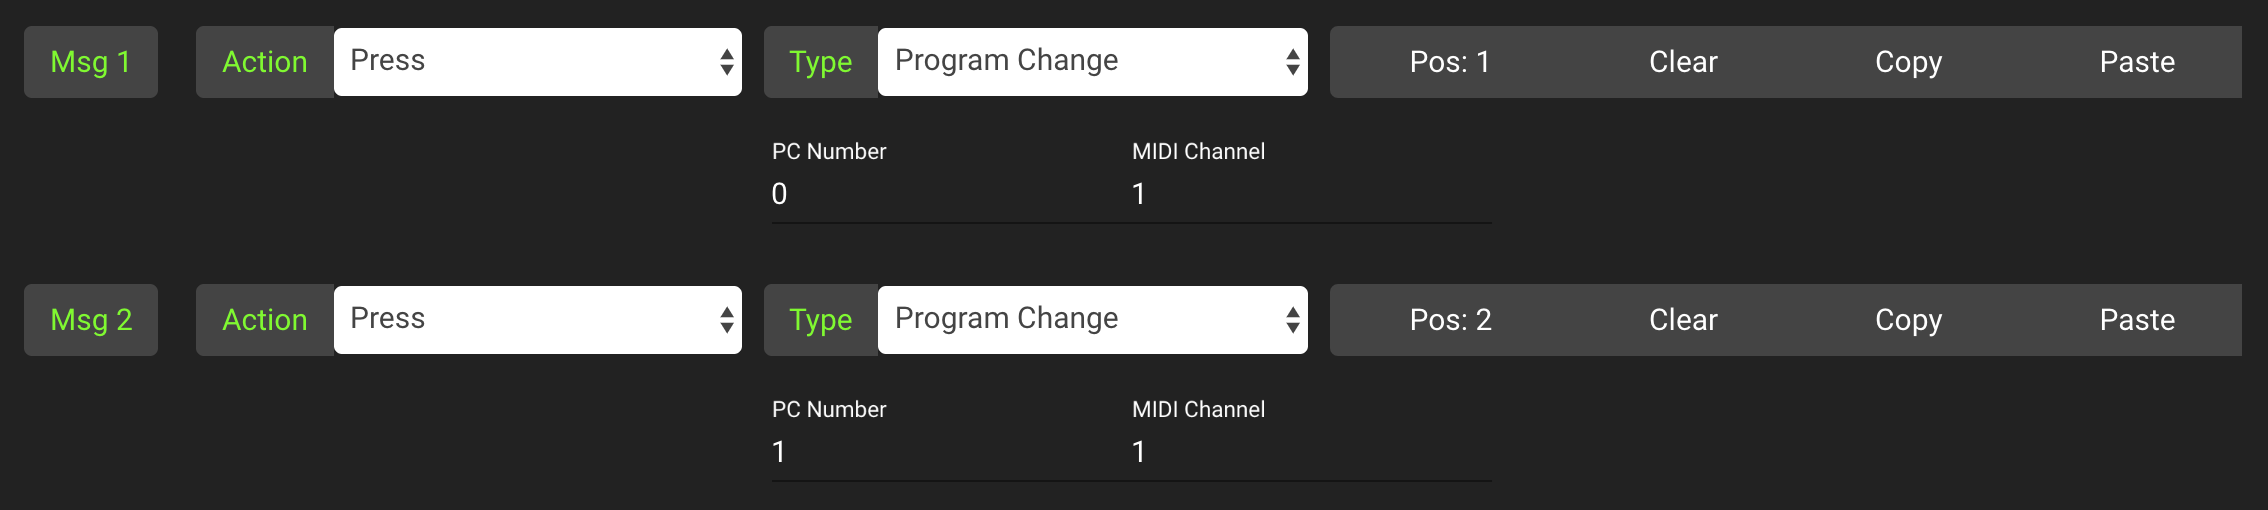
Toggle Mode lets you separate your MIDI messages into 2 different groups – Position 1 and Position 2.
Messages in Position 1 will be sent the first time you press the switch, and messages in position 2 will be sent the second time you press the switch. With each press you will alternate between sending messages in Position 1 and Position 2.
Using the Device Editor
On the top left of the Device Editor interface, there is a button labelled Toggle Mode On/Off (just below the Short name field). Switch it on to enable Toggle Mode.
Each message on the Editor also has a Position setting – Pos 1, Pos 2 or Both.
When Pos 1 is selected, the message will only be sent when the preset is in toggle position 1. When Pos 2 is selected, the message will only be sent when the preset is in toggle position 2. When set to Both, the message will be sent regardless of which toggle position the preset is in.
In the example below, we have programmed Msg1 to be a PC message (PC#0) in Pos 1, and Msg2 to be a PC Message (PC#1) in Pos 2. With each alternate press, PC#0 and PC#1 will be sent.
If you have not enabled Toggle Mode for a particular switch, leave toggle position at 'Both' for all MIDI messages.
Toggle Name
The Toggle Name is the switch name shown when a preset is in toggle position 2.
With each alternate press, the Short Name and Toggle Name will be displayed.
Name Blink
To show that a preset is in position 2, you can also make a switch name blink. if the Blink option is enabled, the Toggle Name will blink when the preset is in position 2.
Enabling Toggle Mode on the Controller Itself
Press [A+B+C] > Select Preset > Press [NextPg] till you see ‘ToggleMde' > Press 'ToggleMde’ to enable or disable Toggle Mode for this switch
When editing individual messages, there will be an option to select the toggle position for the message you are editing. Choose Position 1, 2 or Both.
Bank Settings
Pressing switches [A+B+C] will also allow you to edit the current bank’s settings.
Press [NextPage] until you see the bank number (eg. if you are in bank 1 you will see ‘Bank 1’). Press ‘Bank X’ to enter the Bank Settings Menu.
In the Bank Settings Menu, you have the following options:
[BankName] - Bank Name
Name your bank.
[ClearTgl] - Clear Toggles
When enabled, this feature will reset the toggle positions of all other presets within the bank to position 1. This is useful when you want only the last engaged preset to blink.
[Copy] - Copy Bank
Copy the entire current bank
[Paste] - Paste Bank
Paste the last copied bank to the current bank. This will overwrite the current bank.
[Swap] - Swap Bank
Swap the current bank with your last copied bank.
[EditMsgs] - Edit Messages
Edit your Bank Preset messages. Refer to the Bank Presets section for more information.
Bank Presets
🎥 Watch https://youtu.be/q_X75WNI02c for a demo and tutorial on using Bank Presets.
Bank Presets allow you to send up to 16 MIDI messages upon entering or exiting a particular bank. You can program your Bank Presets under the Edit Bank tab on the Morningstar Device Editor or on your controller itself.
If you select the ‘On Enter’ event for a particular MIDI message, it will be sent when you enter that particular bank. If you select ‘On Exit’, the MIDI message will be sent when you exit that particular bank.
Some useful applications would be for you to engage a preset the moment you enter a bank, or automatically put your controller into Looper Mode when you enter a bank for looper control.
Expression Pedals
🎥 Watch https://youtu.be/-TNTkqh-gEE for a demo and tutorial on how to use an expression pedal with MIDI.
Connecting an Expression Pedal
Before using an expression pedal, check to make sure that the Omniport you are using is set to accept an expression pedal.
Press [A+B+C] > Global Config > ExprInput > Press switch C until you see ExprnPdl > Save and Exit.
The MC3 works only with TRS expression pedals. Expression pedals fitted with 10k ohm linear potentiometers give the most accurate and smoothest response, though 10k - 25k ohm linear potentiometers will work too. The potentiometer wiper should be connected to the Tip of the stereo cable, while the Ring and Sleeve should be connected to the outer lugs on the potentiometer.
Calibrating your Expression Pedal
When connecting a new Expression pedal, be sure to calibrate it first.
Press [A+B+C] > Expression 1 > Calibrte
Follow the instructions shown. First, put your expression pedal into heel down position. Ideally, the value 0 should be displayed. Press ‘Next’. Then, put your expression pedal into toe down position. Ideally, the value 127 should be displayed. Press ‘Save’ to save your settings. Do not worry if you are unable get values of 0 and 127 for each position. Once calibration is complete, the MC3 will automatically optimize settings to suit your expression pedal.
Expression Pedal Sensitivity
Expression pedals not using 10k ohm potentiometers can cause jitters in the expression pedal readings. If you are experiencing this, you can lower the sensitivity of your expression pedal to eliminate the jitters.
Press [A+B+C] > Expression 1 > Sensitivity
Expression Pedal Name
You can also name your expression preset so that its name is displayed up when you move the expression pedal. You can name your expression presets using the Device Editor or on the MC3 itself
Press [A+B+C] > Expression 1 > FullName
The MC3 works with an expression pedal with a Linear potentiometer only. Logarithmic potentiometers will not work well.
Programming an Expression Pedal Preset
Programming using the Device Editor
First move the expression pedal that you want to use (it will show up on the Editor screen) or select it from the Preset dropdown list. You can then use the Editor to program the messages you want your expression pedal to send. Refer to this video for an in-depth tutorial: https://youtu.be/-TNTkqh-gEE
Programming on the Controller Itself
Move your expression pedal > Press [A+B+C] > Press [NextPage] > Expression 1 > EditMsg
Proceed to edit your expression pedal just like you would with your switch presets as explained before.
Select Expression Messages to Send or Omit
The Select Expression Message message type allows you to decide which expression messages you want to send or omit. You can use your MC3 foot switches to do this on the fly. Refer to this video for an in-depth tutorial: https://youtu.be/m6rMVbxCoa4
Disable Expression Pedal Readout
You can stop the expression preset name and percentage from showing when you move your expression pedal. Type "#" as the first character of your expression preset name to do so.
External Aux Switches
🎥 Watch https://youtu.be/IYEjrzsaSbc for a demo and tutorial on how to add aux switches to your controller.
Connect external aux switches for extra control. Under your Global Config settings, you can configure to behave as fully programmable switches or Fixed Switches to control banking up/down and page toggle.
Press [A+B+C] > Global Config > ExprInput > Press switch C and choose either Aux Switch or Fixed Switch > Save and Exit.
TRS Aux Switch - Your Aux switches will function as fully programmable switches, just like the built-in switches (sans the LCD display). You can map any of the MC8 presets to your desired aux switches.
You can also set your Aux switches to function as bank up, bank down, toggle page and MIDI Clock switches and more.
Using external aux switches will give you direct access to the presets on the second page of each MC3 bank without having to toggle page.
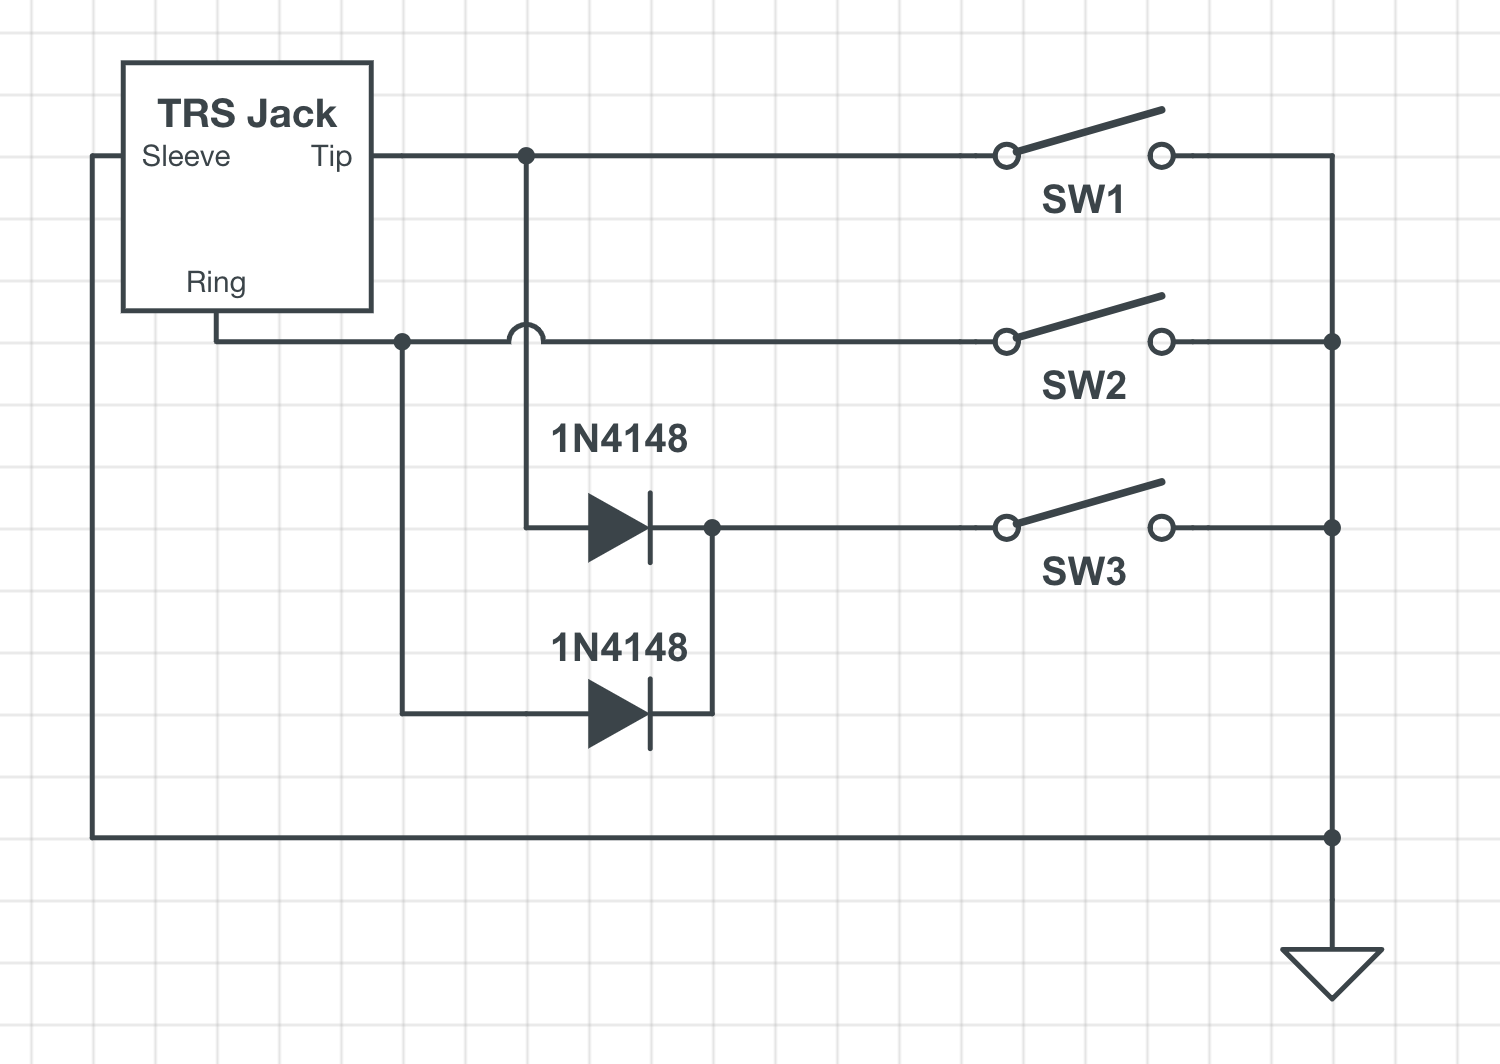
The MC3 requires aux switches that are wired like in the schematic below. It has to be connected to the device with a stereo cable, where the Tip is connected to the ground via a SPST Footswitch, and similar to the Ring as well. Another switch can be added to connect both Tip and Ring to ground to engage an additional preset/setting. Please refer to the schematic below.
Below are a few builders that offer such switches.
Click for link to products. We are not affiliated with them.
The foots witches need to be Momentary and Normally Open
If you would like to build one yourself, you can refer to the following schematic:
TRS MIDI Outputs (1/4 Inch)
Switchable TRS MIDI Configuration
The Exp 1 port (Omniport) on the MC3 can also be set to send MIDI via TRS. The TRS configuration can be adjusted via the menus on the device itself or by using the Device Editor.
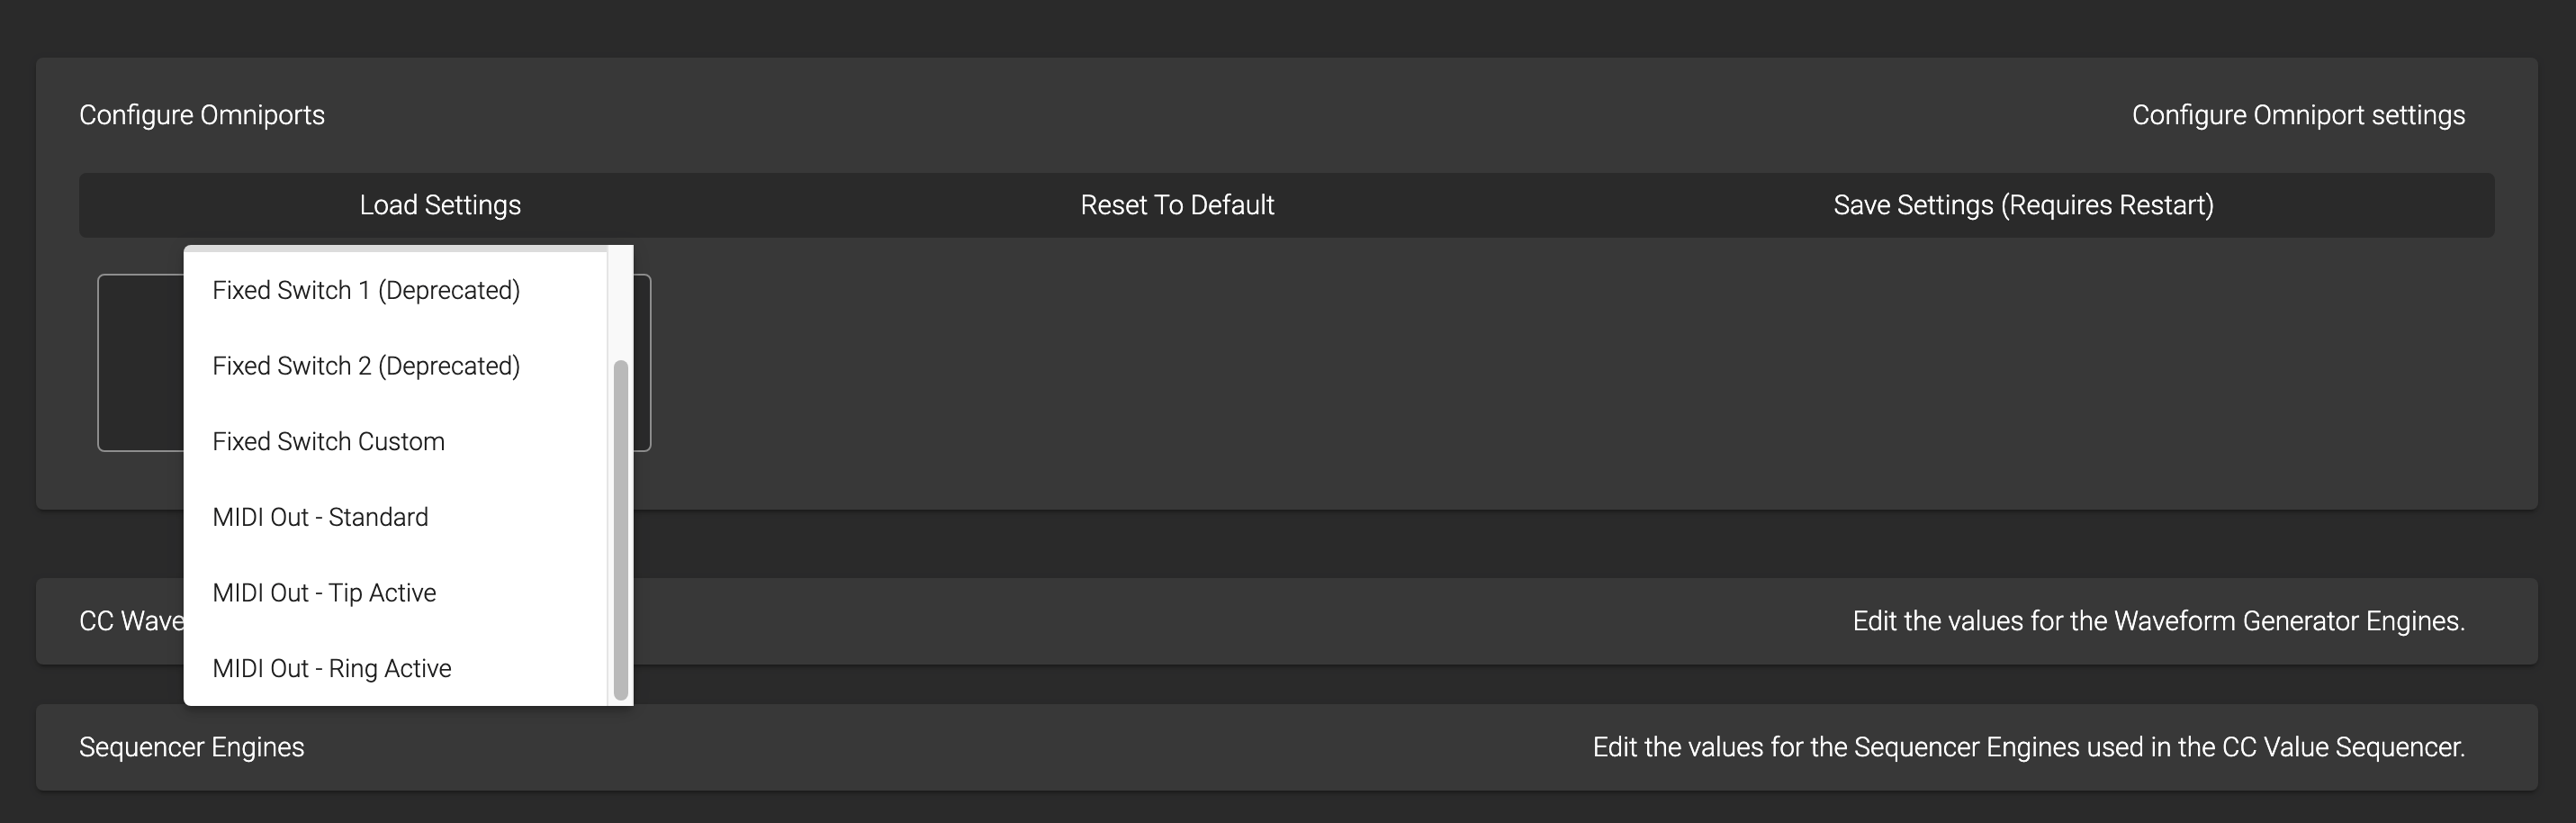
There are 3 TRS MIDI configurations available:
MIDI Out - Standard : Send MIDI via the Tip and the Ring is powered
MIDI Out - Tip Active : Send MIDI via the Tip and Ring is unpowered (floating)
MIDI Out - Ring Active: Send MIDI via the Ring and Tip is unpowered (floating)
MIDI Out - Type B: Send MIDI via the Ring and Tip is powered
The Omniports do not send System Exclusive messages
Copy, Paste and Swap Presets
You can copy, paste and swap presets on your MC3. These options are available on the device itself (Press the switch you want to copy, Press [A+B+C] > Preset > CopyPst, PastePst, SwapPst) and on the Morningstar Editor.
After you have copied your desired preset:
Press the switch you want overwrite or swap your copied preset with (it can be from any bank)
Press [A+B+C] > Preset > PastePst, SwapPst
Paste - Will overwrite the current preset with your copied preset.
Swap - Will cause your copied preset and current preset to exchange positions.
Dual Switch Press Functions
Dual switch press combinations allow you to control certain utility functions and access hidden presets beyond the first 16 presets.
Utility Function | Switches |
|---|---|
Bank Down | A+C |
Bank Up | B+C |
Toggle Page | A+B |
Enter Editing Menu | A+B+C |
Global Settings
To access the Global Settings Menu, press switches [A+B+C] and then press [NextPg] till you see Global Config. Select that by pressing C. The following options will be displayed and you can use the NextPage button to scroll through more settings options.
[ExprInput] - OmniPort Settings
Set what your Exp 1 port (Omniport) functions as – MIDI Output, Expression Pedal Input or Aux Switch Input. For more information, please refer to the Omniports section of this manual.
[SwitchSens] - Switch Sensitivity
Set switch sensitivity. Choose from 1 (least sensitive) to 5 (most sensitive). Pressing switches [B+C] will select level 3 sensitivity. Higher sensitivity means less delay between the time when a switch is pressed and when MIDI messages are sent out.
By default, sensitivity is set to level 3 and should be comfortable for most users. Depending on personal preference, you may adjust sensitivity to help you bank up/down (by stepping on 2 switches at once) more accurately.
[Factory Reset] - Reset to factory settings
To perform a factory reset, hold down for 2 seconds. The display will show that it is performing a factory reset.
All user presets will be erased and all settings will be reset to factory default.
[MidiClockPersist] - Persistent MIDI Clock
Turn persistent MIDI clock ON or OFF. If persistent MIDI clock is ON, MIDI Clock data will continue to be sent even when you press another switch, change banks or move your expression pedal. If persistent MIDI clock is OFF, MIDI clock data will cease to be sent when an event (like a switch press or expression pedal move) is triggered.
[BankDispTime] - Bank Display Time
Set the length of time your bank name and number will be displayed whenever you change banks. The unit of measurement is in milliseconds.
[BankChgDelay] - Bank Change Delay
Adjust the time it takes to load the next bank when the bank is changed. The unit of measurement is in milliseconds.
[DualSwitchLock] - Dual Switch Press Lock
When turned on, dual switch press functions like bank up/down and toggle page will be disabled.
[LcdAlign] - Align Switch Names
When turned on, your switch’s short name will be auto-aligned, depending on its position on the LCD. For example, switch A’s name will aligned to the left, while switch D’s name will be aligned to the right.
[MidiChannel] - MIDI Channel
Set the MIDI receive channel for the MC3. The MC3 can receive and respond to MIDI messages from other MIDI controllers. Press Up or Down to select your desired MIDI receive channel.
Press Save to set the channel before exiting.
[MidiChnlName] - MIDI Channel Names
Name each of your MIDI channels so you know which device each MIDI channel controls.
[RmbrTogg] - Remember Preset Toggle States Across Banks
Determine whether preset toggle states are remembered across banks even after you have changed banks. If ON, your presets will remain in their last used toggle state even as you scroll through banks. If OFF, your preset toggle states will reset once you exit a bank.
[LongPrsTm] - Long Press Time
Determine the amount of time (in milliseconds) you need to hold down a switch to trigger a Long Press action.
[ResetBankPresets] - Reset Bank Presets
This resets all the Bank Presets to be empty.
[CrossMidiThru] - Cross MIDI Thru
Enable or disable the passing through of MIDI messages received from the USB port out through all MIDI outputs.
Not all MIDI message types are supported for Cross MIDI Thru. The supported MIDI message types are PC, CC, Note, MIDI Clock, Pitch Change and After Touch.
[IgnoreMidiClk] - Ignore Incoming MIDI Clock
If ON, incoming MIDI clock will be blocked and not passed through. If OFF, incoming MIDI clock received from the USB port will be passed through to the MIDI outputs.
[CstmBankArrangement] - Bank Arrangement
Your banks can be re-arranged in this menu. More info here.
MIDI Send Delay
The amount of delay in milliseconds between each MIDI message sent. Ideally, this should be set to 0. Some MIDI devices cannot process incoming MIDI messages so quickly and might skip some messages. If this happens, a longer delay should be used, if required.
Useful Concepts and Features
There are many special functions and features on the controller to help you achieve your desired workflow. We have documented these concepts and features under How-to Articles
Preset Message Scroll (scroll through messages within a preset)
Toggle Switch Mode (send different MIDI messages with each alternate press)
Using a Bluetooth MIDI adaptor to connect with the Editor (CME WIDI)
Bank Presets (send MIDI messages upon entering or exiting a bank)
Update Firmware
We regularly update our controllers' firmware to introduce new features, improve performance and fix bugs.
🎥 Watch video tutorial https://youtu.be/wtvX8Y9LzXo
How to Update your Firmware
To update your Morningstar controller firmware, you first need to download the Morningstar Firmware Updater from the Morningstar website in the ‘Downloads’ section. Both Mac OS and Windows versions are available. Just download the correct version for your operating system. Download the Firmware Uploader here.
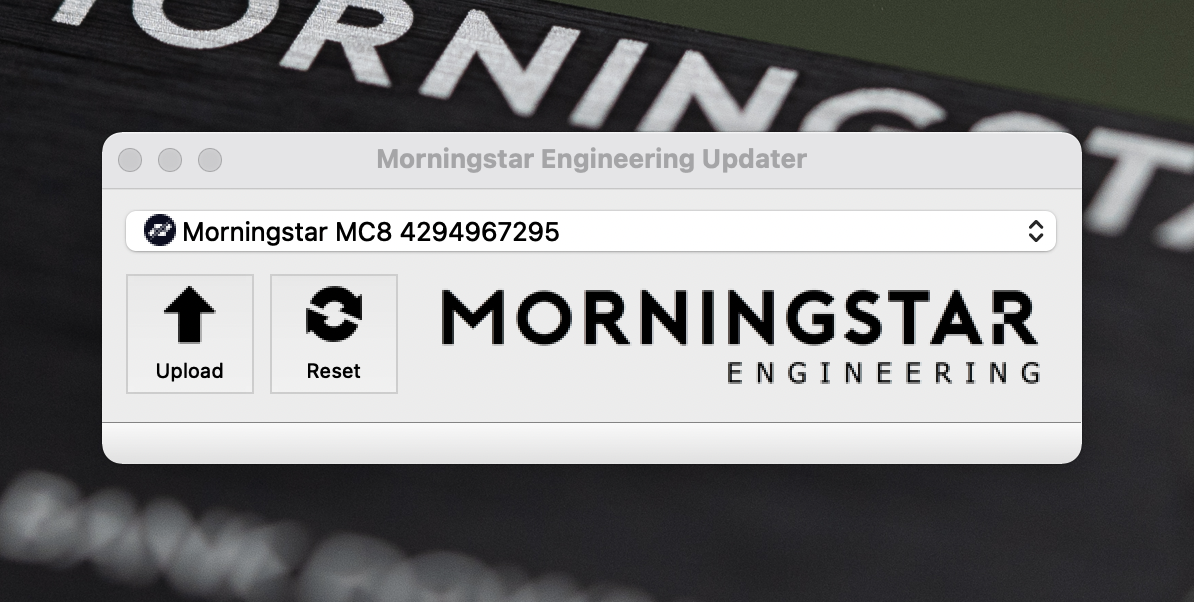
Install the Firmware Updater on your computer. If you are on Mac OS, you may need to go into your security and privacy settings and click on Open Anyway to allow the application to be installed.
After you’ve installed the Firmware Updater, you’ll need to download the latest firmware, also found under the ‘Downloads’ section on the Morningstar Website. Download the latest MC3 firmware here
Once you’ve downloaded it, launch the Morningstar Firmware Updater and connect your MIDI controller to your computer via USB. Your controller will automatically be recognised by the Updater.
Click on the Upload button and open the new firmware .hex file from your downloads folder. The firmware update will begin automatically and your controller will restart. That’s it!
Unsuccessful Firmware Update
In the rare event where your device upload is not successful, the device might appear to be bricked with blocks showing across the LCD screen. Do not worry and follow these steps:
Download the latest firmware from our website.
Remove the back cover for your device and locate the reset button.
While the device is connected to your computer via USB, and with the Firmware Uploader open, press the reset button location on the PCB.
Once pressed, the Firmware Uploader should detect the device. Thereafter, repeat the above upload procedure.
Using an External MIDI Controller to control the MC3
The MC3 can be controlled by external MIDI controllers via its USB port.
MIDI Implementation Charts
PC Messages
PC messages will change the banks on the MC3, where a PC#0 message will engage Bank 1, and PC#1 message will engage Bank 2, and so on.
MIDI PC Implementation Chart
PC# | Bank |
|---|---|
0 | 1 |
1 | 2 |
2 | 3 |
. . . | . . . |
29 | 30 |
CC Messages
CC messages allow you to navigate through the MC3’s banks, engage presets and clear toggle states.
MIDI CC Implementation Chart
Function | CC# | Value |
|---|---|---|
Bank Up | 0 | any |
Bank Down | 1 | any |
Set Toggle (All) | 2 | 127 |
Set Toggle (Individual) | 2 | 0 = Preset A . . |
Clear Toggle (All) | 3 | 127 |
Clear Toggle (Individual) | 3 | 0 = Preset A . . . |
Toggle Page | 4 | any |
Engage Preset | 10 = Preset A . . | 0 = Do Nothing |
Set MIDI BPM (MSB 2 bits) | 5 | 0-127 |
Set MIDI BPM (LSB 7 bits) | 6 | 0-127 |
Looper Mode | 7 | 0-127 |
MIDI Clock Tap | 8 | 0-127 |
Jump to last bank | 9 | 127 = Execute bank presets |
Engage Expression 1 | 51 | 0-127 |